How to Insert Images into iTopia based Excel Export Files
|
Additional Information Resizing a Column in Excel |
Please ensure that you have the following tasks complete before beginning this procedure:
- You must have the Tecsys_iTopia.xla file from your Tecsys SMB Professional Service consultant or from Tecsys SMB Support. This file may be emailed to you.
- Save the file to a location on your local harddrive, for example: c:\iTopia\Add-ins
- You must have a view that contains images. Tip: The column to the right of the images should consistently contain data (i.e. a mandatory field). Once this procedure is complete, if the column to the right of the image does not contain data, the link for the image may display in that column. This can be manually corrected by clearing the thumbnail image column. You will remove the title of the column in the spreadsheet, but the images will remain (and the links will be removed). You can manually rename the column if required.
- All images should be the same size. In the procedure that follows, all of the images are 40 x 40 pixels. You can use any width/height, as long as all images are the same size. For more information on the location of images in iTopia, see the Image Location topic.
Follow these steps to display images in PointForce iTopia based Excel Export files:
- Add the Tecsys_iTopia.xla add-in to Excel: (If you do not already have this file, please contact your Tecsys SMB Professional Service consultant or Tecsys SMB Support.)
Open Excel and click on File and then select Options.
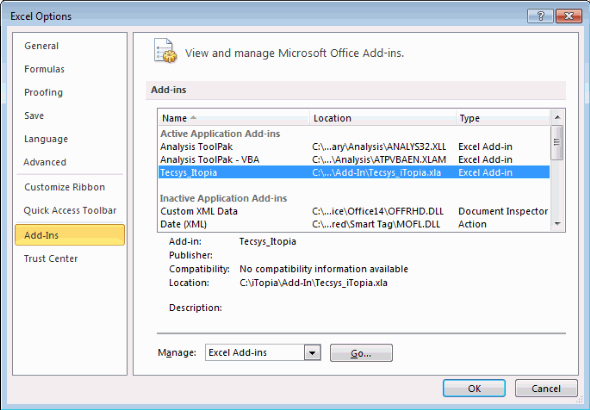
The Excel Options window opens. From the menu on the left side of the window, select the Add-Ins option.
This opens the Add-ins page. Click the Go… button found beside the Manage drop list at the bottom of the page. The Add-Ins window opens; click Browse... and navigate to the location of the Tecsys_iTopia.xla file. If you saved this file to c:\iTopia\Add-ins, navigate to this location, select the Tecsys_iTopia add-in, and click OK. The Tecsys_iTopia file should now be included in the Add-Ins available list.
Here is an example of the Add-ins page with the Tecsys_iTopia file:

-
Click OK to save and close this window.
- Customize the Excel quick access toolbar:
In Excel, click on the Customize Quick Access Toolbar icon
 icon found in the following location on the toolbar:

And then select the More Commands option.
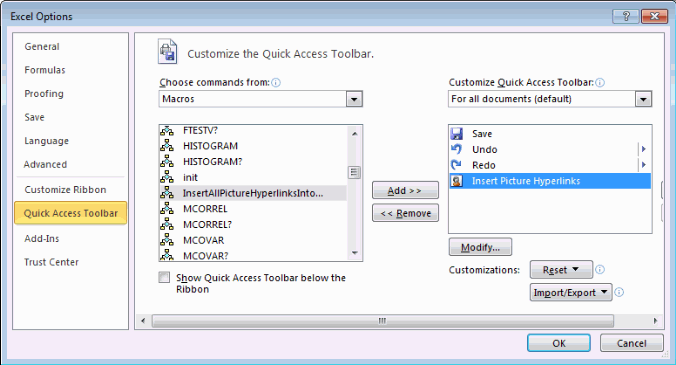
The Excel Options window opens. From the menu on the left side of the window, select the Quick Access Toolbar option. This opens the Customize the Quick Access Toolbar page.
From the Choose commands from drop list, select Macros.
From the list box on the left, select the InsertAllPictureHyperlinksIntoActiveSheet and then click Add>> .
In the list box on the right, select the InsertAllPictureHyperlinksIntoActiveSheet and then click Modify.
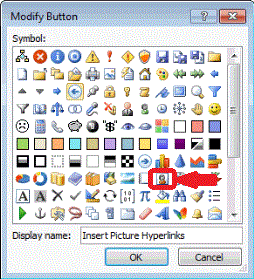
The Modify Button window opens. Change the icon to
 and change the Display name field to "Insert Picture Hyperlinks" (without the quotation marks). Click OK to save your changes and close the window.
Here is an example of the Modify Button window:

Here is an example of the completed Customize the Quick Access Toolbar window:

-
Once this step is completed, the icon labeled 'Insert Picture Hyperlinks' is added to the Quick Access toolbar and can be used to change image hyperlinks imported from iTopia into the actual images. Here is an example of the new icon on the toolbar:
- The final step is to export and embed images from PointForce iTopia into a worksheet:
Note: The images must all be the same size.
In PointForce iTopia, open the view you wish to export to excel and perform a search for all of the records you want to export to Excel with images. Once the appropriate records are returned to the search results section of the view, export the items to Excel by clicking on the Export to Excel icon
 .
.
Here is an example of the search results from the Product Master (IM13) view:

As you can see, initially the pictures do not automatically display in the spread sheet. (Reminder: the images must all be the same size. In this example, all three images are 40 x 40 pixels.)
You must size the column with the images to the correct width and height in order for the images to display properly. If you require more details on resizing the Thumbnail Image column in the Excel spreadsheet, please see the Resizing a Column in an Excel Spreadsheet topic.
With the width and height set to the appropriate dimensions, click the Insert Picture Hyperlinks icon
 to run the macro to insert pictures wherever hyperlinks exist in the current worksheet.
The thumbnail images now display the actual image rather than a link to the image. Following our example, here is the spreadsheet after the macro has been run:

![]()

