G/L History Entry (GL95)
The Enter History (GL95) program is used during the installation of Enterprise to enter period end balances for closed periods for each Account, unless the information is transmitted electronically from your existing system to Enterprise. When first starting the GL system, account history can be entered, if required, for all months prior to the first actual month of system implementation.GL95 is intended to be used to load period end balances for periods 1-11 of the prior closed year. The activity from Period 12 is then captured as a journal entry, the normal month end programs are run to close period 12 and then year end is performed. If these steps are followed, then the year end closing entries (to close P&L accounts to Retained Earnings) will be properly staged into period 01 in the GL Collector File; these entries are needed to properly present the correct YTD balance of Profit and Loss accounts on the Yearly History Report (GL92).
Note: If you are loading balances for a period, you must enter the closing balance for the period being converted, not the net transaction activity. If this program is being used to adjust balances previously loaded, the Debit/Credit amount will be NETTED into that period's existing balance.
You can use GL95 in the following situations only:
- The first live period is Period 1 and you are loading history for last year:
- In Maintain Fiscal Dates (CC90), set the Current Year fiscal dates to the Period End dates for the year just closing. Set the Next Year dates to the Period End dates for the year just starting.
- In Company Control Initialization (CC00/GL), set the Current Period Ending Date to the period end date of period 12 for the year just closing.
- Use GL95 and Print & Post Last Year Balances (GL96) to post Period End balances for closed periods, for example periods 1 to 11.
- Use Enter Journal Vouchers (GL30) and Print/Post Journal Vouchers (GL31) to post period 12 net transactions into period 12 (flagged as current period open).
- Use Preliminary/Final GL Report (GL81) to close period 12.
- Use Fiscal Year End (GL90) to close the year. Period End dates in the fiscal calendar are rolled forward. 'This Year' account balances move to 'Last Year'. Period 12 closing balances = Period 1 opening balances. Closing entries are posted into Period 1 for Income & Expense Accounts.
Note: GL92 calculates an account balance as LY (Last Year) Period 12 + GLYH (General Ledger Yearly History) transactions for current year (which contains Y/E closing entries).
- In Maintain Fiscal Dates (CC90), set the Current Year fiscal dates to the Period End dates for the year just closing. Set the Next Year dates to the Period End dates for the year just starting.
- The first live period is not Period 1 and you are loading history for closed periods for last year and current year:
- In CC90, set the Current Year fiscal dates to the period end dates for the year previously closed and Next Year dates to the period end dates for the current year.
- In CC00/GL, set the Current Period Ending Date field to the period end date of period 12 for the previously closed year.
- Use GL95 and GL96 to post period end balances for Last Year closed periods (periods 1-11).
- Use GL30 and GL31 to post period 12 net transactions
into period 12 (which has been flagged as current period).
- Close period 12.
- Use GL 90 to close the year. Period end dates in the fiscal calendar are rolled forward. 'This Year' account balances move to 'Last Year'. Period 12 closing balances = Period 1 opening balances. Closing entries are posted into Period 01 for Income & Expense accounts.
- for each closed period of the current fiscal year, use GL30 and GL31 to post net transactions for the period and then use GL81 to close each period.
Note: GL92 calculates an Account balance as LY Period 12 + GLYH transactions for current year (which contains Y/E closing entries and net transaction activity for each closed period).
- In CC90, set the Current Year fiscal dates to the period end dates for the year previously closed and Next Year dates to the period end dates for the current year.
The following list defines every field on GL95:
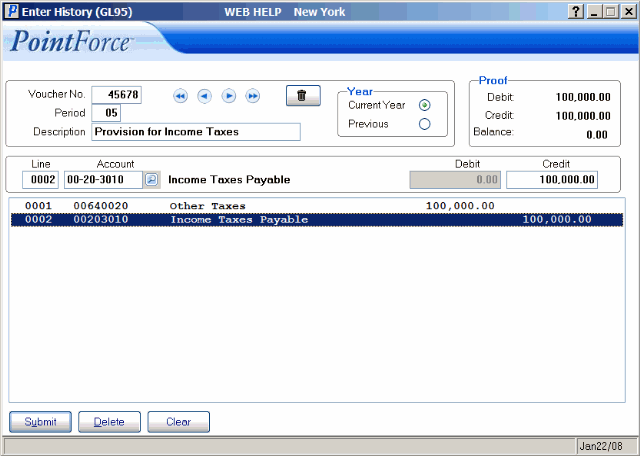
- Voucher No. - enter the Voucher Number assigned to this entry. This number is assigned to all entries on this Voucher. The Voucher No. appears on the GL96 report as a cross reference back to the source documents. If this Voucher number has been entered but not yet posted by GL96, the header information is displayed and you can review, delete, add on or modify the Voucher.
- Period - enter the period for which history is being loaded.
- Description - enter a description of the Voucher entry, for example Period Ending balances for period 1. The Description can be a maximum of 30 alpha-numeric characters in length. The Description prints on the Print & Post Last Year Balances report produced by GL96.
- In the Year section, select the period for which history is being input, either Current or Previous. The Current Year is within the CC90 fiscal date program, since this program uses that date information in conjunction with this maintenance program.
- Previous - select Previous if you are entering history for the year prior to the Current Year as defined in CC90.
- Current - select Current if you are entering history for the Current Year as defined in CC90.
Note: GL95 is used for data conversion purposes during Enterprise implementation. There are numerous combinations and options for maintaining this GL history prior to operating the system live. You should confirm the process with your PointForce Enterprise Business Consultant.
- Previous - select Previous if you are entering history for the year prior to the Current Year as defined in CC90.
- The Proof section keeps a running total of all entries made in the Debit and Credit fields. The Proof is designed to assist with the entry of each period's history posting. GL95 is similar to entering a Journal Entry in Enter Journal Vouchers (GL30), except that the source or input document is a Trial Balance from your existing system. To ensure that debits and credits balance, the Proof section displays the Debit and Credit balances as the detail lines are entered. The debits and credits must balance by the time the very last entry is input into the system.
- Debit - the total of the Debits entered in the Detail section display here. This field cannot be edited.
- Credit - the total of the Credits entered in the Detail section displays here. This field cannot be edited.
- Balance - the difference between the Debit and Credit totals displays here. The Voucher must balance (i.e. the Proof must be zero) before you can create a new Voucher or exit from this program. This field cannot be edited.
- Debit - the total of the Debits entered in the Detail section display here. This field cannot be edited.
- Line - Line numbers are automatically generated in multiples of ones (e.g. 1, 2, 3, 4). You can assign your own line number or you can allow the program to generate the number for you. The Line number field is also used to recall an existing line: enter the line number directly into this field and the line is recalled for review, correction or deletion.
- Account - enter or select from the query the GL Account to be debited or credited. Accounts are created in Maintain Chart of Accounts (GL01).
Note: If you enter a GL Account that does not exist, the program automatically opens the GL Accounts query beginning with the closest Account to the one entered. If the Account entered needs to be set up in the Chart of Accounts, click on the Open File icon
 to open Maintain Chart of Accounts (GL01) to set up the GL Account. After the Account is set up, you are returned to GL95 to continue with loading history.
- Debit/Credit - enter a debit or credit posting in the appropriate field. Minus signs are not required. The information entered in these fields automatically populates the Proof section (above). The only way to change the display in the Proof section is to edit the Debit/Credit values entered.
The following table outlines the functionality of each button in GL95:
| Button Label | Icon | Functionality |
| Submit |  |
Updates the current Voucher information entered on the detail line. |
| Delete |  |
Deletes the information entered on the recalled detail line. |
| Clear |  |
Clears the fields on the screen allowing you to create another Journal Voucher. |
| Delete Record |  |
Deletes all information related to the current Voucher. Before the information is deleted, the following message displays: "Delete Header and all its details? Yes/No". Select Yes to confirm the delete request; select No to cancel the delete request. |
Enter History (GL95)
