A/R & Invoice Diag. List Print (AR73)
|
Additional Information Diagnostics Programs |
The Print AR-IN Diagnostic List (AR73) program is a tool that can be used to diagnose problems in the AR sub-ledger. If your AR sub-ledger does not balance to the AR control account in the General Ledger, the problem might reside in the sub-ledger itself. AR73 will produce a list of Cash Receipt postings or Invoices/Credit Notes for a specific date, including a total of the transactions, that should match to your AR31 or IN44 report(s) for the same business day.
The diagnostic is trying to identify whether or not a sub-ledger transaction has gone missing. For example, if there is a payment record on the Print Cash Receipts/Adjustments (AR31) report that is not on the AR73 list, then that would indicate that the payment has gone missing in the sub-ledger. Or if there is an Invoice/Credit Note record on the IN44 report that is not on the AR73 list, then that would indicate that the Invoice/Credit has gone missing in the sub-ledger. The opposite can also be diagnosed, i.e. where there is a transaction on the AR73 list that is not on the corresponding register.
- The Printer Selection screen automatically opens. Select the Printer destination and click OK.
- The Report Parameters screen for AR73 opens.
- The Format field defaults to 'AR/IN Diagnostic List'.
- Select a Sequence from the drop down list. Valid options include:
- Cash Receipts Entries
- Invoice Register Entries
- If a New Page for each Break is required, select the check box.
- The Levels list box displays the various levels of detail available for the report. The levels predefined for AR73 are:
- Detail
- Report Total
- There are no Restriction available for AR73.
- Select the Range From and To for the report. The Range must match the Sequence selected.
- In the From field, enter the starting 'code' for the report.
- In the To field, enter the ending 'code' for the report.
- The information displays in the list box below.
- To add additional Ranges, repeat these steps.
Note: To print the entire file (all Invoice Registers), simply tab through the From and To fields. The list box displays *Start and *End in the From and To fields.
- To delete a Range from the list box, double click on the line. The following message displays, "Do you wish to delete this range? Yes/No". Click Yes to delete the range.
- In the From field, enter the starting 'code' for the report.
- When all of the information on the Report Parameters screen is complete, click OK to run the report.
- Once OK is clicked, the 'Aging Date' window opens. Select the Aging Date for the report and click OK to continue.
- The Format field defaults to 'AR/IN Diagnostic List'.
- The Report Complete screen opens when the report is generated. Click OK to accept the report, click Restart to restart the printing of the report, or Abort to cancel the report. Note: Acceptance codes are not required to accept this report.
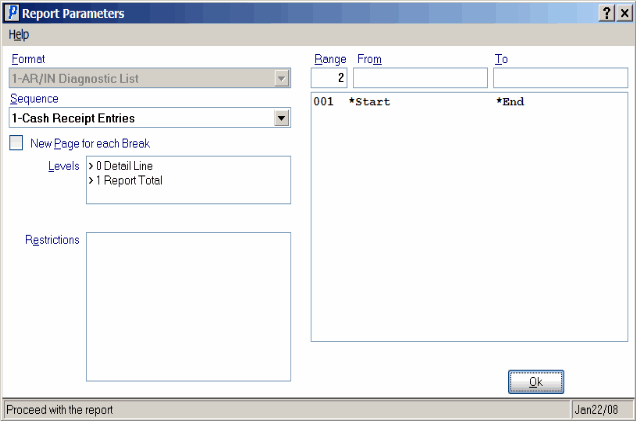
Print AR-IN Diagnostic List Report Parameters screen (AR73)
