Home Page
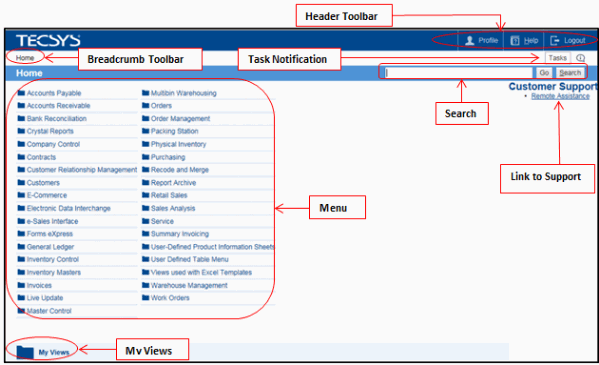
The Home Page is different depending on the user logged into iTopia. Using the home page set up for 'user10' as our example, the home page organizes information into the following sections:

Home Page
- Breadcrumbs Toolbar - is a navigation path which appears near the top of every page within PointForce iTopia. Here is an example of a more detailed breadcrumbs list:

Navigating the menu system can potentially take you very far away from the Home page. Breadcrumbs tell you which sub menus you have accessed to arrive to your current location and allow you to click any of the breadcrumb menu entries to take you back to any link in that chain.
- Header Toolbar - consists of a the following options:
- Profile - access to the Profile view (which includes the Change Password option).
- Help - when you are in a view, click Topic Help from the Help menu, and the appropriate help page opens.
- Logout - log out of PointForce iTopia.
- Task Notification - you can access the Tasks dashboard by clicking on the Tasks link. When the Tasks status is red, there are outstanding or failed tasks in the Tasks dashboard. When the Tasks status is green, there are tasks that are currently running or have been completed.
- Search - you can search for Views in a number of ways:
- Search by a PointForce Enterprise Term, for example 'Sales'. All Views created with the term 'Sales' in the title will display. You can refine the search by using a more specific term, like 'Sales Rep'; all Views with 'Sales Rep' in the title will display.
- Search by a PointForce Enterprise Program name, for example 'CC96' (Sales Office/Warehouse Numbers). In this case, the Sales Office/Warehouse Numbers view automatically displays.
- Search by a PointForce Enterprise File name, for example 'SAB' (Sales Office/Warehouse Numbers). In this case, the Sales Office/Warehouse Numbers automatically displays.
Once you enter the Search term, you can click on Go or Search. If you click on Go, the View automatically launches, provided there is only one view matching the Search term entered. If you click on Search, the view name(s) display and you must select the view name in order to launch the view. For example:
- If you enter SU14 and click Go, the SU14 view automatically opens.
- If you enter SU14 and click Search, the view name displays and you must select the name in order to launch SU14.
- Search by a PointForce Enterprise Term, for example 'Sales'. All Views created with the term 'Sales' in the title will display. You can refine the search by using a more specific term, like 'Sales Rep'; all Views with 'Sales Rep' in the title will display.
- Menu - Depending on the roles assigned to your user name, the Home page menu items will vary depending on the roles and permissions associated with your user ID. In most cases, the menu will look as it does in the example above, which includes all of the PointForce Enterprise modules.
- Remote Access Link - the Remote Access link allows you to request live remote assistance from a TECSYS SMB Support Representative.
- My Views
- provides a link to all views personalized by the current User Name and to any system views the user has added to this folder using the "drag and drop" feature (see below for more details).
- This is a quick and easy way to navigate to personalized views that were saved using the 'Save As' button in the Personalization pages and assigned the same title as the system view or a unique title.
- If you make changes to a system view and save the view as the same name (by clicking 'Save' or 'Submit' when the changes are complete) the view is not automatically saved into My Views.
- You can add system views to your My Views folder using the "drag and drop" feature. Simply click on a view and then drag the view to the My Views folder (bottom left corner of the window). With the view name hovering over the My Views folder, release the mouse button to drop the view into the My Views folder. The system view name will still be visible on the original menu, but a copy now resides in the My Views folder.
- Having frequently used system views in your My Views folder allows you to access these views very quickly and easily.
- This is a quick and easy way to navigate to personalized views that were saved using the 'Save As' button in the Personalization pages and assigned the same title as the system view or a unique title.

