Details Page
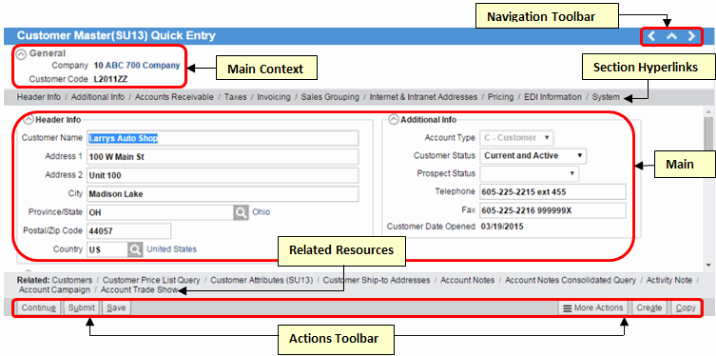
The Details page consists of the following sections:
- Main Context
- Navigation Toolbar
- Section Hyperlinks (depending on the view, this section may not be available)
- Main (Record of Details)
- Related Resources
- Action Button(s)
You access the Details page for a sepecific record by clicking on View Record Details  from the Search Criteria/Results Page.
Here is an example of a customer master detail page:

The following list defines each section on the Details page:
- Main Context - this section provides reference information for the detail record you are viewing. If you wish to add or modify the fields displayed in this section for a view, you must use the Personalization pages for the view (specifically, you will be working with on the Main Context section of the Details folder in Personalization). You can access the Personalization pages by clicking on the Personalize button found on the Search Criteria/Results page of the view. You must have proper permissions in order to personalize a view.
- For more information on personalizing the Details folder, click here.
- Some fields have the description displayed to the right of the file as a hyperlink. Here is an example of a the Main Context section of the Inventory Purchasing Master view:

The hyperlinks in the Main Context section of a view include a number of functions:
- If you hover over the link, the first 12 records in the related view display. When you move the mouse away from the link, the information from the related view no longer displays.
- If you press the SHIFT key before hovering over a link, the first 12 records of the related view display and to remain on the screen until you hover over another link or close the display (by clicking on the 'X' in the upper right corner of the related view).
- If you click on the hyperlink, the record opens in the related view. Following the example above, the Supplier Code and the Product Code descriptions are links that, when clicked, open the Supplier Master or Product Master views respectively.
- If you hover over the link, the first 12 records in the related view display. When you move the mouse away from the link, the information from the related view no longer displays.
- For more information on personalizing the Details folder, click here.
- Navigation Toolbar - enables you to navigate within and across a series of records. The Navigation Toolbar consists of a the following options:
- Go to Previous
 - performs one of the following:
- Displays the previous record in the search result set, when on a Details page;
- Is disabled/hidden if the first record is being accessed;
- Is not displayed if there is only one record in the search result set.
- Return to Search Page
 - returns you to the Search Criteria/Results page for the current view.
- Go to Next
 - performs one of the following:
- Displays the next record in the search result set, when on a Details page;
- Is disabled/hidden if the last record is being accessed;
- Is not displayed if there is only one record in the search result set.
- Go to Previous
- Section Hyperlinks - a list of hyperlinks that take you to directly to each section in the view. Hyperlinks are created in the Personalization section of the view, on the Personalization/Details folder; hyperlinks are defined in the 'Details Section Description' field. For more information on personalizing the Details folder, click here.
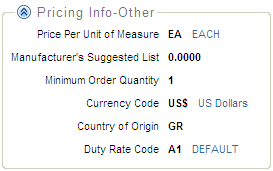
- Main - displays the detailed data associated with the record selected from the Search Page. Here is an example of the Main section from a view:

- Some fields have the description displayed to the right of the file as a hyperlink. These hyperlinks include a number of functions:
- If you hover over the link, the first 12 records in the related view display. When you move the mouse away from the link, the information from the related view no longer displays.
- If you press the SHIFT key before hovering over a link, the first 12 records of the related view display and to remain on the screen until you hover over another link or close the display (by clicking on the 'X' in the upper right corner of the related view).
- If you click on the hyperlink, the record opens in its respective view. In the example above, the 'Price Per Unit of Measure', 'Currency Code' and 'Duty Rate Code' descriptions are links that, when clicked, open the Inventory Master, Currency Table or the Purchasing Table views respectively.
Note: Access to the link is dependent on the set up of your user id.
- If you hover over the link, the first 12 records in the related view display. When you move the mouse away from the link, the information from the related view no longer displays.
- All grouped field sections can be collapsed using the
 icon. Collapsing sections will reduce the amount of information that can be seen on the Details page. The fields will remain collapsed while the view is open. You can reopen the section by clicking on the
  icon.
icon.
- All mandatory fields are highlighted for new records. When you hover over a highlighted field, the following message displays if a valid entry has not been entered: "An entry is required." If you enter invalid information into a mandatory field and then hover over that field, the following message displays: "The entry does not exist." Here is an example of mandatory fields from the Customer Master view:

- In fields where a large number of characters can be entered, character count indicators identify the number of characters entered and the maximum number of characters allowed in the field. Here is an example from the Web Address field in the Customer Master view:

- In this example, only 14 out of the maximum of 64 characters have been entered in the field. The number 14 is displayed in green .
- As you approach the maximum number of characters in the field, the text displays in orange:

- When you exceed the maximum number of characters, the text displays in red:

- Some fields have the description displayed to the right of the file as a hyperlink. These hyperlinks include a number of functions:
- Related Resources - a Related Resource is a resource or group of resources that are related to the current view. These resources are located at the bottom of the page.
- Each related resource is a hyperlink, and these hyperlinks include a number of functions:
- If you hover over the link, the first 12 records in the related view display. When you move the mouse away from the link, the information from the related view no longer displays.
- If you press the SHIFT key before hovering over a link, the first 12 records of the related view display and to remain on the screen until you hover over another link or close the display (by clicking on the 'X' in the upper right corner of the related view).
- If you click on the hyperlink, the record opens in the related view, i.e. the parent view displays information about the key field(s).
Note: Access to the link is dependent on the set up of your user id.
- If you hover over the link, the first 12 records in the related view display. When you move the mouse away from the link, the information from the related view no longer displays.
- Each related resource is a hyperlink, and these hyperlinks include a number of functions:
- Action Buttons - depending on the view and the permissions assigned to the user for the view, the following Action buttons are available:
- Continue - saves the changes made on the Details page and opens the next logical view in the work flow.
- Submit - saves the changes made on the Details page and returns you to the Search Criteria/Results page.
- Save - saves the changes made on the Details page and you remain on the Details page.
- More Actions - click this icon to open the Link To, Show References, or Export to Outlooks Contacts/Appointments/Tasks (depending on the view).
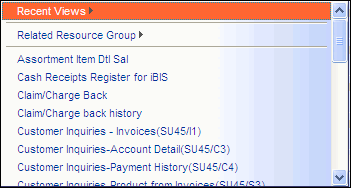
- The Link To list is unique for each view and offers an easy method to navigate to related views using key data elements from the current record. Here is an example of the menu that displays when you click 'Link To':

Example of the Link To menu- Recent Views - this option may not appear if you have not linked to other views from the current view. When you click on this option, a list of the views recently accessed by your user id displays. Click on any view and it opens in your current browser window. Use the browser's Back button to return to the original view.
- Related Resource Group - when you click on this option, a list of views directly related to the current view display. For example, if you are in the 'Invoice Register' view, the Related Resource Group include the Invoice Register GL Detail, Invoice Register GL Summary, EFT Invoice Register and IN44 EFT Log. (These represent elements of the IN44 Register that were previously separated by page breaks in the hard copy report.) Note: Not all views will have a Related Resource Group set up.
- Recent Views - this option may not appear if you have not linked to other views from the current view. When you click on this option, a list of the views recently accessed by your user id displays. Click on any view and it opens in your current browser window. Use the browser's Back button to return to the original view.
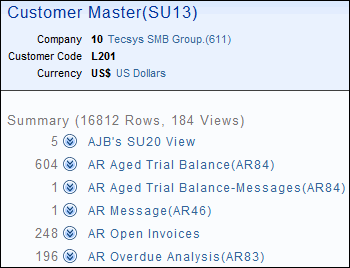
- The Show References button opens a new page that displays a list of all views related to the current view. Here is an example of the Show References view:

Example of the Show References view- At the top of the view, a summary of the number of rows and number of views is given. In our example, there are 16,812 Rows and 184 Views on the Customer Master Show References page.
- Below the summary line is a listing of all of the views that reference the current record which, in this case, is Customer L201 in Company 10. The number of individual records in each view is also displayed. Note: Each view listed here is an active hyperlink.
- If you hover over a view name, the first 12 records associated Customer L201/Company 10 display. When you move the mouse away from the link, the information no longer displays.
- If you press the SHIFT key before hovering over a link, the first 12 records of the related view display and to remain on the screen until you hover over another link or close the display (by clicking on the 'X' in the upper right corner of the related view).
- If you click on the hyperlink, the record opens in the related view, i.e. the parent view displays information about the key field(s).
- If you click on the Expand
 icon, the first 12 records of the related view display. To close the related view, click on the Collapse
  icon.
icon.
- If there are no views related to the current view, the following message displays: "No records match your selection."
Note: Access to the link is dependent on the set up of your user id.
- At the top of the view, a summary of the number of rows and number of views is given. In our example, there are 16,812 Rows and 184 Views on the Customer Master Show References page.
- Export to Outlook Contacts - this option is only available if the current view includes the 'Export to Outlook Contacts' functionality.
- When you select this option, the 'Export to Outlook Contacts-Webpage Dialog' window opens with the following message: "Export to Outlook Contacts. Updating entries....".
- Once the export is complete, the following message displays: "Number of entries Updated: x".
- Click Close to complete the export.
- When you select this option, the 'Export to Outlook Contacts-Webpage Dialog' window opens with the following message: "Export to Outlook Contacts. Updating entries....".
- Export to Outlook Appointments - this option is only available if the current view includes the 'Export to Outlook Appointments' functionality.
- When you select this option, the 'Export to Outlook Appointments-Webpage Dialog' window opens with the following message: "Export to Outlook Appointments. Updating entries....".
- Once the export is complete, the following message displays: "Number of entries Updated: x".
- Click Close to complete the export.
- When you select this option, the 'Export to Outlook Appointments-Webpage Dialog' window opens with the following message: "Export to Outlook Appointments. Updating entries....".
- Export to Outlook Tasks
- this option is only available if the current view includes the 'Export to Outlook Tasks' functionality.
- When you select this option, the 'Export to Outlook Tasks-Webpage Dialog' window opens with the following message: "Export to Outlook Tasks. Updating entries....".
- Once the export is complete, the following message displays: "Number of entries Updated: x".
- Click Close to complete the export.
- When you select this option, the 'Export to Outlook Tasks-Webpage Dialog' window opens with the following message: "Export to Outlook Tasks. Updating entries....".
- The Link To list is unique for each view and offers an easy method to navigate to related views using key data elements from the current record. Here is an example of the menu that displays when you click 'Link To':
- Delete - deletes the current record. The following message displays: "Are you sure you want to delete this record? OK/Cancel". Only records that are not in use anywhere else in the system can be deleted.
- Create - initiates the start of a new record with blank entry fields.
- Copy - initiates the creation of a new record that contains the same information as the current record, i.e. many of the fields for the new record are pre-populated with data from the current record. This button only displays if the record already exists or if the record has been saved using the Save button.
- Continue - saves the changes made on the Details page and opens the next logical view in the work flow.

