How to Add Resources to a Role
In this topic we are going to a resource to a role. This topic assumes that you have created a new role and wish to add a resource(s) to that role. We will be using the Customer Entry Only (pfitopia_customer) role created in the How to Create a Role topic.Adding resources to a role can be done from either the:
- Roles (md_role) view
OR - Role Permissions (md_permission) view
We will walk through the steps using each view. Note: You must be logged in as the system administrator to access either view.
- Adding Resources using the Roles View:
- To open the Roles (md_role) view, enter role in the search field on the home menu page and then click Go.
- Search for the role you wish to add resources to. In our example, we want to work with the pfitopia_customer role.
- From the results page section of Roles view, click the 'Use Record as Criteria for Action' icon
 to the left of the role name, and from the drop list, select Permissions.
- A new Roles page displays. If this is a new Role, then no roles display in the grid area.
- The Add a Resource field is validated against the Resources table. You can:
- Manually enter the resource you want to add to this role.
OR - Click on the lookup icon to search and select a resource from the Resources view that displays when the lookup is invoked.
In this case, we want the role to contain the resources that apply to Customer Entry, including the Customers view (ibis_sucu.su13_customer_master) so we will enter this manually into the add a resource field and then select the Include Related Resources check box.
- Manually enter the resource you want to add to this role.
- Click Add.
- The resource entered plus all of the related resources display in the grid.
- Click Submit.
- Close the Roles view.
- To open the Roles (md_role) view, enter role in the search field on the home menu page and then click Go.
- Adding Resources using the Role Permissions View:
- To open the Role Permissions (md_permission) view, enter permission in the search field on the home menu page and then click Go.
- You can add resources to a role one at a time, using Create or you can recall an existing role and use the Edit with Excel feature to copy all of the resources to the new role. Both methods are discussed in this topic.
- To add one resource to a role using the Create action, follow these steps:
- Click Create.
- The Role Permissions > Create page opens. For details on each field in the Role Permissions view, please see the Role Permissions topic.
- There are 3 fields:
- Role Name - enter or select from the lookup the role you are working with. In this case, we will enter pfitopia_customer.
- Resource Name - enter or select from the lookup the resource that is to be assigned to the role. In this case, we will enter ibis_sucu.su13_customer_master.
- Operation Name - enter or select from the lookup the operation that is to be assigned to the resource. In this case, we will add the read and execute operations to enable the user assigned the role the ability to open and view the resource.
- Role Name - enter or select from the lookup the role you are working with. In this case, we will enter pfitopia_customer.
- Click Submit to update the record.
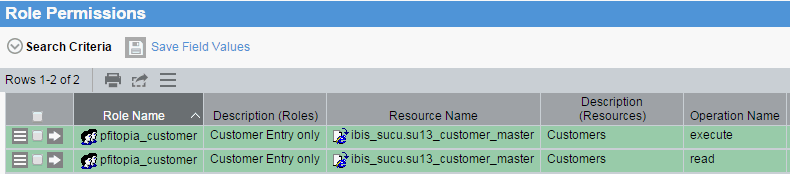
- When both the read and execute permissions are added, the Role Permissions view looks like this:
- Close the Role Permissions view.
- Click Create.
- To add multiple resources to the role using Edit with Excel
, follow these steps:
- Enter the role you wish to copy the resources from in the role name field in the Search Criteria section of the Role Permissions view. In this case, we will enter ibis_sucup.
- Click Search and the resources contained in the role display in the search results section of the view.
- Select the roles individually that you wish to copy or select all of the records.
- Select the Edit All Record With Excel option from the to export the records to an Excel spread sheet.
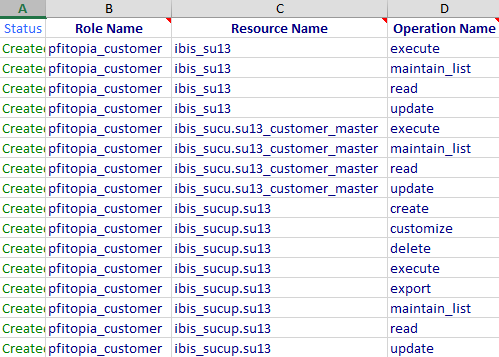
- On the spread sheet, change the role name to reflect the new role. In this example, we will change the role name column to our new Role name, pfitopia_customer.
- Open the TECSYS iTopia folder on the menu bar and click Save. Here is an example of the spread sheet:
- Close Excel without saving the changes.
- To see the update, enter the new role in the role name field in the Search Criteria section and click Search.
- Close the Role Permissions view.
- Enter the role you wish to copy the resources from in the role name field in the Search Criteria section of the Role Permissions view. In this case, we will enter ibis_sucup.
- To open the Role Permissions (md_permission) view, enter permission in the search field on the home menu page and then click Go.

