How to Add Permissions to a View
In this topic we are going to add permissions to a new system view. This topic assumes that you have created a new view and wish to add permissions to that view. We will be using the Outstanding Orders by Customer (ibis_v_oeoop.oe45_order_product.1) view, which is based on the Order Product Query (ibis_v_oeoop.oe45_order_product) view.When assigning permissions to a system view, you must be logged in as the system administrator.
- Open the new system view. In this example, we will open the Outstanding Orders by Customer (ibis_v_oeoop.oe45_order_product.1) view.
- Click Personalize.
- On the Personalization page, click Permissions.
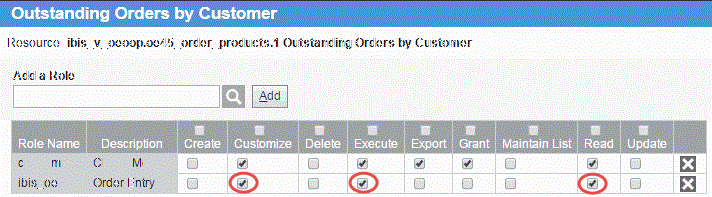
- The Permissions page for the new system view opens. The title, resource and roles that currently have access to the view display. At this point, the only role that has access to the view is the system user that created the view.
- In the Add a Role field, enter or select from the lookup a role and then click Add. For example, we will add the Order Entry role by entering ibis_oe.
- For the role entered, select the check boxes for the appropriate permissions. For example, we will give the 'Customize', 'Execute' and 'Read' operations to the ibis_oe role.
Here is an example of the Permissions page for a new system view:
- Now that the permissions are assigned to the role for the new view, click Submit to save the changes. Note: Even though you have not yet added the view to the iBIS menu system, this view can still be accessed by the users assigned to the role(s) you just added. These users can access the view by entering the title or the resource name in the search field when an iTopia session is opened.
- Click Submit on the Personalization page. You are then returned to the Search Criteria/Results page of the new view.
- Close the view as required.

