Compatibility Requirements for WIN 7.0/8.1 with Chrome versions 36 (and higher)
|
Index Verify System Compatibility Configuration Configure MS Excel Troubleshooting |
|
Additional Information Export to Outlook Contacts: Mapped Fields |
This topic provides the details to ensure that your Windows 7/8.1 with Chrome 36 (and higher) desktop configuration is compatible with PointForce iTopia (PFE version 7.1 on iTopia 9.4).
PointForce iTopia supports Chrome 36 (and higher) on Windows 7 and 8.1. Please be advised of the following notes:
- Microsoft extensions are not supported with Chrome, therefore the following features are not available: Outlook integration and anything using Microsoft ActiveX technologies.
- Modal windows, such as look ups, do not block the containing page. You must close the modal window before attempting to interact with the containing page.
Chrome has limited support for the Office Integration. Specifically:
- Export to Excel and Edit with Excel are supported; and,
- Export to Outlook Contacts is not supported.
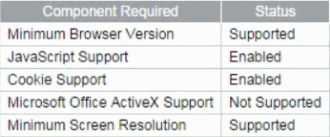
The System Compatibility Check List enables you to determine whether or not your system's components are set up for compatibility with iTopia. The check list link can be found on the link on the PointForce login page. The required components on the checklist include:

Disabling Popups:
- Open PointForce iTopia in the browser. You do not need to login to PointForce, just have PointForce open when you open Google Chrome.
- Launch the Google Chrome application.
- Click
 in the top right corner of the browser window.
- Click the Settings option. The Settings folder opens.
- Click the Show Advanced settings... hyperlink, found at the bottom of the browser window.
- Click the Content Settings button under the Privacy category.
- Click the Manage exceptions... button.
- Enter [*].tecsys.com in the Hostname pattern input text box and click Done.
- Click Done to close the Content settings window.
- Close the Settings folder to return to the original browser window.
Configuring Interactivity with Microsoft Excel
The following configuration is optional, enabling you to access a Save button directly from within a Microsoft Excel spreadsheet (utilized in the 'Edit with Excel' feature).
Prerequisites
To use the Edit with Excel feature, you must have the following set up:
- Microsoft Excel must be installed on your system (laptop/desktop).
- A Web services license must be assigned to your user id by the PointForce iTopia system administrator.
- The TECSYS Excel Add-In must be installed.
One-Time Setup Procedure
If you PC was equipped with an older version of the TECSYS Excel Add-In (file extension .xla), it must be removed before installing the new version. The following steps outline how to remove the older add-in:
- Launch Windows Explorer.
- Go to the Add-In folder and delete the XLA file (i.e. C:\Users\{username}\Documents\Tecsys\iTopia\Add-In\tecsys_iTopia.xla).
- Launch Microsoft Excel.
- A prompt will advise you that the add-in no longer exists. Click OK.
- Click File.
- Click Options.
- Click Add-Ins.
- From the Manage drop-down menu, select the Excel Add-ins option, and then click Go....
- Select the Tecsys_Itopia plugin.
- A prompt will advise you that it cannot find the add-in and to delete it from the list. Click Yes.
- Click OK.
- Close Excel.
- Install the latest version of the add-in using the instructions in the following procedure.
The following steps outline how to install the TECSYS Excel Add-in:
- Launch the Export to Excel (meta_export_excel) resource from the application portal.
- Click the Download hyperlink to download the indicated Tecsys.zip file onto your local system.
- Open the ZIP file and extract its contents into your Windows Documents folder. This will create a folder called Tecsys/iTopia (i.e. C:\Users\{username}\Documents\Tecsys\iTopia), as well as three sub folders titled Add-in, Output, and Template.
- Launch Microsoft Excel.
- Click File.
- Click Options.
- Click Add-Ins....
- From the Manage drop-down menu, select the Excel Add-ins option and then click Go...
- Click the Browse... button and go to the C:\Users\{username}\Documents\Tecsys\iTopia\Add-In folder.
- Select the Tecsys_iTopia.xlam add-in file and click OK. This will add the Tecsys_Itopia option to the list of add-ins.
- Ensure that the Tecsys_iTopia check box is selected, and then click OK.
Using the Edit with Excel Feature
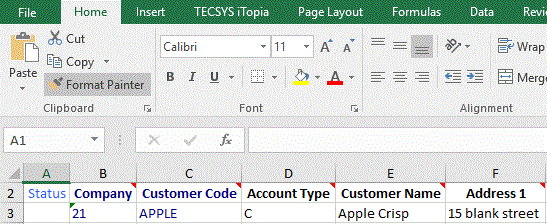
Here's an example from the Customer Master resource using Edit with Excel. In this example, we have selected 1 record to edit. Here is what the spreadsheet looks like in Excel:

- To modify a record, change the value of any modifiable column.
-
If you wish to create an additional record, add a new row with a unique business key and complete the required columns.
- When all of the data has been modified or created, click the Save action from the TECSYS iTopia tab in the Excel ribbon to write the data to the database.

- Once the Save action is performed, the status of the record(s) is displayed in the Status column. Any record that has been modified successfully will have a status of Updated. Every record that has been created will have a status of Created. Any record with an Updated or Created status has been written to the database. Every record that was unsuccessfully created or updated will have a status of Invalid. This record will also have cell notes in each column in which the error occurred. Correct the errors and save the record again.
Note: If you are working with a view that includes links to other views on the details page, you will experience issues when you export the table to excel and attempt to save your changes. This section explains the issue and provides a solution.
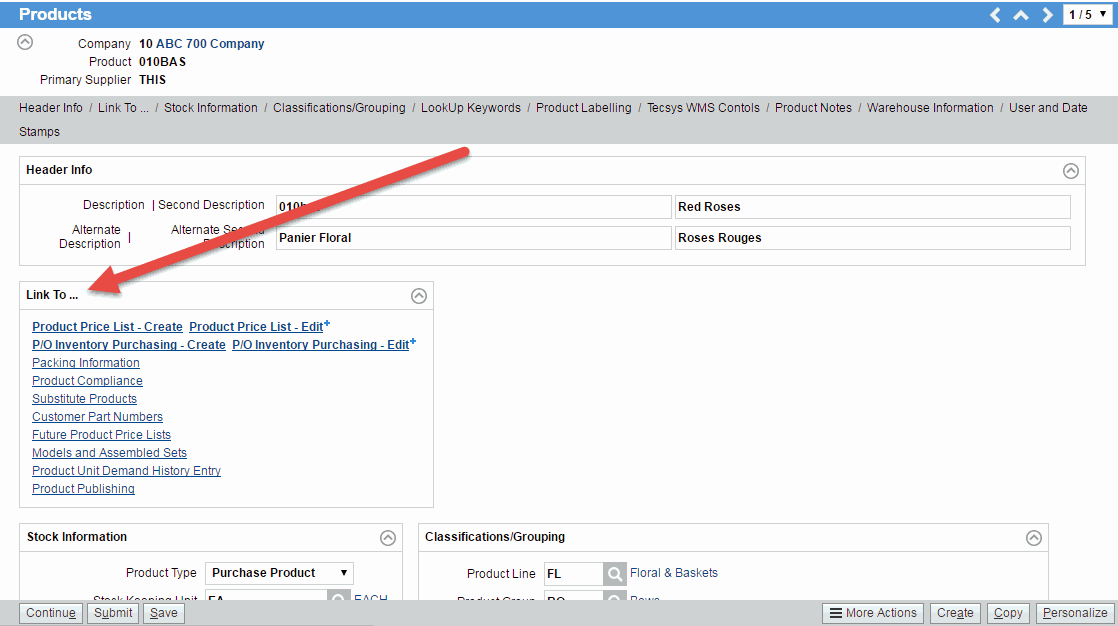
Here is an example of the Products (ibis_ici1.im13) view's detail page:

- You can export the data to excel without any issues. When you save your change(s), the following message displays: "The Web service cannot be executed. OK".
- In order to save the changes, you must personalize the view (i.e. you must start over, so all of the changes you just made in excel will be lost).
- Return to the view in iTopia and click on Personalize found in the bottom right-hand corner of the search criteria/results page or on the details page.
- On the Details folder, remove the section (and all of the contents) under 'Link To ...' in column on the right (Show These Fields in This Order).

- We recommend that you use the Save As option in Personalization in order to save a new view rather than saving the master view. In this way, you have a view that is always available for editing with Excel.
- With the Link To section removed from the view, you can successfully edit records in Excel and save the changes in iTopia.
Clearing the Browser Cache:
The following list outlines how to clear your browser's cache:
- Launch the Google Chrome application.
- Click
 in the top right corner of the browser window.
- Click the History option.
- Select the History option.
- Click the Clear browsing data... button. The Clear browsing data window opens.
- Ensure the Browsing history check box is selected.
- Ensure the Cookies and other site and plugin data check box is selected.
- Ensure the Cached images and files
check box is selected.
- Set the Obliterate the following items from option to the beginning of time.
- Click the Clear browsing data button.
- Close the Settings folder and return to the original browser window.

