Print Support Tables (SU10)
The Print Support Tables (SU10) provides the ability to print the Support Tables defined in Maintain Support Tables (SU09) and Maintain Tax Groups (IN06) with the exception of Attention Codes and Company Languages. Attention Codes are printed in Print Mail Attention Codes (SU19).
- The Printer Selection screen automatically opens. Select the Printer destination and click OK.
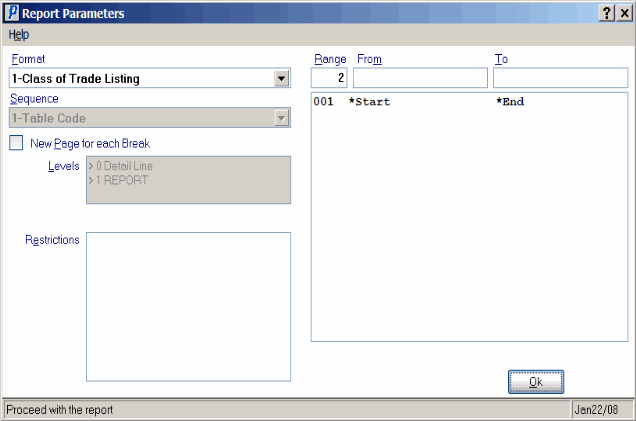
- The Report Parameters screen for SU10 opens.
- Select a Format from the drop down list. Valid options include:
- Class of Trade Listing
- Tax Group Listing
- Accounts Receivable Terms Code
- Territory Code List
- Salesrep List
- Sales Group List
- Ship Via Code List
- The Sequence field defaults to 'Table Code'. You cannot modify the Sequence field.
- If a New Page for each Break is required, select the checkbox.
- The Levels list box displays the various Levels of detail available for the report. All Levels are automatically selected in SU10; the '>' before each Level option indicates the Level is selected. You cannot remove the Level selectors. SU10 includes the following Levels:
- Detail Line
- Report
- There are no Restrictions that apply to the Report. Tab through the Restrictions section.
- Select the Range From and To for the report. The Range must match the Sequence selected, and in this case the only Sequence available is 'Table Code'. You can enter codes set up in SU09 that match the Format selected, for example if the format is 'Sales Rep', you can enter Sales Rep codes in the Range From and To fields.
- In the From field, enter the starting 'code' for the report.
- In the To field, enter the ending 'code' for the report.
- The information displays in the list box below.
- To add additional Ranges, repeat these steps.
Note: To print the entire file (all Sales Rep codes), simply tab through the From and To fields. The list box displays *Start and *End in the From and To fields.
- To delete a Range from the list box, double click on the line. The following message displays, "Do you wish to delete this range? Yes/No". Click Yes to delete the range.
- In the From field, enter the starting 'code' for the report.
- When all of the information on the Report Parameters screen is complete, click OK to run the report.
- Select a Format from the drop down list. Valid options include:
- The Report Complete screen opens when the report is generated. Click OK to accept the Report or click Abort to cancel the Report. Note: This report does not require you to enter the Acceptance Codes.

