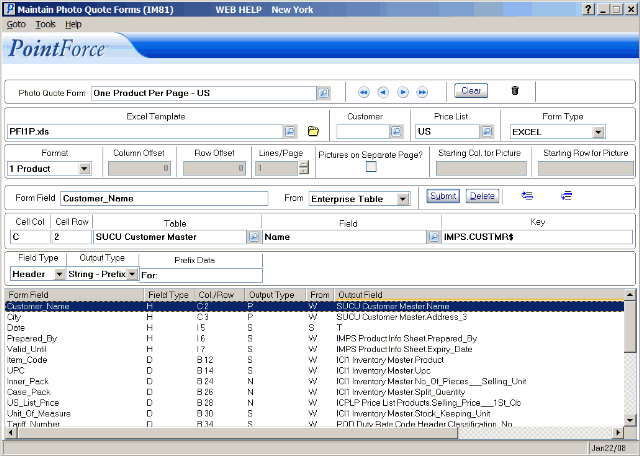
Maintain Photo Quote Forms (IM81)
The Maintain Photo Quote Forms (IM81) program allows you to take an Excel Template and map the data fields to cells in a newly created template or form.The following list defines every field in IM81:
- Photo Quote Form - enter or select from the query the Photo Quote Form you want to work with. The form name can be a maximum of 32 alpha numeric characters in length.
- Excel Template - select from the query the Excel template you want to use. The Excel Template defines the format of the Product Information Sheet. In some cases the Retailer provides the template. Templates can contain logos, headings, borders, calculation and anything else that is required to produce the desired output.
Use the Folder icon
 to open the Excel Template so you can see an example of the Template.
- Customer - enter or select from the query a default Customer number that appears when you use this Quote Sheet in Generator Product Information Sheets (IM82). You may also leave this field blank.
- Price List - enter or select from the query a default Price List that appears when you use this Quote Sheet in IM82. You may also leave this field blank.
- Form Type - currently Excel is the only format available.
- Format - this field determines the layout of the Quote Sheet. Select an option from the drop down list. Valid options include:
- 1 Product - one Product displays per page
- 2 Products - two Products display per page
- 4 Products - four Products display per page
- List of Products - a list of Products displays on each page.
- Column Offset - this field is available when the Format is set to '2 Products', and is mandatory when the Format is set to '4 Products'. IM81 uses the original cell location and adds the column offset to determine where the next product should print on the Excel spreadsheet.
- TIP: To display 2 products side by side on a page, set the Format to '2 Products', the Column Offset to '2' and the Row Offset to '0'.
- Row Offset - this field is available when the Format is set to '2 Products', and is mandatory when the Format is set to '4 Products'. The Row Offset value is the number of lines on the Excel spreadsheet from the start of one Product to the start of the next Product.
- If the Product pictures are to print one above the other, then set the Row Offset but leave the Column Offset at 0.
- For 4 products per page, the original cell location plus the Column Offset indicates where item 2 will appear, the original cell plus the Row Offset indicates where item 3 will appear and the original cell location plus the Row Offset and the Column Offset indicates where item 4 will appear on the quote sheet.
- Lines per Page - this field is available when the Format is set to 'List of Products'. The Lines per Page determines the number of Products per page.
- Pictures on Separate Page? - select this check box to have the pictures print for the list of Products on a separate page.
- Starting Col. for Picture
- this option is available when 'Pictures on Separate Page?' is selected. Enter the column on the Excel spread sheet on which the Pictures will start. Valid entries include A-Z.
- Starting Row for Picture- this option is available when 'Pictures on Separate Page?' is selected. Enter the row on the Excel spread sheet on which the Pictures will start. Valid entries are 1-20.
- Form Field - enter the name of the Field on the form you are mapping the data to, for example 'Price'. Note: The name entered in the Form Field cannot contain spaces, must start with an alpha character (i.e. not a numeric) and can only contain the following characters: '.' (period) or '_' (underscore). TIP: You may find it beneficial to have the name of the Form Field and the Label on the Excel Spreadsheet the same.
- From - from the drop down list, select the location from which the data will be retrieved. Valid options include:
- Enterprise Table
- ODBC Table
- Call Program
- Special Fields
- If you select Enterprise Table in the From field, the following fields are available:
- Cell Col - enter the column the cell is located in. Valid entries include A-Z.
- Cell Row - enter the row the cell is located in. Valid entries include 1-99.
- Table - this field defaults to 'ICI1 Inventory Master' since this is where most of the data is stored. Using the query, you can select another Enterprise Table to be used when retrieving the data.
- Field - enter or select from the query the name of the Field, from the Table entered in the Table field, where the data is stored.
- Key - this field is for information purposes only and cannot be modified. The program Key for the Enterprise Table displays.
- Cell Col - enter the column the cell is located in. Valid entries include A-Z.
- If you select ODBC Table in the From field, the following fields are available:
- Cell Col - enter the column the cell is located in. Valid entries include A-Z.
- Cell Row - enter the row the cell is located in. Valid entries include 1-99.
- DSN - enter the Data Source Name.
- Odbc Table - enter the ODBC Table to be used when retrieving the data.
- Odbc Field - enter the ODBC Field where the data is stored.
- ODBC Name - enter the ODBC name.
- ODBC Key - enter the program Key for the ODBC Table.
- Cell Col - enter the column the cell is located in. Valid entries include A-Z.
- If you select Call Program in the From field, the following fields are available:
- Cell Col - enter the column the cell is located in. Valid entries include A-Z.
- Cell Row - enter the row the cell is located in. Valid entries include 1-99.
- Program - enter the Call Program to be used when retrieving the data.
- Cell Col - enter the column the cell is located in. Valid entries include A-Z.
- If you select Special Fields in the From field, the following fields are available:
- Cell Col - enter the column the cell is located in. Valid entries include A-Z.
- Cell Row - enter the row the cell is located in. Valid entries include 1-99.
- Special field - from the drop down list, select one of the following options:
- Customer's Price
- the program will retrieve the Customer's specific price versus list price QB1.
- Today's Date - is the Enterprise system date.
- Customer's Price
- the program will retrieve the Customer's specific price versus list price QB1.
- Cell Col - enter the column the cell is located in. Valid entries include A-Z.
- Field Type - from the drop down list, select one of the following options:
- Header - select Header if you want the information to print once on each page, for example 'Customer Name'.
- Detail - select Detail if you want the information to print for each Product per page, for example 'Description'.
- Extra - this field is reserved for future use.
- Output Type - from the drop down list, select one of the following options:
- String - the data is text.
- String - Stp - the data is text with the trailing blanks stripped off. The output type is used if you want to center the text in the cell.
- String - Prefix - the data is text that prints with a prefix at the beginning of the field.
- Numeric - the data is a number.
- Date - the data that will print is a date.
- Image - the data that will print is a picture.
- String - the data is text.
- Prefix Data - this field is enabled when the Output Type is set to 'String-Prefix' to enter the prefix text that will print on the Excel sheet.
- Height/Width - these fields are available when the Output Type is set to 'Image'. Enter the size of the image in pixels. If all the pictures are the same size and will fit in the space allocated on the Excel spreadsheet then you do not need to edit these fields. Otherwise it will resize your pictures if the distortion flag is turned off on the image properties screen.
- Form Field List Box - the list box provides a summary of the information entered. Double click on a line in the list box in order to recall the information. When the line is recalled, you can edit or delete the line.
The following table outlines the functionality of each button in IM81:
| Button Label | Icon | Functionality |
| Clear |  |
Clears all of the fields in IM81 allowing you to create a new Photo Quote Form. |
| Delete Form |  |
Deletes the entire Photo Quote Form. Before the information is deleted, the following message displays: "Delete Header and all its details? Yes/No". Select Yes to confirm the delete request; select No to cancel the delete request. Note: If you try to delete a Form that is used by Product Sheets in IM82, the following message displays: "This form is used by one or more Product Sheets set up in IM82. These must be deleted first before deleting the form. OK". |
| Open a Template |  |
Opens the Quote Sheet Forms directory located on your server. |
| Submit |  |
Updates the current Form Field information entered on the screen. (The updated information is automatically added to the list box.) |
| Delete |  |
Deletes the Form Field information highlighted in the list box or recalled from the list box. |
| Move Selected Line Up |  |
Moves the line highlighted in the list box up one level. Continue clicking until the line is in the desired location. |
| Move Selected Line Down |  |
Moves the line highlighted in the list box up down one level. Continue clicking until the line is in the desired location. |
The following list defines the items on the Menu in the Header section of IM81:
- Go To - this option allows you to quickly jump to other programs in Enterprise. The following option is available:
- User Defined Data Def'n - opens the User Defined Data Def'n - Product Sheet (UD05) program. You can create new User Defined fields that are added to the Generate Product Information Sheets in IM82/Form/UDF folder.
- Tools - the Tools menu has two options from which to select:
- Copy Current to New - allows you to copy an existing Quote Form to a new Quote Form sheet. All mapped fields remain mapped and you can modify only the fields required for the new spreadsheet. For example, you can update the Price field to use the Customer's Price instead of QB1. When this option is selected, the Copy Current Sheet to New Sheet opens:
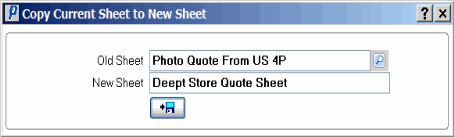
Copy Current Sheet to New Sheet- Enter or select from the query the Old Sheet you want to copy.
- In the New Sheet field, enter the New Sheet name.
- Click on the Copy icon
 to complete the copy and close the window.
- Copy Package to New - allows you to copy an 'Enterprise' Quote Form sheet (i.e. a Quote Form sheet that comes with the package) to a new Quote Form sheet. You can make adjustments to the new form as required. When this option is selected, the 'Transfer from Package Sheets to New Sheet' screen opens:
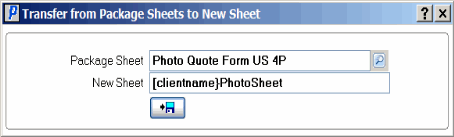
Copy Package to New- Enter or select from the query the Package Sheet you want to copy.
- In the New Sheet field, enter the New Sheet name.
- Click on the Copy icon to complete the copy and close the window.
- Copy Current to New - allows you to copy an existing Quote Form to a new Quote Form sheet. All mapped fields remain mapped and you can modify only the fields required for the new spreadsheet. For example, you can update the Price field to use the Customer's Price instead of QB1. When this option is selected, the Copy Current Sheet to New Sheet opens:
Maintain Photo Quote Forms (IM81)
