Print Inventory Listing (IM15)
The Print Inventory Listing (IM15) program enables you to print a variety of Inventory reports based on the tables that are used to create and support Products entered in Maintain Inventory Master (IM13).
Here are the steps to run IM15:
- The Printer Selection screen automatically opens. Select the Printer destination and click OK.
- The Report Parameters screen for IM15 opens.
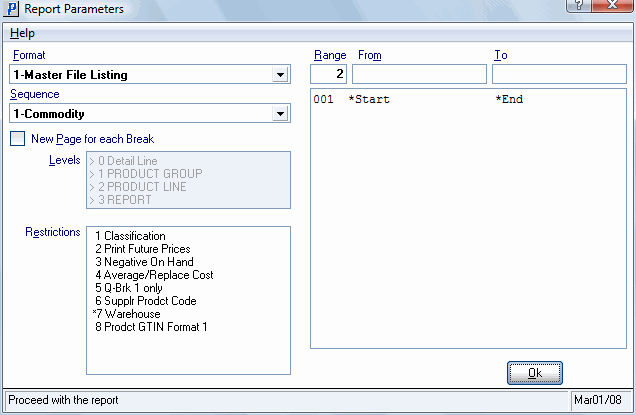
- Select a Format from the drop down list. Valid options include:
- Master File Listing - includes data related to the Product from IM13.
- Check List - a condensed report that includes the Product, Description, Primary Bin Location, SKU and the following Stock levels: On-Shelf, Back-Up and Total. This format is useful when performing a partial Physical Inventory.
- Price List - includes all Quantity Break prices by Product.
- Condensed Listing - includes the Product, Description, Available Quantity and SKU. This report prints one line per Product.
- Product Labels - includes the Primary Bin Location (as applicable), Secondary Bin Location (as applicable), Product, Description, Supplier/Product Code and Product Code formatted to fit on stock labels (approximately 3 1/2" x 15/16", 1-up).
- Cost Comparison - includes the Product, Description, Average Cost, Quantity Break Prices for each price break, and the Gross Profit percent for each price break. This Format works well in combination with the 'Print Future Prices' restriction and with the 'Average/Replacement Cost' restriction.
- Product Substitution List - includes all Product substitutes from IM14.
- Master File Listing - includes data related to the Product from IM13.
- Select a Sequence from the drop down list. Valid options include:
- Commodity - prints the report in Commodity Code order (followed by Product Code order).
- Location - prints the report in Primary Bin Location order (followed by Product Code order).
- Product - prints the report in Product Code order.
- Supplier - prints the report in Supplier Code order (followed by Product Code order).
- Commodity/Sort Sequence Code - prints the report in Commodity Code order (followed by Product Code order). The report Headings include the Commodity Code and the Product Group description, whereas the 'Commodity' sequence report Headings include the Commodity Code and the Product Line and Product Group descriptions.
- Supplier/Comm/Sort Sequence - prints the report in Supplier Code/Commodity Code order.
- Commodity - prints the report in Commodity Code order (followed by Product Code order).
- If a New Page for each Break is required, select the check box.
- The Levels list box displays the various levels of detail available for the report. The levels predefined for IM15 are based on the Sequence selected:
- When Commodity is the Sequence, the predefined Levels are:
- Detail Line
- Product Group
- Product Line
- Report Total
- When Location is the Sequence, the predefined Levels are:
- Detail Line
- Location
- Report Total
-
When Product is the Sequence, the predefined Levels are:
- Detail Line
- Report Total
- When Supplier is the Sequence, the predefined Levels are:
- Detail Line
- Supplier
- Report Total
- When Commodity/Sort Sequence is the Sequence, the predefined Levels are:
- Detail Line
- Sort Sequence
- Commodity
- Report Total
- When Supplier/Commodity/Sort Seq is the Sequence, the predefined Levels are:
- Detail Line
- Sort Sequence
- Product Group
- Supplier
- When Commodity is the Sequence, the predefined Levels are:
- Select the Restrictions that apply to the Report by double clicking on the line in the list box. Restrictions allow you to tailor IM15 to your specific needs. The '>' before a Restriction indicates the Restriction is selected. An '*' before a Restriction means the Restriction is mandatory. IM15 includes the following Restrictions:
- Classification - prints Products with the Class code(s) selected in the Classifications dialogue box. For example, if you wanted to print a listing of products flagged for deletion, you could restrict the report to print only X-class products.
- Print Future Prices - this Restriction only applies to the Master File Listing, Price List or Cost Comparison formats. Enter the Effective Date for the Future Prices and click OK. If a Product has Future Prices for that Effective Date, then the Selling Prices reported are from IM21. If future prices do not exist or are not yet effective, then the Selling Prices reported are from IM18.
- Negative On Hand - prints only Products with a negative on-hand balance.
- Average/Replacement Cost - this Restriction is available with the Cost Comparison format only. Select either Average or Replacement costs and the report will use the selection to calculate the Gross Margin Percent. Each option produces a different Gross Margin percent.
- Q-Brk 1 Only - this Restriction only applies to the Cost Comparison format only. The report prints only Quantity Break 1 prices when this option is selected.
- Supplier Product Code - prints the Supplier Product Code on the report.
- Warehouse - this is a mandatory Restriction. Enter the Warehouse for which you want to print the report.
- Product GTIN Format 1 - this Restriction only applies to the Master File Listing format. The report lists the GTIN details for each Product.
- Classification - prints Products with the Class code(s) selected in the Classifications dialogue box. For example, if you wanted to print a listing of products flagged for deletion, you could restrict the report to print only X-class products.
- Select the Range From and To for the report. The Range must match the Sequence selected; if, for example, the Sequence is Commodity, you must enter Commodity Codes in the To and From fields.
- In the From field, enter the starting 'code' for the report.
- In the To field, enter the ending 'code' for the report.
- The information displays in the list box below.
- To add additional Ranges, repeat these steps.
Note: To print the entire file (all Commodity Codes, for example), simply tab through the From and To fields. The list box displays *Start and *End in the From and To fields.
- To delete a Range from the list box, double click on the line. The following message displays, "Do you wish to delete this range? Yes/No". Click Yes to delete the range.
- In the From field, enter the starting 'code' for the report.
- When all of the information on the Report Parameters screen is complete, click OK to run the report.
- Select a Format from the drop down list. Valid options include:
- The Report Complete screen opens when the report is generated. Click OK to accept the report and Abort to cancel the report.
Print Inventory Listings (IM15)
