Print Inventory Tables (IM10)
The Print Inventory Tables (IM10) program is designed to print reports of any of the tables maintained in Maintain Inventory Tables (IM09).
To run IM10:
- The Printer Selection screen automatically opens. Select the device destination and click OK.
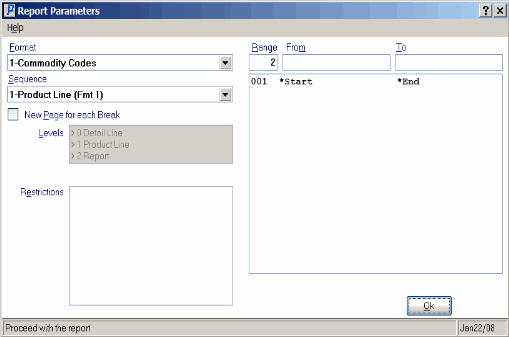
- The Report Parameters window for IM10 opens.
- Select a Format from the drop down list. Valid options include:
- Commodity Codes
- Unit of Measure Codes
- Inventory Adjustment Codes
- Inventory Quantity Break Report
- Color/Size Codes
- ABC Class Codes
- Price Book Codes
- GL Codes
- Catalog Codes
- Character Codes
- Colour Schemes
- Themes
- Fragility Code
- Item Status
- Licensed Name
- Mark Up Category
- Material Type
- Package Description
- Package Design
- Product Tests
- Selling Status
- Special Features
- Warehouse Shipping Rates
- Developers
- Product Brands
- Season Codes
- Select a Sequence from the drop down list. Valid options include:
- Product line (Fmt 1)
- Table Code
Note: If you have selected Format 1 (Commodity Codes) you must select Product Line (Fmt 1). If the Product line Sequence is used in conjunction with any other Format an error message will display when you try to run the report.
- If a New Page for each Break is required, select the check box.
- The Levels list box displays the various Levels of detail available for the report. All Levels are automatically selected in IM10; the '>' before each Level option indicates the Level is selected. The levels that display is dependent on the Sequence selected and can be modified.
- There are no Restrictions that apply IM10.
- Select the Range From and To for the report. The Range must match the Sequence selected. Multiple Ranges may be entered.
- In the From field, enter the starting 'code' for the report.
- In the To field, enter the ending 'code' for the report.
- The information displays in the list box below.
- To add additional Ranges, repeat these steps.
Note: To print the entire file (all records in the selected sequence), simply tab through the From and To fields. The list box displays *Start and *End in the From and To fields.
- To delete a Range from the list box, double click on the line. The following message displays, "Do you wish to delete this range? Yes/No". Click Yes to delete the range.
- In the From field, enter the starting 'code' for the report.
- When all of the information on the Report Parameters screen is complete, click OK to run the report.
- Select a Format from the drop down list. Valid options include:
- The Report Complete screen opens when the report is generated. Enter the Acceptance Codes to accept the report (if applicable), click OK to complete the printing of the report, or click Abort to cancel the report.
Print Inventory Tables (IM10)
