Compatibility Requirements for Windows XP with IE 6.0
|
Additional Information Troubleshooting IE Set Up |
| Important Note: Before you read this document, please be advised that the Internet Explorer 6.0 browser has many known security issues. It is recommended that you upgrade your browser to IE 8.0 or install all of the fixes for IE 6.0 through Windows update(s). |
The following steps provide the details for making your Windows XP with Internet Explorer 6.0 desktop configuration compatible with PointForce iTopia:
- Internet Browser Settings:
- Set the Security:
If you would like to read additional information on the importance of the Internet Security zone, click here.
Select the Tools - Internet Options menu option in Internet Explorer. From the Security folder, highlight the Local Intranet option and then click the Sites button.
- The Local Intranet window opens. Click Advanced.
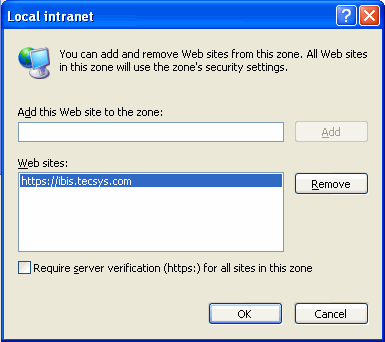
- Another Local Intranet window opens. Enter the name of your iTopia or IBIS server in the 'Add this website to the zone' field.
- Click Add to add the IBIS sever name to the Websites list box.
- Click OK to close the Local Intranet window.

Local Intranet windowClick OK on the original Local Intranet window.
- The Local Intranet window opens. Click Advanced.
- Enabling ActiveX Support:
PointForce iTopia takes advantage of Microsoft's ActiveX web component, which must be installed the first time a new machine accesses the system. In order to do so, the user ID logged into the system must have administrative privileges on the machine.
The following steps outline how to enable the appropriate ActiveX controls:
- On the Security Settings window:
- Prior to setting the ActiveX controls we recommend that you click Reset to ensure that the original browser defaults are in effect.
- If changes were made when you click on the Reset button, the following message displays: "Are you sure you want to change the settings for this zone? Yes/No". Select Yes.
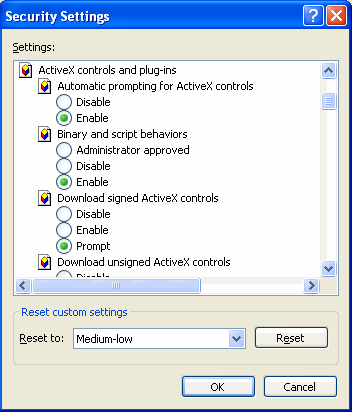
- Scroll down to the 'ActiveX controls and plug-ins' and set the following subcategories:
-
'Automatic prompting for ActiveX controls - Enable
- 'Binary and script behaviors' - Enable
- 'Download signed ActiveX controls' - Prompt (or Enable)
- 'Download unsigned ActiveX controls' - Prompt
- 'Initialize and script ActiveX controls not marked as safe for scripting' - Enable
- 'Run ActiveX controls and plug-ins' - Enable
- 'Script ActiveX controls marked safe for scripting' - Enable

Security Settings/ActiveX Controls & Plug-ins window in IE 6.0 -
'Automatic prompting for ActiveX controls - Enable
- When the ActiveX controls on the Security Settings window are correct, click OK. If you have made changes, the following warning message displays: "Are you sure you want to change the security settings for this zone? Yes/No". Select Yes.
- You are returned to the Security folder on the Internet Options window. Click OK to complete the changes.
- Prior to setting the ActiveX controls we recommend that you click Reset to ensure that the original browser defaults are in effect.
- On the Security Settings window:
- Set the Security:
- Changing Screen Resolution:
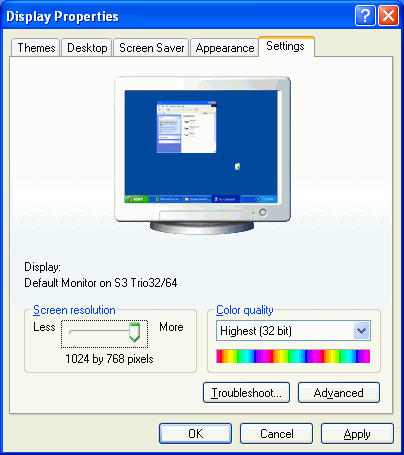
PointForce iTopia is designed to be run at a screen resolution of a minimum of 1024x768 pixels. To change your desktop resolution, do the following:
- Right-click on the desktop and select Properties. In the Settings folder, adjust the screen resolution to your desired setting (1024 x 768) and click OK to accept your changes.

Display Properties in Windows XP
- Right-click on the desktop and select Properties. In the Settings folder, adjust the screen resolution to your desired setting (1024 x 768) and click OK to accept your changes.
- Configuring Interactivity with Microsoft Excel:
The following configuration is optional, enabling you to access a Save button directly from within a Microsoft Excel spreadsheet (utilized in the 'Edit with Excel' feature):
To add the Save button to Microsoft Excel 2003:
- Launch Microsoft Excel 2003 and select the Tools - Macro - Security menu option.
- Select the Trusted Publishers folder.
- Select the Trust access to Visual Basic project check box.
- Click OK to apply your changes.
To add the Save button to Microsoft Excel 2007:
- Launch Microsoft Excel 2007 and click the Microsoft Office
 button.
- Click the Excel Options button.
- Select the 'Trust Center' category and then click the Trust Center Settings button.
- Select the 'Macro Settings' category and then select the Trust access to the VBA project object model check box.
- Click OK to apply the changes.
To add the Save button to Microsoft Excel 2010:
- Launch Microsoft Excel 2010 and under the File menu, click on 'Options'.
- The Excel Options window opens. Select the 'Trust Center' category and then click the Trust Center Settings button.
- Select the 'Macro Settings' category and then select the Trust access to the VBA project object model check box.
- Click OK to apply the changes.
- Launch Microsoft Excel 2003 and select the Tools - Macro - Security menu option.
- When these changes are complete, open PointForce iTopia and on the login window, click on the System Compatibility Checklist
link (on the right side of the login page).
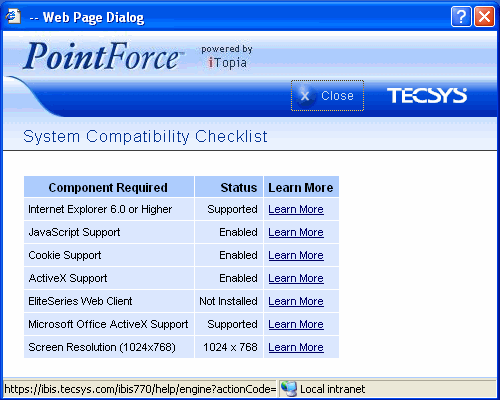
- Your check list should be set as follows:

System Compatibility Checklist - If any of the options are not enabled or supported as on the screen capture above, or if your screen resolution is not 1024x768, then repeat the required steps to ensure your Internet Browser is compatible to run iTopia.
- Your check list should be set as follows:
- PointForce Enterprise 6.0 and higher offers a "Quick Link" feature that launches iTopia directly from selected programs in Enterprise. This feature is available in various Enterprise programs including: GL45, IC45, IN45, OE45 and SU45.
In order to use the Quick Link functionality, your default HTM/HTML editor must be set to Internet Explorer. In order to set this default in Windows XP, we will create an HTML document in Notepad so you can launch it using IE. (This is optional and is only required if your Quick Link functionality does not work correctly.)
- To open Notepad:
- Click on the 'Start' menu.
- Select 'All Programs'; select 'Accessories'; and then select 'Notepad'.
- Click on the 'Start' menu.
- With Notepad open and a new document automatically displayed, enter text into the document. For example, you can enter "Test for Quick Link."
- To save this document as an HTML document, under the 'File' menu, select 'Save As'.
- On the Save As window, ensure you select the Desktop icon in the panel on the left side of the window.
- In the 'File name' field, enter test.htm
- In the 'Save as type' field, use the drop down arrow to select 'All Files' from the list.
- Click Save to save the document as an HTML file and close the Save As window.
- On the Save As window, ensure you select the Desktop icon in the panel on the left side of the window.
- You can now close the 'test' document in Notepad (you can also close Notepad at this time).
- On your Desktop, right click on the 'test' icon:
- Select 'Choose Program'.
- The 'Open With' window opens. Highlight 'Internet Explorer' and then select the 'Always use the selected program to Open this kind of file' check box.
- Click OK.
- Select 'Choose Program'.
- Internet Explorer launches and your test.htm file opens.
- You can close IE.
Your default HTM/HTML editor is now IE.
- To open Notepad:

