Print Inbound Reports (EI49)
The Generate Inbound Reports (EI49) goes into ProEDI for the specified Trading Partners and look for any of the following new reports:
- 852 - Product Activity Data
- 820 - Payment Remittance Advice
- 816 - Organizational Relationships
- 864 - Text Message
- 830 - Forecast/Planning Schedule
- 824 - Error Messages Report
- 812 - Credit/Debit Adjustments
- 860 - PO Change
A warning message displays if a prior update exists and the result will print again. Note: You must accept the Report before you can print a new batch.
The following list defines the steps involved in running EI49:
- The Printer Selection screen automatically opens. Select the device destination and click OK.
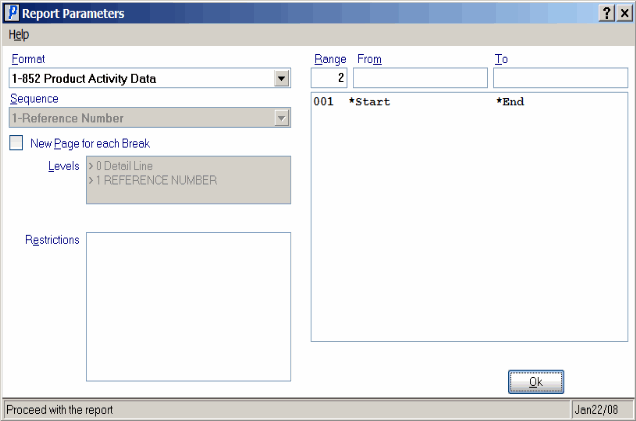
- The Report Parameters screen for EI49 opens.
- In the Format field select one of the following options:
- 852 - Product Activity Data
- 820 - Payment Remittance Advice
- 816 - Organizational Relationships
- 864 - Text Message
- 830 - Forecast/Planning Schedule
- 824 - Error Messages Report
- 812 - Credit/Debit Adjustments
- 860 - PO Change
- The Sequence field defaults to 'Reference Number'. You cannot modify the Sequence field.
- If a New Page for each Break is required, select the checkbox.
- The Levels list box displays the various Levels of detail available for the report. All Levels are automatically selected in EI49; the '>' before each Level option indicates the Level is selected. Double click on the line to remove the selector. EI49 includes the following Levels:
- Detail Line
- Reference Number
- There are no Restrictions for EI49.
- Select the Range From and To for the report. The Range must match the Sequence. Multiple Ranges may be entered.
- In the From field, enter the starting 'code' for the report.
- In the To field, enter the ending 'code' for the report.
- The information displays in the list box below.
- To add additional Ranges, repeat these steps.
Note: To print the entire file (all Reverse PO numbers), simply tab through the From and To fields. The list box displays *Start and *End in the From and To fields.
- To delete a Range from the list box, double click on the line. The following message displays, "Do you wish to delete this range? Yes/No". Click Yes to delete the range.
- In the From field, enter the starting 'code' for the report.
- When all of the information on the Report Parameters screen is complete, click OK to run the report.
- In the Format field select one of the following options:
- The Trading Partner Selection screen opens. Select the Trading Partner with which you want to work and click OK.
- Once the Trading Partner is selected, the following message displays: "Do you wish to start this update? Yes/No". Select Yes to start the update; select No
to cancel the request and close the EI49 window.
- If you have selected 820-Payment Remittance Advice, the following confirmation message displays: "Do you wish to print product/adjustment detail? Yes/No". Select Yes to print all of the details; select No to print summary information only.
- The Report Complete screen opens when the report is generated. Enter the Acceptance Codes to accept the report (if applicable), click Restart to restart the printing of the report, or click Abort to cancel the report.
- Upon entering the Acceptance Codes, the batch is automatically cleared.

Generate Inbound Reports (EI49)
