Header (AP95)
|
Additional Information GL Distribution |
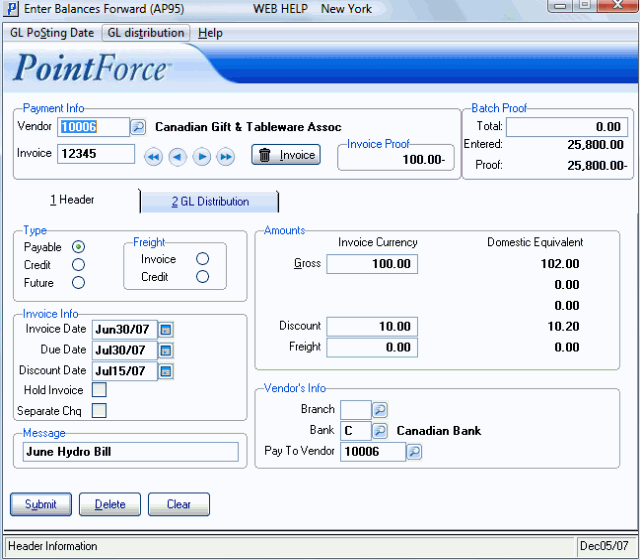
The Header folder in Enter Balances Forward (AP95) is used to enter information for the Invoice that appears in the Header section.
When you open AP95, the GL Posting Date screen opens. Enter the date you want to use with the transactions you are about to enter.
The following list identifies every field on the Header folder:
- The Type refers to the kind of Invoice being entered. Valid options include:
- Payable - by definition, a Payable Invoice is an Invoice dated within the current or next fiscal AP period.
- Credit - Credit notes debit the Accounts Payable system on your books, and are dated within the current or next fiscal AP period.
- Future - a Future Invoice is an Invoice dated beyond the current or next fiscal AP period.
- Payable - by definition, a Payable Invoice is an Invoice dated within the current or next fiscal AP period.
- In the Invoice Info section:
- Invoice Date - enter or select from the query the Invoice Date. The Invoice Date of the transaction can be any date equal or prior to the Previous Period Ending Date specified during the AP Company Control Initialization (CC00/Accounts Payable). The Invoice Date is used along with the Vendor's Payment Terms set up in Maintain Vendors (AP13) as the basis of calculating both the 'Due Date' and the 'Discount Date' for the transaction.
- Due Date - the Due Date of an Invoice is used by the Cash Requirements process to select Invoices for payment. If the Vendor's 'Payment Terms' are set up in AP13, a suggested Due Date is calculated and displayed; otherwise the Due Date equals the Invoice Date. You can enter or use the query to select a new Due Date as required.
Note: When the Hold Invoice option is enabled, the Due Date displays as HOLD.
- Discount Date - the Discount Date of an Invoice is used by the Cash Requirements process to select Invoices for payment with the advantage of the discount. If the Vendor's 'Discount Terms' coding is set up in AP13, a suggested Discount Date is calculated and displayed; otherwise the Discount Date equals the Invoice Date. You can enter or use the query to select a new Discount Date as required.
Note: Discounts are calculated and taken at the time of payment if the Discount Date is equal to or less than the Discount Date restriction specified when the Cash Requirements Report (AP40) is run.
- Hold Invoice - the Hold Invoice option controls an Invoice's eligibility for payment. AP40 bases its selection of Invoices by Due Date, which is set to HOLD if the Hold Invoice option is selected. When an Invoice is on Hold, it is reported on the Cash Requirements Report as a memo only to remind you of its status. Held Invoices appear with an H Aging status in Display Vendor Accounts (AP45).
Note: If you want to hold all Invoices for a specific Vendor, it may be more efficient to assign the Hold Status to the Vendor in AP13 instead of enabling the Hold Invoice option against each Invoice.
- When you select the Hold Invoice option, the Invoice's 'Due Date' is changed to HOLD and the Invoice is reported on AP40 as a memo only.
- To release the held Invoice, you can:
- Enter or select from the query a valid Due Date.
- De-select the 'Hold Invoice' option. When this occurs, AP95 calculates a new Due Date based on the Invoice Date and the Vendor's assigned 'Payment Terms' (AP13).
- When you select the Hold Invoice option, the Invoice's 'Due Date' is changed to HOLD and the Invoice is reported on AP40 as a memo only.
- Separate Check - the Separate Check option allows you to signal the Cash Requirements process to produce the payment for this Invoice as an individual Check as opposed to being aggregated into a payment for this and potentially other Invoices due from the same Vendor at that time.
- When you select the Separate Check option, an individual Check is produced by the Cash Requirements process as payment for this Invoice.
- When you clear the Separate Check option, the payment for this Invoice may be aggregated along with other Invoices due from the same Vendor at the same time.
- When you select the Separate Check option, an individual Check is produced by the Cash Requirements process as payment for this Invoice.
- The Message field of an Accounts Payable Invoice is used to record a brief note that prints along with the payment on the Check stub. The message can be a maximum of 30 characters in length. The Invoice message displays under the 'Description' heading on the Check. For more information, see Print Checks (AP42).
- Invoice Date - enter or select from the query the Invoice Date. The Invoice Date of the transaction can be any date equal or prior to the Previous Period Ending Date specified during the AP Company Control Initialization (CC00/Accounts Payable). The Invoice Date is used along with the Vendor's Payment Terms set up in Maintain Vendors (AP13) as the basis of calculating both the 'Due Date' and the 'Discount Date' for the transaction.
- In the Amounts section:
- Gross - enter the total on the Vendor's Invoice before early payment discounts. This is the amount paid unless discounts are applicable at the time of payment. The Gross Amount is expressed in terms of the Vendor's currency, with a Domestic Equivalent displayed to the right. Domestic Equivalents are calculated using the current exchange rate associated with the Currency Code in Maintain Bank Codes (AP01) from the assigned Bank (found in the Supplier's Info section below).
Exchange Factors should be kept up-to-date in order to calculate and distribute the Domestic Equivalent as accurately as possible. The GL Distributions of an Invoice can be entered using the Vendor's currency, but they are converted to Domestic Equivalents for posting.
- Discount
- the Discount amount is calculated using the 'Discount Percentage' set up in AP13 for the Vendor. The Discount can be modified by entering a new Discount value in this field.
- If a payment for the Invoice is processed on or before the Discount Date, then the Invoice payment is reduced by the Discount amount. If the Bank listed on the Header folder is set up to hold a Foreign Currency in Maintain Bank Codes (AP01), then the Discount is calculated based on the Gross Amount. If the Bank listed holds Domestic Currency, the Discount is calculated on the Gross Amount. )
- Freight - the Freight field is used to enter Freight charges that are included in the Gross Amount. This field is only available when the Type is set to Payable, Credit or Future. This field is not available when the Type is a Freight Invoice or Credit.
- The amount entered here updates the Vendor's Freight statistics and is reported on the Freight Analysis Report (AP60).
- Domestic Equivalent - Domestic Equivalents are calculated using the current Exchange Rate set up in Maintain Currency Table in (CC22) for the currency associated with the Vendor's Bank. The Vendor's Bank is displayed on this folder in the 'Vendor's Info' section. The GL Distributions of an Invoice can be entered using the Vendor's currency, but they will be converted to Domestic Equivalents for posting.
- Gross - enter the total on the Vendor's Invoice before early payment discounts. This is the amount paid unless discounts are applicable at the time of payment. The Gross Amount is expressed in terms of the Vendor's currency, with a Domestic Equivalent displayed to the right. Domestic Equivalents are calculated using the current exchange rate associated with the Currency Code in Maintain Bank Codes (AP01) from the assigned Bank (found in the Supplier's Info section below).
- In the Supplier's Info section:
- Branch - the Branch field defaults to the 'Branch Default' set up in AP13 for this Vendor. You can enter or select from the query a new Branch code. The Branch is used to associate the Invoice with a specific Branch or Sales Office in the business.
- The Print Aged Trial Balance (AP83) report supports a Branch restriction that can be used to study liabilities for a specific Branch or Sales Office of the business.
- Bank - the Bank field defaults to the 'Bank Code' set up in AP13 for this Vendor. You can enter or select from the query a new Bank code. The Bank field is used to select the Bank account from which this Invoice should be paid. When the payment is processed, the Bank Code set up in AP01 specifies the GL accounts used for the Bank, Accounts Payable, Discount and Exchange.
- If the Bank holds a Foreign Currency (set up in AP01), the Domestic Equivalent will be calculated and displayed using the Bank's current Exchange Factor set up in AP01. GL Distributions are made using the Domestic Equivalent, therefore once the first GL Distribution line has been updated, the Bank code cannot be changed.
- The following reports have a Bank code restriction:
- Print Aged Trial Balance (AP83)
- Print Cash Requirements (AP40)
- Print Reconciled Checks (AP87)
- If the Bank holds a Foreign Currency (set up in AP01), the Domestic Equivalent will be calculated and displayed using the Bank's current Exchange Factor set up in AP01. GL Distributions are made using the Domestic Equivalent, therefore once the first GL Distribution line has been updated, the Bank code cannot be changed.
- Pay To Vendor - the Pay To Vendor field defaults to the 'Pay To Vendor' field from AP13 for this Vendor. You can enter or select from the query a Vendor code in the Pay To Vendor field. This field allows for goods to be Invoiced by one Vendor the payment is re-directed to a different Vendor for those goods. The Invoice is posted to and purchasing history is updated against the source Vendor's code.
The following table outlines the functionality of each button on the Header folder:
Button Label Icon Functionality Submit 
When AP95 is being used without the GL Distribution option, the Submit button is used to save New or Modified transactions. When the GL Distribution option is enabled, the transaction is committed when the first distribution is updated; thereafter the Submit button can be used to save changes in the header fields or GL Distributions. Delete 
The Delete button is used only with the GL Distribution option. To delete a vendor/invoice record, use the Delete Record in the Header section. Clear 
The vendor and invoice fields in the header section automatically clear and you can begin adding to the new record. The current transaction must be balanced before you can begin a new one. - Branch - the Branch field defaults to the 'Branch Default' set up in AP13 for this Vendor. You can enter or select from the query a new Branch code. The Branch is used to associate the Invoice with a specific Branch or Sales Office in the business.
Once the Invoice information is entered, you may want to access the GL Distribution folder. The GL Distribution folder is available only when the GL Distribution option is enabled. To enable the GL Distribution folder:
- Click on the GL Distribution menu option on the top menu bar.
- Select the 'Enter GL Distribution' check box to enable this option.
- Click on OK to close the window.
Note: If you enable the GL Distribution option after you enter one or more Invoices, you must review those Invoices before balancing their GL Distributions.
If you want to change the GL Posting Date, click on the GL Posting Date menu option on the top menu bar.
Enter Balances Forward (AP95/Header)
