Print Vendor Lists (AP15)
The Print Vendor Lists (AP15) program allows you to print a complete Vendor master file report that displays all of the fields entered using Maintain Vendors (AP13). You also have the option to print a condensed master file listing.
- The Printer Selection screen automatically opens. Select the Printer destination and click OK.
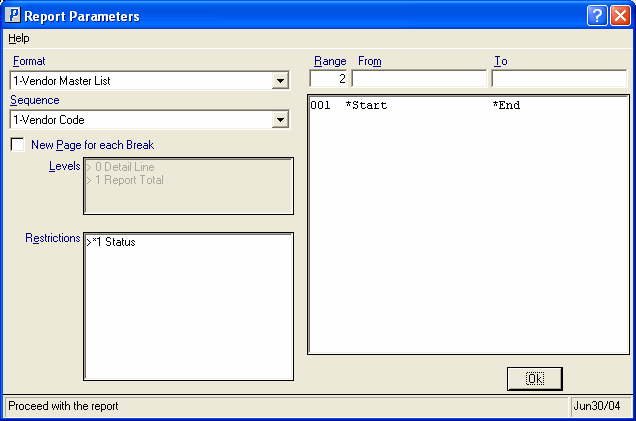
- The Report Parameters screen for AP15 opens.
- Select a Format from the drop down list. Valid options include:
- Vendor Master List - includes the entire Vendor master record from AP13.
- Vendor Short List - a condensed listing of Vendor code, name, address and telephone number.
- Payable Vendors Short List - includes 'Pay To Vendors' Vendor code, name, address and telephone number.
- Vendor Mailing Labels - prints mailing labels for Vendors in AP13.
- Vendor Master Mail Merge - a Word document and a tab delimited (.txt) flat file are created. For more information on the Mail Merge option, click here.
- Vendor Master List - includes the entire Vendor master record from AP13.
- Select a Sequence from the drop down list. When using Format 5, Vendor Master Mail Merge, a Sequence selection is not required. Valid options include:
- Vendor Code - prints the report in Vendor Code sequence.
- Vendor Name - prints the report in Vendor Name sequence.
- Vendor Code - prints the report in Vendor Code sequence.
- If a New Page for each Break is required, select the check box.
- The Levels list box displays the various levels of detail available for the report. The levels predefined for AP15 are:
- Detail Line
- Report Total
- There is one Restriction available for AP15. Restrictions allow you to tailor reports to your specific needs. The '>' before a Restriction indicates the Restriction is selected. Once a Restriction is selected, it can be de-selected but the '>' remains. An '*' before a Restriction means the Restriction is mandatory. AP15 includes the following Restriction:
- Status - double clicking on this option opens the 'Status Code to Print' window. Valid options are:
- A - All
- P - Perm
- T - Temp
- D - Del
- H - Hold
- Status - double clicking on this option opens the 'Status Code to Print' window. Valid options are:
- Select the Range From and To for the report. The Range must match the Sequence selected.
- In the From field, enter the starting 'code' for the report.
- In the To field, enter the ending 'code' for the report.
- The information displays in the list box below.
- To add additional Ranges, repeat these steps.
Note: To print the entire file (all Vendors), simply tab through the From and To fields. The list box displays *Start and *End in the From and To fields.
- To delete a Range from the list box, double click on the line. The following message displays, "Do you wish to delete this range? Yes/No". Click Yes to delete the range.
- In the From field, enter the starting 'code' for the report.
- When all of the information on the Report Parameters screen is complete, click OK to run the report.
- Select a Format from the drop down list. Valid options include:
- The Report Complete screen opens when the report is generated. Click OK to accept the report, click Restart to restart the printing of the report, or Abort to cancel the report. Note: Acceptance codes are not required to accept this report.
Print Vendor Lists (AP15)
