Master Pick Slip Report (OE35)
The Master Pick Slip Report (OE35) prints a report that summarizes Order detail lines by Product across multiple Orders. Total units required for the Product can then be picked all at once, brought back to a staging area and then distributed amongst the individual Orders represented on the Master Pick Slip.
- The Master Pick Slip functionality is independent by Warehouse and is turned on in Maintain Sales Office/Warehouse Numbers (CC96). You may choose to print both the Master Pick Slip and the regular Pick Slip (printed by Print Shipping Documents (OE34)) or just the Master Pick Slip. Parameters in CC96 also control the Maximum Number of Lines and the Maximum Number of Orders to be combined on a Master Pick Slip; you also have the option to sort the Master Picking Slip by Ship Via code.
- The Schedule Orders for Printing (OE32) program updates the Master Pick Slip print file. Once the maximum number of lines is reached, a new Master Pick Slip is started even if the maximum number of Orders has not been reached, or vice versa (once the maximum number of Orders has been reached, a new Master Pick slip is started even if the maximum number of lines has not been reached). Master Pick Slips are created until all Order detail lines in the batch have been included.
- Master Pick Slips may be printed before or after shipping documents are printed.
- You can clear Master Pick Slips from the print file that have just been printed upon acceptance of the print job. For example, if Master Pick Slips are printed in multiple Warehouses, after printing Master Pick Slips for Warehouse 01 you would typically choose to purge those but leave the records for Warehouse 02 in the print file.
Here are the steps to print OE35:
- The Printer Selection screen automatically opens. Select the device destination and click OK.
- The Report Parameters screen for OE35 opens.
- The Format field defaults to 'Master Pick Slip Report'. You cannot modify the Format field.
- The Sequence field defaults to 'Warehouse'. You cannot modify the Sequence field.
- If a New Page for each Break is required, select the checkbox.
- The Levels list box displays the various Levels of detail available for the report. The Levels predefined for OE35 include:
- Detail Line
- Product
- BIN Location
- Master P.S. Number
- Ship Via
- Warehouse
- Report Total
- Select the Restrictions that apply to the Report by double clicking on the line in the list box. Restrictions allow you to tailor OE35 to your specific needs. The '>' before a Restriction indicates the Restriction is selected. An '*' before a Restriction means the Restriction is mandatory. OE35 includes the following Restrictions:
- Warehouse - enter or select from the query the Warehouse from which the Sales Orders originate.
- Summary - this restriction allows you to print a summary of the Sales Orders. The following message displays: "Do you want to print a summary of orders?". Select the check box to have a summary printed and then click OK to close the message window.
- Supplier Product Code - this restriction allows you to print the Supplier Product Code. The following message displays: "Do you wish to print Supplier Product Code?". Select the check box to have the Supplier Product Codes printed and click OK to close the message window.
- Warehouse - enter or select from the query the Warehouse from which the Sales Orders originate.
- Select the Range From and To for the report. The Range must match the Sequence selected; if, for example, the Sequence is Warehouse, you must enter Warehouse Number(s) in the To and From fields. Multiple Ranges may be entered.
- In the From field, enter the starting 'code' for the report.
- In the To field, enter the ending 'code' for the report.
- The information displays in the list box below.
- To add additional Ranges, repeat these steps.
Note: To print the entire file (all Warehouse codes), simply tab through the From and To fields. The list box displays *Start and *End in the From and To fields.
- To delete a Range from the list box, double click on the line. The following message displays, "Do you wish to delete this range? Yes/No". Click Yes to delete the range.
- In the From field, enter the starting 'code' for the report.
- When all of the information on the Report Parameters screen is complete, click OK to run the report.
- The Format field defaults to 'Master Pick Slip Report'. You cannot modify the Format field.
- The Report Complete screen opens when the report is generated.
- Click OK to accept the report, click Restart to restart the printing of the report, or Abort to cancel the report. Enter the Acceptance Codes as required.
- Note: Master Pick Slips may be printed before or after shipping documents are printed. Once the Master Pick Slips are printed and you have clicked OK on the Report Complete screen, the following message displays: "Delete Master Picking Slips just printed? Yes/No". Select Yes to clear the Master Pick Slip file. Select No to retain the file.
Here is a sample of the Master Pick Slip report:
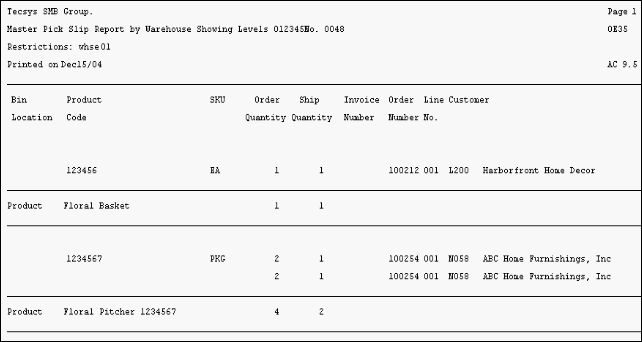
Sample of Master Pick Slip Report (OE35)
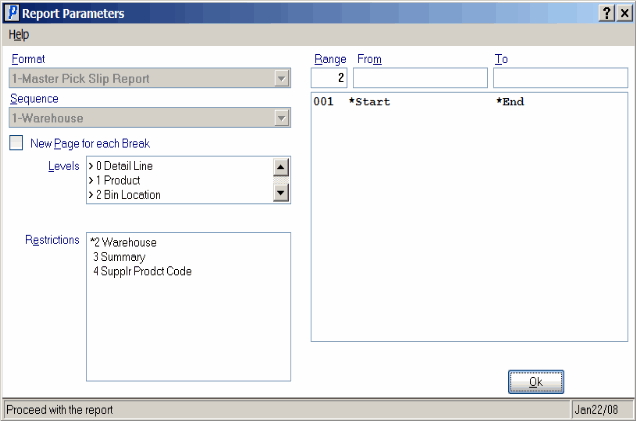
Master Pick Slip Report Parameters screen(OE35)
