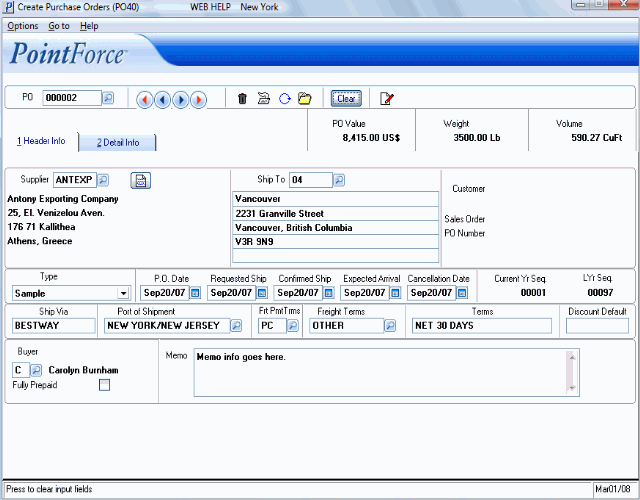
Header Info (PO40)
|
Additional Information Detail Information Folder Generate Dedicated PO Overview Manual Ship To Address Non-Inventory Product Overview PO40 Options Menu |
The Header Info folder in Create Purchase Orders (PO40) allows you to enter the supplier and shipping information for the Purchase Order number entered in the header section. Any default values (purchase prices, etc.) may be overridden at entry time for one-time changes without affecting subsequent purchase orders.
- Purchase orders may be recalled and modified whenever necessary; a revised PO may be printed if desired.
- Purchasing information for all products being ordered must be set up for the supplier being processed. If any elements are not defined (i.e. no Purchasing record), you will have the option to set up the Maintain Purchasing Info (PO13) record for the supplier/product. Once the maintenance is complete, the system returns you to PO40 to continue with the PO.
- If lot/serial number control is being used, lot hold flags can be assigned at time of purchase order creation and can be added or maintained any time prior to receiving or deleting the purchase order detail line.
- If using the dedicated purchase order feature, orders can be recalled via PO40 and comments added or product detail lines modified as required.
The following list defines every field on the Header Info folder of PO40:
- Supplier - enter or select from the query a Supplier code. If a Supplier Message exists for this Supplier, the following message displays: "There are ## messages for this supplier dated mmm/dd/yy." Click OK to close this message.
- To view the Supplier Message(s), select Go To from the top menu and click on Supplier Messages from the dropdown list. The Enter Supplier Messages (PO35) screen opens for you to view or modify the existing Supplier messages. You can also add new Messages on this screen.
Once the Supplier is entered, most of the fields on the Header Info folder automatically populate with information from relevant tables set up within Enterprise. You can modify these fields as required, or you can accept the default information.
- Ship To - the Ship To information automatically updates with the Ship To address for the Warehouse identified in the Default Ship To field in PO11. If this field is blank in PO11, then the Ship To information automatically updates with the Ship To address for the current Warehouse. This information is taken from Maintain Ship To Addresses (PO01). (If there is no Ship To Address for the current Warehouse in PO01, then the "Deflt" Ship To Address information from PO01 displays.)
-
You can manually enter an alternate ship to address for the PO in one of two ways:
- You can simply enter the alternate ship to information in the address fields. When you manually update the fields, the Ship To field automatically displays MANUAL.
- You can enter an M in the Ship To field and then tab to the next field. The Ship To field automatically displays MANUAL.
- You can simply enter the alternate ship to information in the address fields. When you manually update the fields, the Ship To field automatically displays MANUAL.
- In both cases, the address lines allow a maximum of 40 alphanumeric characters to be entered.
-
You can manually enter an alternate ship to address for the PO in one of two ways:
- Customer / Sales Order / PO Number - these three fields automatically display information when the PO is linked to a Sales Order or when the PO is dedicated to a Sales Order from OE30. Note: The PO Number refers to the Customer PO number on the Sales Order.
- Type - the PO Type displays in this field. You can change the Type field using the drop down arrow. There are 4 types of Purchase Orders:
- Stock - the PO is for items for the Warehouse.
- Direct Ship- the PO will be sent directly to the customer. For example, a large department store orders an entire container of merchandise; it may be easier to have the container shipped directly to their Warehouse.
- Customer to Our Whse - the PO is sent to our Warehouse, but the products are specifically for one client. For example, Company ABC has an order for ABC brand light bulbs.
- Sample - the PO is for samples of the product and not for an entire case of the product.
Note: The Type field is used as a selected Restriction in Print Outstanding PO Report (PO80).
- Non-Inventory - the PO is for non-inventory products. Non-inventory products are are items that are for office use only, including cleaning supplies, bathroom and office supplies, etc. Products are flagged as Non-Inventory (NI) in IM13.
- When a supplier flagged in PO11 as 'Exclusively Non-Inventory' is entered in the Supplier field, the Type field defaults to Non-Inventory and becomes unavailable.
- When you set the PO Type to Non-Inventory, you can only access NI type products on the Detail Info folder. In the same way, if you select anything but Non-Inventory, you can only access inventory products on the Detail Info folder.
- You cannot mix inventory and non-inventory products on the same PO.
- When you enter a supplier in the Supplier field that is eligible for both inventory and non-inventory products, you must manually select the Type field.
- You cannot switch to and from inventory and non-inventory types once a detail line is entered on the Detail Info folder.
- Note: Non-Inventory items are supported by the Accellos warehouse management interface.
- When a supplier flagged in PO11 as 'Exclusively Non-Inventory' is entered in the Supplier field, the Type field defaults to Non-Inventory and becomes unavailable.
- PO Date - automatically defaults to the system date, e.g. the date on the bottom right-hand corner of the screen. This date is used to calculate the Requested Ship
date for each PO detail line.
- Requested Ship - is calculated from the system date plus the number of days in the Production Lead Time Days field in PO11. You can change the date in this field as required.
- If you change this date and you have detail lines entered on the PO, a message displays notifying you of the specific dates that are changing. The message asks "How do you want the detail line date(s) to be modified?". You have 3 options:
- Do not modify the detail line dates.
- Recalculate the detail line dates.
- Set the detail line dates to the header dates.
- Select one of these options and click OK.
- Order Management Note: If you select 'Recalculate the detail lines' or 'Set the detail line dates to the header dates', and you have products guaranteed to a Sales Order in Manual Allocation Override (OM30), the Review P.O. Lines Guaranteed to Orders window opens allowing you to remove the guaranteed allocation by selecting the Remove Guarantee check box on each line. If you chose to keep the guarantee, the Receipt Date on the guarantee will be adjusted to reflect the new date.
- Note: Once you have made your 'remove guarantee' selections, you must click Done to complete the process. The Receipt Date in OM30 is automatically updated for all products regardless of whether you have chosen to remove the guarantees or not.
- Caution: If you have selected to remove guarantees and you click the X in the top right corner of the Review P.O. Lines Guaranteed to Orders window, the guarantees will not be removed and the Receipt Date in OM30 will not be updated.
- Note: Once you have made your 'remove guarantee' selections, you must click Done to complete the process. The Receipt Date in OM30 is automatically updated for all products regardless of whether you have chosen to remove the guarantees or not.
- If you change this date and you have detail lines entered on the PO, a message displays notifying you of the specific dates that are changing. The message asks "How do you want the detail line date(s) to be modified?". You have 3 options:
- Confirmed Ship - this field is left blank when a new PO is created. When the Supplier provides the Confirmed Ship date and it is entered here, the Expected Arrival Date is recalculated using the Confirmed Ship date plus the Transit Lead Time Days in PO11.
- When the POs to Print field in Control Company Initialization (CC00/Purchasing) is set to 'With Confirmed Ship Dates' then the PO must have a confirmed ship date entered in order to be printed in Print Purchase Orders (PO42). (FYI: You can print POs without a confirmed ship date in PO42 by entering the PO number in the PO Number to Reprint field on the P.O. Reprints window in PO42.)
- You can print all POs directly from PO40 (with or without a confirmed ship date).
You can change the Confirmed Ship date as required.
- If you change this date and you have detail lines entered on the PO, a message displays notifying you of the specific dates that are changing. The message asks "How do you want the detail line date(s) to be modified?". You have 3 options:
- Do not modify the detail line dates.
- Recalculate the detail line dates.
- Set the detail line dates to the header dates.
- Select one of these options and click OK
.
- Order Management Note: If you select 'Recalculate the detail lines' or 'Set the detail line dates to the header dates', and you have products guaranteed to a Sales Order in Manual Allocation Override (OM30), the Review P.O. Lines Guaranteed to Orders window opens allowing you to remove the guaranteed allocation by selecting the Remove Guarantee check box on each line. If you chose to keep the guarantee, the Receipt Date on the guarantee will be adjusted to reflect the new date.
- Note: Once you have made your 'remove guarantee' selections, you must click Done to complete the process. The Receipt Date in OM30 is automatically updated for all products regardless of whether you have chosen to remove the guarantees or not.
- Caution: If you have selected to remove guarantees and you click the X in the top right corner of the Review P.O. Lines Guaranteed to Orders window, the guarantees will not be removed and the Receipt Date in OM30 will not be updated.
- Note: Once you have made your 'remove guarantee' selections, you must click Done to complete the process. The Receipt Date in OM30 is automatically updated for all products regardless of whether you have chosen to remove the guarantees or not.
- When the POs to Print field in Control Company Initialization (CC00/Purchasing) is set to 'With Confirmed Ship Dates' then the PO must have a confirmed ship date entered in order to be printed in Print Purchase Orders (PO42). (FYI: You can print POs without a confirmed ship date in PO42 by entering the PO number in the PO Number to Reprint field on the P.O. Reprints window in PO42.)
- Expected Arrival - is initially calculated to be the Requested Ship date plus the Transit Lead Time Days from PO11. If a Confirmed Ship date is entered, the Expected Arrival date becomes the Confirmed Ship date plus the Transit Lead Time Days from PO11.
- If this date is changed manually or by a recalculation and you have detail lines entered on the PO, a message displays notifying you of the specific dates that are changing. The message asks "How do you want the detail line date(s) to be modified?". You have 3 options:
- Do not modify the detail line dates.
- Recalculate the detail line dates.
- Set the detail line dates to the header dates.
- Select one of these options and click OK.
- Order Management Note: If you select 'Recalculate the detail lines' or 'Set the detail line dates to the header dates', and you have products guaranteed to a Sales Order in Manual Allocation Override (OM30), the Review P.O. Lines Guaranteed to Orders window opens allowing you to remove the guaranteed allocation by selecting the Remove Guarantee check box on each line. If you chose to keep the guarantee, the Receipt Date on the guarantee will be adjusted to reflect the new date.
- Note: Once you have made your 'remove guarantee' selections, you must click Done to complete the process. The Receipt Date in OM30 is automatically updated for all products regardless of whether you have chosen to remove the guarantees or not.
- Caution: If you have selected to remove guarantees and you click the X in the top right corner of the Review P.O. Lines Guaranteed to Orders window, the guarantees will not be removed and the Receipt Date in OM30 will not be updated.
- Note: Once you have made your 'remove guarantee' selections, you must click Done to complete the process. The Receipt Date in OM30 is automatically updated for all products regardless of whether you have chosen to remove the guarantees or not.
- If this date is changed manually or by a recalculation and you have detail lines entered on the PO, a message displays notifying you of the specific dates that are changing. The message asks "How do you want the detail line date(s) to be modified?". You have 3 options:
- Cancellation Date - is the PO Date plus the Days for Cancellation
from PO11. If the Days for Cancellation from PO11 is left blank, the Cancellation Date field remains blank in PO40.
- Current Yr. Seq - is a sequence order that is reset annually. This number represents the total number of Purchase Orders issued to the Supplier within a year.
- The creation of a PO increases the sequence number, but the deletion of a PO does not decrease the sequence number.
- Last Yr. Seq - represents the total number of Purchase Orders issued to the Supplier last year. For reference purposes, the Current Year Sequence number is rolled over to the prior year as part of the Purchasing Year End process.
- Ship Via - prints on the PO when the PO is faxed, e-mailed or printed to inform the Supplier of the freight-carriers with whom your PO should be shipped. The default for this field is taken from the Ship Via field in PO11. You can change this field on the PO.
- Port of Shipment - prints on the PO when the PO is faxed, e-mailed or printed. The default for this field is taken from the Port of Shipment field in PO11. You can change this field on the PO.
- Freight Payment Terms (Frt Pmt Trms) - prints on the PO when the PO is faxed, e-mailed or printed. The default for this field is taken from the Freight Payment Terms field in PO11. You can change this field on the PO.
- Freight Terms - print on the PO when the PO is faxed, e-mailed or printed. The default for this field is taken from the Freight Terms field in PO11. You can change this field by entering or selecting from the query a new Freight Term code. The Freight Terms are maintained in Maintain Purchasing Tables (PO09).
- Terms - print on the PO when the PO is faxed, e-mailed or printed. The default for this field is taken from the Payment Terms field in PO11. You can change this field by entering new payment terms.
- Discount Default - the Discount Default entered here is applied to each detail line on the PO, overriding any defaults from PO13/Promotion folder. This field is not mandatory and if no value is entered, discounts are based on the values set up in PO13 for each detail line.
- Tip: This field can be updated or changed at any time during the input of a PO. You can set the Discount Default for certain lines and then you can clear or change the value for subsequent lines.
The Discount Default value is expressed as a percentage, and can be a maximum of 11 characters. You can enter the value in one of the following ways:
- Straight Discount: 33
- Fractional Discount: 33.333
- Chain Discount: 30/10/5
- The Fully Prepaid check box is only available when the Receipts Accrual Processing check box is selected in CC00/Purchasing. You select this check box when you know in advance that the Supplier/Vendor requires full payment for the Purchase Order prior to the shipment of the goods. Once the value of the Purchase Order is determined, you then produce a check for the prepayment in AP30.
- When you receive the goods in Print Receiving Register (PO64), the system will check to see whether this check box is selected and will update the Prepaid Inventory GL (set up in CC00/PO) rather than the regular Receipts Accrual GL. Fully prepaid inventory does not update the Receipt Accrual files (APRA, APRD, etc). For more information on Prepayments, see Prepaid Inventory .
- Buyer - enter or select from the query the Buyer code to which this PO is associated. The Buyer Codes available from Maintain Purchasing Tables (PO09/Buyer Codes). The Buyer prints on the PO when the PO is faxed, e-mailed or printed. This is not a mandatory field.
- Memo - enables extra information about the PO to be entered. The information entered here prints on the PO when the PO is faxed, e-mailed or printed. You can enter up to 120 alpha numeric characters of information in the Memo field.
The following table outlines the functionality of the button on the Header Info folder:
| Button Label | Icon | Functionality |
| PO Notes |  |
Opens the Purchase Order Notes screen. Once notes are entered, the
icon changes to indicate that there are existing notes  . . |
PO40/Header Info
