Print Reorder Report (PO20)
The Print Reorder Report (PO20) program prints the Reorder Notification Report, used by the Purchasing Agent when reordering stock. You can print this report in Product sequence or in Supplier/Product sequence. You can also print this report for all Products or you can restrict the report to print only Products that have fallen below their Re-Order Point (ROP).
PO20 includes pricing details and the current Replacement Cost of each Product plus all applicable quantities (ROP, ROQ, On Hand, On Reserve, On Order, and so on). The report includes the Usage to date and the Average Usage for the current year (YTD) and Total Usage and Average Usage for the previous year (LYR).
Note: Usage = Units Sold as updated by Schedule Invoices/Credits (IN43). The system keeps track of how many months each Product has been active for the current year and the previous year. These counters (which are updated by Close Sales Fiscal Period (SA89)) are used in the calculation of Average Usage for YTD and LYR. The calculation is Units Sold (YTD/LYR) divided by No. Months Active (YTD/LYR).
- The Printer Selection screen automatically opens. Select the device destination and click OK.
- The Report Parameters screen for PO20 opens.
- The Format field defaults to 'Reorder Notification'. You cannot modify the Format field.
- In the Sequence field, select one of the following options:
- Commodity Product
- Supplier
- Product
- If a New Page for each Break is required, select the checkbox.
- The Levels list box displays the various Levels of detail available for the report. All Levels are automatically selected in PO20; the '>' before each Level option indicates the Level is selected. Double click on the line to remove the selector. PO20 includes the following Levels:
- Detail Line
- Supplier
- Report
- Select the Restrictions that apply to the Print Reorder Report by double clicking on the line in the list box. Restrictions allow you to tailor PO20 to your specific needs. The '>' before a Restriction indicates the Restriction is selected. Once a Restriction is selected, it can be de-selected but the '>' remains. An '*' before a Restriction means the Restriction is mandatory. PO20 includes the following Restrictions:
- Below ROP - select the check box to report only those Products with stock levels (quantity available plus quantity on purchase order) that have fallen below their reorder point (ROP) established in Maintain Inventory Master (IM13/Warehouse). When the check box is not selected, ALL Products within the specified range are included on the report.
- If reporting a specific warehouse (Restriction 3) in combination with Below ROP (Restriction 1), then the Avail-PO Quantity for the selected warehouse is compared to the ROP for that warehouse.
- If reporting ALL warehouses (Restriction 3 not selected) in combination with ROP (Restriction 1): if Total Avail-PO Quantity (for all warehouses) is below the ROP for the primary warehouse, then the product is reported for all warehouses that stock (or have stocked) that product. This supports a centralized purchasing environment where purchase orders are issued and stock is received into the primary warehouse and subsequently transferred out to the secondary warehouses. You need to know how much is required across all warehouses before a PO is placed.
- If reporting a specific warehouse (Restriction 3) in combination with Below ROP (Restriction 1), then the Avail-PO Quantity for the selected warehouse is compared to the ROP for that warehouse.
- Primary Products - this restriction is only valid when the Sequence is set to 'Supplier'. Select the check box to print only the Products for which a Supplier is flagged as the Primary Supplier. When the check box is not selected, All Products purchased from each Supplier print on the report.
- Warehouse - this restriction applies only to accounts controlling multiple Warehouses. Enter or select from the query the Warehouse for which you want the report. If you do not select this restriction, all Warehouses are included on the report.
- Classification - enter the Class code(s) you want to print. To print multiple Class codes, for example A,B, and C, enter ABC. Only Products with the Class codes entered are printed on the report.
Note: To modify a Restriction once it is set up, reselect the Restriction and make the necessary changes.
- Below ROP - select the check box to report only those Products with stock levels (quantity available plus quantity on purchase order) that have fallen below their reorder point (ROP) established in Maintain Inventory Master (IM13/Warehouse). When the check box is not selected, ALL Products within the specified range are included on the report.
- Select the Range From and To for the report. The Range must match the Sequence selected; for example, you can enter Product codes in the From/To fields if Product is the Sequence selected. Multiple Ranges may be entered.
- In the From field, enter the starting 'code' for the report.
- In the To field, enter the ending 'code' for the report.
- The information displays in the list box below.
- To add additional Ranges, repeat these steps.
Note: To print the entire file (all Sales Rep codes), simply tab through the From and To fields. The list box displays *Start and *End in the From and To fields.
- To delete a Range from the list box, double click on the line. The following message displays, "Do you wish to delete this range? Yes/No". Click Yes to delete the range.
- In the From field, enter the starting 'code' for the report.
- When all of the information on the Report Parameters screen is complete, click OK to run the report.
- The Format field defaults to 'Reorder Notification'. You cannot modify the Format field.
- The Report Complete screen opens when the report is generated. Enter the Acceptance Codes to accept the report (if applicable), click Restart to restart the printing of the report, or click Abort to cancel the report.
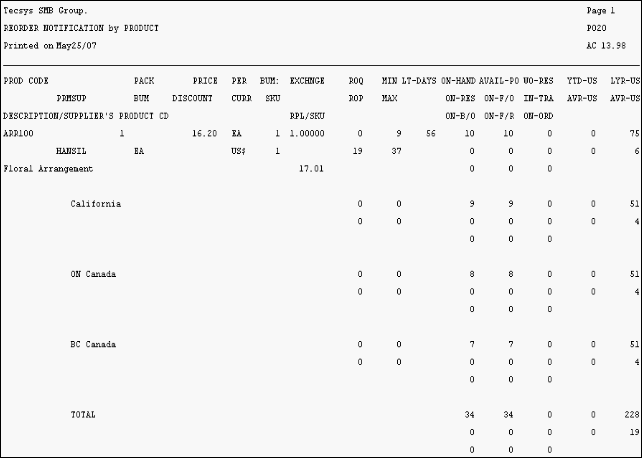
Example of PO20
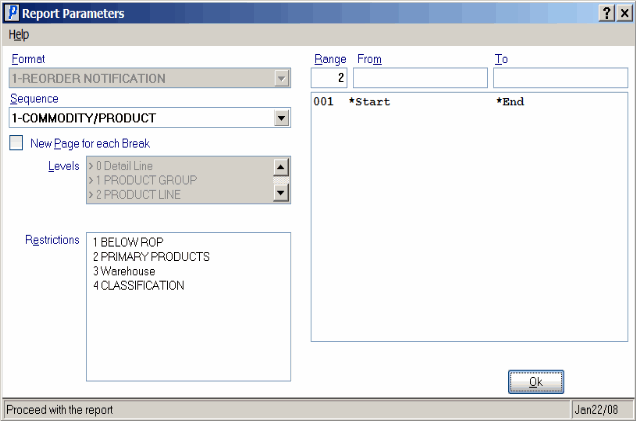
Print Reorder Report (PO20) - Report Parameters screen
