Activate Auto-Print Processor (OE33)
|
Additional Information Auto-Print Orders Overview |
The Activate Auto-Print Processor (OE33) program allows you to automatically print Sales Orders processed through Enter Orders/Quotes (OE30). Once OE33 is activated, OE33 checks the Order queue and when an eligible Order(s) is found, that Order is scheduled and can be printed immediately or on demand, depending on the Processor Mode selected in OE33.
- When you run OE33, you do not need to run Schedule Orders for Printing (OE32) or Print Shipping Documents (OE34).
- OE33 allows you to automatically schedule and print orders as they are processed in OE30 if the Processor Mode is set to 'Automatic' or to select specific orders for printing if the Processor Mode is set to 'Manual'.
Running OE33:
- The Warehouse Selection window automatically opens. Select the Warehouse for which the Orders are to be scheduled/printed and click OK.
- The Schedule/Print Orders window automatically opens once the Warehouse is entered. You can enter multiple criteria on this window. If, however, any of the criteria is found to be false, the sales order(s) will be bypassed. For example, if you select 'CAN' as the Ship Via and 'ATL' as the territory, then only sales orders that incorporate both of these criteria are considered for scheduling and printing in OE33.
There are two folders available:
- Selection Criteria
- Other Criteria
The following criteria are available on the Selection Criteria folder:
- Ship Vias - you can select 'All Ship Vias' using the check box or you can select specific Ship Vias from the 'Enter Ship Via' query. OE33 will only process sales orders that pertain to the selected Ship Via(s). All other sales orders are bypassed by OE33.
- If you select specific Ship Via codes, they are listed in the 'Ship Vias' list box. The 'All Ship Vias' check box is automatically de-selected.
- To delete a Ship Via from the 'Ship Vias' list box, re-enter the Ship Via code in the 'Enter Ship Via Code' field. To remove all selected Ship Via codes from the list box, select the All Ship Vias check box.
- If you select specific Ship Via codes, they are listed in the 'Ship Vias' list box. The 'All Ship Vias' check box is automatically de-selected.
- States/Prov - you can select 'All States/Prov' using the check box or you can select specific States and/or Provinces from the 'Enter State/Prov' query. OE33 will only process sales orders that pertain to the selected States and Provinces. All other sales orders are bypassed by OE33.
- If you select specific State/Prov codes, they are listed in the 'State/Prov' list box. The 'All States/Prov' check box is automatically de-selected.
- Note: OE33 matches the selected criteria to the Ship To on the selected sales order(s).
- If the Ship To is 'Same', the customer's State/Province is used.
- If the Ship To is a Manual Ship To or an alternate Ship To, the State/Province for the entry is used.
- To delete a State/Prov from the States/Prov list box, re-enter the State or Province code in the 'Enter State/Prov' field. To remove all selected State/Province codes from the list box, select the 'All State/Prov' check box.
- If you select specific State/Prov codes, they are listed in the 'State/Prov' list box. The 'All States/Prov' check box is automatically de-selected.
- Sales Orders - enter or select from the query the sales order(s) you want to schedule and print through OE33. As you select individual sales order numbers, they are listed in the 'Sales Order' list box. When a sales order number is entered, all other specific criteria are cleared and the flags are reset to 'All'.
- If the selected Sales Order cannot be scheduled, the following message displays: "This Sales Order cannot be scheduled. OK". Click OK to clear the message and select a different sales order. This message displays under the following conditions:
- The sales order is invalid.
- The sales order has not been released from OE30.
- The sales order is on a shipping document.
- The sales order is not entered for the specified warehouse.
- To delete a sales order from the 'Sales Orders' list box, re-enter the order number in the 'Sales Order' field.
- If the selected Sales Order cannot be scheduled, the following message displays: "This Sales Order cannot be scheduled. OK". Click OK to clear the message and select a different sales order. This message displays under the following conditions:
- Customer - enter or select from the query the customer for which you want to schedule/print sales orders. When a Customer code is entered, all other specific criteria are cleared. The system will only process the sales order(s) for the customer entered here. All other sales orders are bypassed by OE33.
- You can use a 'wild card' to select multiple customers. The wild card indicator must be the last character of the customer code, for example L20* will process sales orders for the customer codes that begin with 'L20'. You cannot enter 'L2*0'
- When you use the Customer restriction, all other restrictions are cleared and the flags are reset to 'All'.
- To delete a Customer code, clear the customer code from the field and then press the TAB key.
- You can use a 'wild card' to select multiple customers. The wild card indicator must be the last character of the customer code, for example L20* will process sales orders for the customer codes that begin with 'L20'. You cannot enter 'L2*0'
- Territories - you can select 'All Territories' using the check box or you can select specific territories from the 'Enter Territory' query. OE33 will only process sales orders that pertain to the selected territories associated with the customer assigned to the order. All other sales orders are bypassed by OE33.
- If you select specific Territory codes, they are listed in the 'Territories' list box. The 'All Territories' check box is automatically de-selected.
- To delete a territory from the Territories list box, re-enter the Territory code in the 'Enter Territory' field. To remove all selected Territory codes from the list box, select the 'All Territories' check box.
- If you select specific Territory codes, they are listed in the 'Territories' list box. The 'All Territories' check box is automatically de-selected.
- Sales Groups - you can select 'All Sales Grps' using the check box or you can select specific sales groups from the 'Enter Sales Grp' query. OE33 will only process ssales orders that pertain to the selected Sales Groups associated with the customer assigned to the order. All other sales orders are bypassed by OE33.
- If you select specific Sales Group codes, they are listed in the 'Sales Groups' list box. The 'All Sales Grps' check box is automatically de-selected.
- To delete a sales group from the Sales Groups list box, re-enter the Sales Group code in the 'Enter Sales Grps' field. To remove all selected Sales Group codes from the list box, select the 'All Sales Grps' check box.
- If you select specific Sales Group codes, they are listed in the 'Sales Groups' list box. The 'All Sales Grps' check box is automatically de-selected.
- Sales Reps - you can select 'All Sales Reps' using the check box or you can select specific sales reps from the 'Enter Sales Rep' query. OE33 will only process sales orders that pertain to the selected Sales Reps. All other sales orders are bypassed by OE33. Note: OE33 matches the selected criteria by:
- Checking the first and second sales reps entered on the Miscellaneous folder of OE30.
- Checking the sales rep for the alternate Ship To address entered on the General folder of OE30 (if applicable)
If the criteria entered match any of these fields, the order(s) is eligible for scheduling and printing.
- If you select specific Sales Rep codes, they are listed in the 'Sales Reps' list box. The 'All Sales Reps' check box is automatically de-selected.
- To delete a sales rep from the Sales Reps list box, re-enter the Sales Rep code in the 'Enter Sales Reps' field. To remove all selected Sales Rep codes from the list box, select the 'All Sales Rep' check box.
- Class of Trades - you can select 'All COTs' using the check box or you can select specific classes of trade from the 'Enter COT' query. OE33 will only process sales orders that pertain to the selected COTs associated with the customer assigned to the order. All other sales orders are bypassed by OE33.
- If you select specific COT codes, they are listed in the 'Class of Trades' list box. The 'All COTs' check box is automatically de-selected.
- To delete a COT from the Class of Trades list box, re-enter the COT code in the 'Enter COT' field. To remove all select COT codes from the list box, select the 'All COT's' check box.
- If you select specific COT codes, they are listed in the 'Class of Trades' list box. The 'All COTs' check box is automatically de-selected.
The following criteria are available on the Other Criteria folder:
- Commodities - you can select 'All Commodities' using the check box or you can select specific commodity codes from the 'Enter Commodity' query. OE33 will only process a sales order if the sales order has a product with a shippable quantity for the selected commodity code(s). Note: Models and Set components are not taken into account. All other sales orders are bypassed by OE33.
- If you select specific Commodity codes, they are listed in the 'Commodities' list box. The 'All Commodities' check box is automatically de-selected.
- To delete a Commodity from the list box, re-enter the Commodity code in the 'Enter Commodity' field. To remove all selected Commodity codes from the list box, select the 'All Commodities' check box.
- If you select specific Commodity codes, they are listed in the 'Commodities' list box. The 'All Commodities' check box is automatically de-selected.
- Products - you can select 'All Products' using the check box or you can select specific product codes from the 'Enter Product' query. OE33 will only process a specific sales order if the sales order has a shippable quantity for the selected product code(s). Note:
Models and Set components are not taken into account. All other sales orders are bypassed by OE33.
- If you select specific Product codes, they are listed in the 'Products' list box. The 'All Products' check box is automatically de-selected.
- To delete a Product from the list box, re-enter the Product code in the 'Enter Product' field. To remove all selected Product codes from the list box, select the 'All Products' check box.
- If you select specific Product codes, they are listed in the 'Products' list box. The 'All Products' check box is automatically de-selected.
- Shippable Value - enter the shippable value for which you want to schedule/print sales orders. The system will only process the sales order(s) if the sales order is equal to or greater than the shippable value entered here. All other sales orders are bypassed by OE33. Note: If you enter a quantity in this field, criteria entered in the Sales Order or Customer fields on the Selection Criteria folder are automatically removed. All other selected criteria are unaffected.
- To delete a 'Shippable Value', delete the text entered in this field or reset the value to 0.00.
- Campaigns - you can select 'All Campaigns' using the check box or you can select specific Campaigns from the 'Enter Campaign' query. OE33 will only process sales orders that pertain to the selected Campaigns. All other sales orders are bypassed by OE33. Note: This option is only available with the purchase of the CRM module.
- If you select specific Campaign codes, they are listed in the 'Campaigns' list box. The 'All Campaigns' check box is automatically de-selected.
- To delete a campaign from the list box, re-enter the Campaign code in the 'Enter Campaign' field. To remover all selected Campaign codes from the list box, select the 'All Campaigns' check box.
- If you select specific Campaign codes, they are listed in the 'Campaigns' list box. The 'All Campaigns' check box is automatically de-selected.
- Trade Shows - you can select 'All Trade Shows' using the check box or you can select specific Trade Shows from the 'Enter Trade Show' query. OE33 will only process sales orders that pertain to the selected Trade Shows. All other sales orders are bypassed by OE33. Note: This option is only available with the purchase of the CRM module.
- If you select specific Trade Show codes, they are listed in the 'Trade Shows' list box. The 'All Trade Shows' check box is automatically de-selected.
- To delete a trade show from the list box, re-enter the Trade Show code in the 'Enter Trade Show' field. To remover all selected Trade Show codes from the list box, select the 'All Trade Shows' check box.
- If you select specific Trade Show codes, they are listed in the 'Trade Shows' list box. The 'All Trade Shows' check box is automatically de-selected.
Once you have entered the criteria on the Schedule/Print Orders window:
- Click Submit to open OE33.
- Click Close to close OE33 without scheduling/printing any Orders.
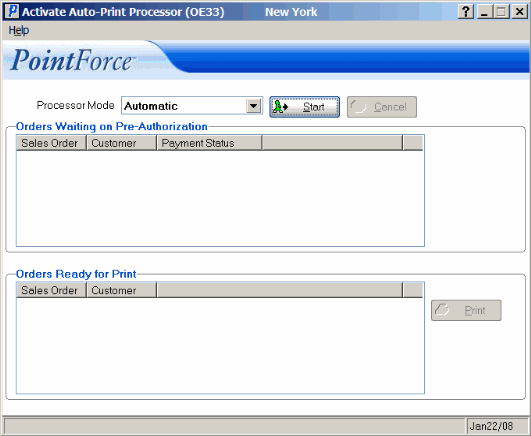
- OE33 can be set to 2 Processor Modes:
- When the Processor Mode is set to Automatic:
- Click Start to begin the auto process.
- The Printer Selection window automatically opens. Select the Printer destination and click OK.
-
All Sales Orders that are ready for scheduling and printing (i.e. have no holds against them) are automatically sent to the selected destination. OE33 continuously monitors the queue for Sales Orders and as new Sales Orders are found, they are automatically scheduled and printed.
- Sales Orders in the queue that are waiting for pre-authorizations appear in the Orders Waiting on Pre-Authorization section. Authorizations can be manually entered in Process EFT Authorizations (AR39) or automatically processed in EFT Authorizations Auto-Processor (AR38).
- There should be no Sales Orders listed in the Orders Ready for Print section, as the Orders are automatically printed when the Processor Mode is set to 'Automatic'.
- Click Cancel to stop processing Orders.
- Click Start to begin the auto process.
- When the Processor Mode is set to Manual:
- Click Start to begin the process. Any orders in the queue are scheduled.
- All Sales Orders that have been successfully scheduled (i.e. have no holds) and are ready for printing display in the Orders Ready for Print section. When Orders appear in this list box, the Print icon activates.
- Click Print to initiate the printing process. By default, the orders are printed by 'Sales Order'. You can also sort and print orders by customer by clicking on the 'Customer' label.
- The Printer Selection window automatically opens. Select the Printer destination and click OK.
- Each Sales Order is automatically sent to the printer destination. The Sales Order number is removed from the 'Orders Ready for Print' list box.
- Print all Sales Orders as required.
- Once the Orders are printed, the Start button is re-enabled. New Orders will not be processed until you click Start.
- Sales Orders in the queue that are waiting for pre-authorizations appear in the Orders Waiting on Pre-Authorization section. Authorizations can be manually entered in AR39 or automatically received in AR38.
- Click Cancel to close OE33.
Note: Acceptance Codes are NOT required once Orders are printed using either mode.
- Click Start to begin the process. Any orders in the queue are scheduled.
- When the Processor Mode is set to Automatic:
Activate Auto-Print Processor (OE33)
