Options folder - Personalize View
The Options folder allows you to control a number of additional settings that affect both the search results and the details pages of your views.The Options folder includes the following elements:
- Display Search Results With - you can set the Search Results page on your view to display details, subtotals, grand totals, or any combination thereof. Valid options include:
- Details Only - only detail lines display in the search results section of the view.
- Details and Subtotals - both detail lines and subtotals display in the search results section.
- Details and Grand Totals - both detail lines and grand totals display in the search results section.
- Details, Subtotals, and Grand Totals - detail lines, subtotals and grand totals display in the search results section.
- Subtotals Only - only the subtotal lines display in the search results section. This option provides summary information only.
- Subtotals and Grand Totals - subtotal and grand total lines displays in the search results section. This option provides summary information only.
- Grand Totals Only - only grand total lines display in the search results section of the view. This option provides summary information only.
The option selected is dependent upon the sort value(s) selected for the view. The sort value(s) are entered on the Sort folder in the Personalization section of PTiT. The sort value that will be used for the subtotal must have the 'Show Subtotal' check box selected (on the Sort folder). When at least one field is identified as a Show Subtotal field, and the search results have at least one math-enabled field, PTiT is able show subtotals.
Here is an example of a view that displays details and subtotals:

- Subtotals disappear from the view when the sort order of the result set is changed by clicking on a given column heading.
- Only physical columns that appear in the Sort tab may be selected to sort on and may be identified as Show Subtotal field (or break columns).
- Subtotals and grand totals are calculated on math-enabled fields only.
- Subtotals and grand totals are not carried over when the view is exported to Excel. You must reset the subtotals and grand totals for the data in Excel.
- Number of Rows per Page - you can define the number of rows per page that display when a search is performed. This option only effects the search results section of the view. The default number of rows per page is set in the User Master view for the user currently logged into PFiT. You can set this value to one of the following: 10, 20, 30, 50, 100, or All records. Selecting the All option will display all of the records as defined by the Maximum Number of Records to Retrieve option.
Here is an example of a search results page set to 30 rows per page:

- Enable Quick Add - this feature allows you to customize the fields that display on the 'create' page of a view. This field works in conjunction with the Details page in the personalization section for the view. When you enable the Quick Add feature on a view:
- The action buttons, 'Submit' and 'Add Details', display on the create page for the view. Note:
The Add Details action only displays if there are additional details for the view. If there are no other details, then this action does not display.
- If the create page for the view currently has a 'Continue' action, then the Continue action button displays instead of the 'Submit' action.
- You can group the fields on the create page into sections.
Here is an example of the create page for a Customer Master (SU13) that has the 'Enable Quick Add' feature set to 'Yes':

Note: In the example above, the Customer Master (SU13) view now has two pages combined into one during the create process. Because all of the mandatory fields have been added to the Key section of the Details page (see below for details on this step), the system will NOT display the details page when a new customer is set up in the Customer Master (SU13). If information that is not mandatory is captured during the create step, you can access all of the fields on the details page by clicking on the 'Add Details' action.
Follow these steps to implement the 'Quick Add' feature for a view:
- Launch the view that you wish to modify.
- Click the Personalize action in the lower right-hand corner of the Search page.
- Go to the Options folder.
- Set the 'Enable Quick Add' field to 'Yes' and then save the view.
- Go to the Details folder (you are still in Personalization).
- From the drop list at the top of this folder, select the 'Key' sub view. (The default value for the drop list is 'Main'.)
- Add the fields required to create a new record for this view. You must ensure that the fields selected are sufficient to make a new, unique, record.
- Save your changes.
- The action buttons, 'Submit' and 'Add Details', display on the create page for the view. Note:
The Add Details action only displays if there are additional details for the view. If there are no other details, then this action does not display.
- Automatically Perform a Search When the Number of Records is Less Than - allows you to set the minimum number of records required for the system to automatically perform a search. By default, a view must have a minimum of 10 records before the results are automatically displayed when the view is launched; if less than 10 records exist for the view, you must click Search before any results display. If you set the minimum number of entries to zero, when you launch the view a search is automatically performed and results are automatically displayed, regardless of the number of records in the database.
- Maximum Number of Records to Retrieve - you can define the number of entries to retrieve for the view. By default, every view returns a maximum of 400 records from the database. You can define this value to be more or less the default value. Here is an example of a view set to return a maximum of 88 records:
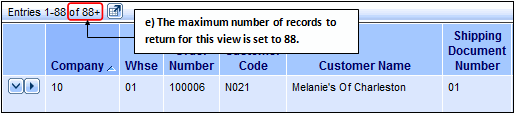
- Note: You can change the value in this field for the current view up to the value entered in the 'Maximum Number of Records to Retrieve' defined in the User Master view for your user ID. If you enter a value that exceeds the value set for your user ID, an error occurs and you cannot save the view.
- Related Resource Group - allows you to assign a predefined resource or resource group to the current view that displays on the Details page as a related link. Caution: This is an advanced feature offered through the Personalization section of PFiT that requires an advanced level of knowledge of the PFiT database. The majority of views in PFiT are already configured with applicable 'Related Resource Groups'. These predefined relationships offered with each view should be suitable for ALL of your needs. If you wish to use this feature, you will require additional training. Please contact your Tecsys SMB Business Consultant for more information.
For information on the functionality of each button on the Options folder in the Personalization section, click here.

