Details folder - Personalize View
|
Index Adding Sections |
The Details folder allows you to add and remove fields as well as add or change Section Descriptions that display on the Record Details page.
The Record Details page consists of 2 distinct sections: Main Context and Main. Depending on your user setup, you may have access to select fields and enter Detail Section Descriptions for both the Main Context and the Main sections. If your user set up allows you to select these sections, a drop list is displayed at the top of the Details folder where you can select these sections, otherwise, this drop list will not be visible and you will only be able to control the appearance of the Main section of the Record Details page. Note: There is also a Key selection available in the drop list. This option is for future use.
- Main Context – fields selected for this section are usually comprised of the key fields from the base table for the selected view, but may contain any field that is listed in the Available Fields list box. The selected fields are displayed at the top portion of the Record Details page.
- Main – fields selected for this section may contain any of the fields listed in the Available Fields list box as well as Detail Section Descriptions. The selected fields and Section Descriptions display below the Main Context fields on the Record Details page.
Note: Fields that have been selected for the Main Context section will not be available for selection for the Main section. Fields that have been selected for the Main section are available for selection when Main Context is selected, however, if the field is selected a message displays indicating that the selected field already exists in the Main section. You can continue to select the field and it will be removed from the Main section of the Show These Fields in This Order list box.
The Details folder contains the following elements:
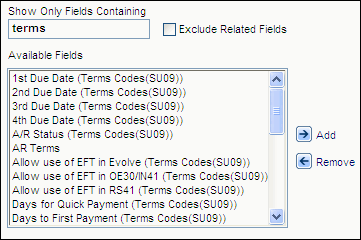
- Show Only Fields Containing - this text box allows you to filter the information displayed in the Available Fields list box. The Available Fields list box has the potential to display hundreds of fields. Enter the text you are looking for in the 'Show Only Fields Containing' text box and the Available Fields list box displays only those fields (and associated table names, if applicable) containing the information entered. For example, if you are personalizing the Customer Master and you enter the word 'terms', all of the fields and table names with the word 'terms' display in the 'Available Fields' list box:
- Exclude Related Fields - select this check box to display the fields that are assigned to the base table for the selected view in the Available Fields list box.
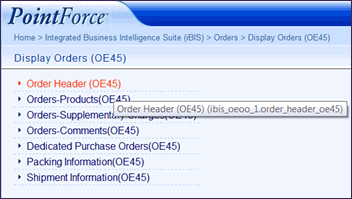
Tip: You can identify the name of base tables for views, created by Tecsys, by hovering over the title of the view on the iTopia menu. Following the example below, if you hover over Order Header(OE45) the description 'Order Header(OE45) (ibis_oeoo.1.order_ header_oe45)' displays. The base table used for this view is ibis_oeoo.1.
- Available Fields - the Available Fields list box includes the criteria data elements that are available for the view. It includes the data elements from the base table and other tables that relate to the current view. Fields that belong to the base table do not display the Description of the table name, however fields from related tables include the related Description table name in brackets beside the field name.
- Once a field is selected from the Available Fields list box, it is removed from this list.
You can add single fields to the Show These Fields in this Order list box by the following methods:
- Double click on the selected field.
- Select the field and click the Add icon
 .
.
You can also move multiple fields to the Show These Fields in this Order list box by either of the following methods:
- You can select groups of fields by holding down your Shift key and selecting a first and last field from the list and then clicking on the Add icon. All fields between the first and last field selected are moved to the Show These Fields list box.
- You can select multiple individual fields by holding down the Ctrl key and using your mouse to select fields (not sequential) and then clicking the Add icon. These individual fields are all moved to the Show These Fields list box.
Note: To place the fields in a particular spot in the Show These Fields list box, highlight the field in the Show These Fields list box that you want the selected field(s) to follow, and when you add the fields, they will be inserted after this highlighted field. Otherwise, the fields being added are added to the bottom of the list of fields in the Show These Fields list box.
- Show These Fields In This Order - only fields in this list box will appear on the Details page of the view, in the order in which they are displayed here. You can also re-order these fields:
- To Move Up a single field, highlight the field and click
 Move Up to move this field up one level. You can also move up a group of fields by using the Shift key to select a group of consecutive fields or the Ctrl key to select several individual fields and then click Move Up.
- To Move Down a single field, highlight the field and click
 Move Down to move this field down one level. You can also move down a group of fields by using the Shift key to select a group of consecutive fields or the Ctrl key to select several individual fields and then click Move Down.
- To Remove a field, highlight the field and click
 Remove to move this field from the 'Show These Fields in This Order' list box back into the 'Available Fields' list box, or double click on the field name and it is automatically returned to the other list box.
- To Move Up a single field, highlight the field and click
When you select a field in the 'Show These Fields in This Order' list box the options below become available:
- Keep With Next - this option is available when a field is selected in the Show These Fields in This Order list box. Select this check box when you want to force a section to appear alongside another section on the Detail Results page of a given view. For step-by-step instruction on rendering detail sections side by side, click here
- This check box also allows you to keep fields side-by-side, similar to the way sections can be kept side-by-side. Select the field that you want to display next to the following field and then select the 'Keep With Next' check box. The following example shows the First Name and Last Name fields together on one line:
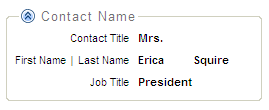
Note: The field labels are separated by the pipe (|) sign.
- This check box also allows you to keep fields side-by-side, similar to the way sections can be kept side-by-side. Select the field that you want to display next to the following field and then select the 'Keep With Next' check box. The following example shows the First Name and Last Name fields together on one line:
- Show Label - this option is available when a field is selected in the Show These Fields in This Order list box. Select this check box to have the Label display for a specific field on the Detail Results page of a given view. By default, this check box is selected.
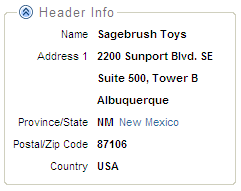
Here is an example of the Details page with the Show Label check box selected:
Here is the same example with the Show Label check box de-selected on the 'Address 2' and 'Address 3' fields:
- Detail Section Description - enter a Section Description for a group of fields. Section Descriptions are used to group the fields entered in the 'Show These Fields in This Order' list box together on the Detail Results page. The Section Description is also used to create Section Hyperlinks on the Detail Results Page. For more information on Section Hyperlinks on the Details Result Page, click here.
- Add Section Title - once the 'Detail Section Description' is entered, click on the 'Add Section Title' action to add the section title or description to the 'Show These Fields in This Order' list box. At least one Section Description must be present when fields have been added to the 'Show These Fields in This Order' list box. Section Descriptions can be removed by double clicking the Section Description or moved by highlighting the Description and using the Move Up or Down arrows as required.
- Note: Section titles or descriptions appear flush to the left of the list box, and all fields that are part of the section appear indented beneath it.
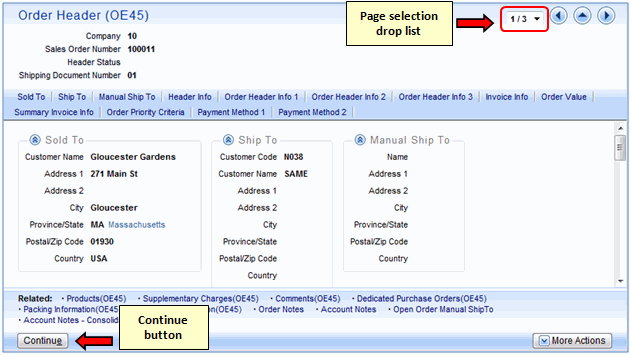
- Display On New Page - this option is only available when you have selected a Section Title in the Show These Fields in This Order list box. Select this check box to display the section on a separate detail page. Note: This option is not available for the first section in the Main sub-view or for any sections in the Main Context and Key sub-views.
- When this checkbox is selected, a page selection drop list and a Continue button are added to the Detail page. You access a specific additional detail page by selecting a page from the drop list, or by clicking on the Continue button.
- Here is an example of a Detail page with a page selection drop list and a Continue button:
- When this checkbox is selected, a page selection drop list and a Continue button are added to the Detail page. You access a specific additional detail page by selecting a page from the drop list, or by clicking on the Continue button.
- For more information on Adding Sections, click here .
For information on the functionality of each button on the Details folder in the Personalization section, click here.

