Allowing Other Users to use Your Views: 'Grant' Permission
Views created and stored in an individual user's My Views folder can be accessed by other users following one of these techniques:
- Granting permissions to the view to the 'system' user who subsequently delegates the view through roles, permissions resources and resource groups. For more information on creating a system view, click here.
- Granting permissions to the view directly to an individual user or group of users within a role.
This topic will walk you through a the second option. This procedure enables users to grant other users access to views owned by them using the 'grant' permission option.
- In order to allow other users to use your views, the views must be flagged with the 'grant' permission.
- The 'grant' permission is a very powerful tool. In fact, when iTopia is installed at your site, none of the views are flagged with the 'grant' permission.
- At this point, we must point out the potential risks associated with this option. The 'grant' permission:
- Allows users to permit access to system views assigned to them through an assigned role as well as their own user defined views to other users.
- Allows users to delete permissions to views assigned to Roles.
- Allows users to limit access to views assigned to Roles.
- Allows users to permit access to system views assigned to them through an assigned role as well as their own user defined views to other users.
We will elaborate on these points using an example. Let's say that USER105 is assigned the ibis_ar and ibis_in roles. These roles are only assigned the Customize, Execute, Export and Read permissions. USER105 now wants to be able to allow other users access to a view he/she is planning to create from the AR Payment History (AR61) view which is currently assigned to the ibis_ar role.
You, as the 'system' user, assign the 'grant' permission to the AR Payment History (AR61) view (ibis_inihp.ar61_ar_payment_hist) for USER105 through the view itself, or through the Role Master-Permission view. In this example, the 'grant' permission is added through the AR Payment History (AR61) view:
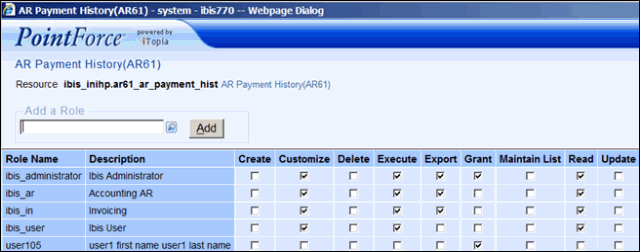
USER105 is given Grant permission to the AR61 view
When USER105 opens the AR Payment History (AR61) view, the Permission button is now available on the Personalization panels. The AR Payment History permission page contains all of the roles that currently have access to the AR Payment History (AR61) view. Note: Only the permissions that are assigned to the role allocated to the user are displayed in this view. Even though USER105 is only assigned to the ibis_ar, ibis_ap and user105 roles, all roles that contain permissions to the current view are accessible. (Caution: Be sure to read the bullet points below the screen capture before assigning the 'grant' permission to any view.) Here is an example of the AR Payment History (AR61) permission view for USER105:

AR61 permission view for USER105
With access to this view, it is now possible for USER105 to:
-
Completely remove access to this view for any or all of the roles listed in this panel by clicking on the ‘X’ to the right of the listed permissions.
- Remove specified permissions to any of the listed Roles by deselecting any of the check boxes next to the Role Name.
- Add permissions to any of the listed Roles by selecting any of the un-checked check boxes next to the Role Name. Note: The user can only select the permissions currently assigned to the Role allotted to them.
- Pass the view to users that do not normally have access to the view. For example, let’s say user USERABC is only assigned the 'ibis_ap' role. USER105 can add the Role 'userabc' to the AR Payment History view with any permission currently listed. USERABC can now access this view whether they should be seeing the information or not.
We will now explain how to use the 'grant' permission to share your views with other users.
About Permissions:
Permissions for views can be added or removed by the 'system' user though the view itself or through the Role Master-Permission view. The end result is the same regardless of which method is used to manage the permissions assigned to a view.
- Note: Predefined 'tecsys' views may contain various permissions depending on whether the view is maintainable or not. Each view assigned to a user/role (through the User Master–Role view) utilizes permissions including: Customize, Execute, Export, and Read.
Assigning the 'grant' permission through an individual view:
This section demonstrates how to add the 'grant' permission to an existing Role or individual user that currently has access to a view with the Customize, Export, Read and Execute permissions through the view itself.
Let's demonstrate this using an example. Our example is based on the following assumptions:
- USER105 is assigned the ibis_ar Role. This user wishes to be able to create a new user view from the AR Payment History (AR61) view (which is allocated to the ibis_ar role) and allow USERABC to access the new view.
- We are logged in as the 'system' user.
The following are the steps required to add the 'grant' permission to the AR61 view for USER105:
- As the 'system' user, open the AR61 view.
- Click the Personalize button.
- When the Personalization pages are open, click the Permissions button. A new window opens. This window displays all Roles that are currently allowed access to the view and the permissions assigned to each Role for the view.
- If you wish to allow all users assigned the ibis_ar role the use of the 'grant' permission then select the 'grant' check box on the row for the Role ibis_ar and then click Save or Submit on this window.
- If you only wish to allow a single user the 'grant' permission to the view:
- Enter the user's role name in the 'Add a Role' field. In this case we will enter USER105.
- Click Add.
- Select the 'grant' check box in the row for USER105.
- Click Save or Submit on this window.
Note: Since the user in this example already owns the predefined permissions (Customize, Execute, Export, Read) to the view through the ibis_ar role it is not necessary to select them again. All other permissions (Create, Delete, Maintain List and Update) only pertain to views that are CRUD (Create, Read, Update, Delete) enabled.
Here is an example of the permissions window for the AR61 view:
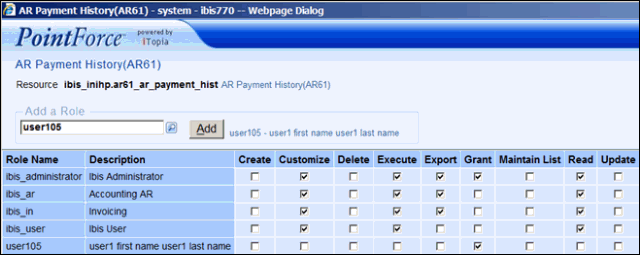
USER105 is given Grant permission to the AR61 view
Once the 'grant' permission is added to a view, the Permission button is available to the user on the Personalization panels for the current view.
To continue with our example, we need to log off as the 'system' user and log into iTopia as USER105.
In order for USER105 to give access to the AR61 view to USERABC, USER105 must follow these steps:
- Open the AR Payment History (AR61) view.
- Make the necessary changes to the current view through personalization and save the user view using the Save As button on the Personalization pages.
- Once you enter a new title for the view in the 'New Title' field, click Save on the Save View As window to return to the Personalization pages or click Submit to save the view and open the search page of the new view. In this example, we will click Submit to save the new view.
- Click the Personalize button on the new view (which is USER105's personalized version of the AR61 view).
- Click the Permissions button on the personalization pages. A new window opens. Note: When a view is saved with a new name, only the Role Name for the user that created the view displays in this window. Only the permissions allotted to the user displayed for the current view can be passed to other users.
- Enter the name of the user you wish to enable access to the view and click Add. In this case, USER105 wants USERABC to have access to the view.
- Select the permissions you wish the user to own for this view. At the very least, you must select the Execute and Read permissions so that the user can open and view the data. Note: It is NOT advisable to give the user the Customize permission as this will enable the user to change the view. If the user changes the view and saves it using the Save or Submit buttons on the Personalization pages (as opposed to using the Save As option) they may no longer view the data in the format you created until the view is 'Restored'. In addition, if the user does save the view using the Save or Submit buttons, you will not be able to delete the view until the view is Restored.
- Click Submit or Save to update the window.
- Enter the name of the user you wish to enable access to the view and click Add. In this case, USER105 wants USERABC to have access to the view.
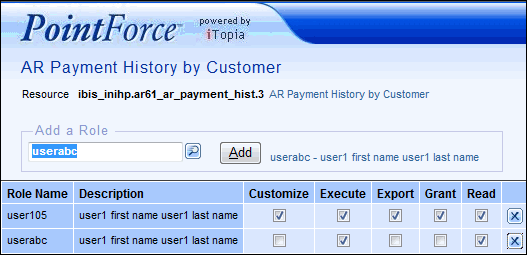
AR61 permission view that includes USER105 and USERABC
- USERABC can now open the AR61 view.
- Note: Even though USERABC now has the ability to open and examine the data in this view, the view will not be available from USERABC's iBIS menu. You must provide the name of the view to the user, and the user can then enter the name of the view in the Search field and select either Go or Search
to open the view.
- If you have given the user the 'Customize' permission for the view, then they can save the view as a different name and it will display in their My Views folder. If, however, you make changes to the original view and the user keeps displaying the view that now exists in their My Views folder, they will not see the changes.

