Creating a New System View
|
Index Create a New System View Add Permissions to new View Create new Resource Group & Add Permissions Add new Individual Resource to a Resource Grp Add new Resource Grp to Existing iBIS Resource Grp |
This topic will guide you through the process of creating a new System view and all of the steps that are required to allow that view to be accessed by others through your iTopia menu system.
- System views can only be created by the 'system' user. The views created by the system user can be viewed by all users who have the proper permissions (Operations) for the resource.
When you want to create a new System view, there are a number of steps that you need to take in order to allow users permission to see the view and in order to add that view to the menu system. Here are a list of steps that are required:
- Create a new system view from an existing view (Individual Resource).
- Add permissions to the new view for specific roles or individual users.
- Create a new Group Resource to contain the new view and add permissions to the new resource group. Note: You can skip this step if the Group Resource you are putting the new view into already exists.
- Add the new Individual Resource to a Resource Group.
- Add the new Resource Group to an existing iBIS Resource Group. This step is optional if the Individual Resource has been added to a pre-existing Resource Group.
The details of each step are outlined below (you can also click on the link associated with each step to go directly to the details for that step). Through each step we are going to walk through an example that:
- Creates a new system view called 'AR Totals by Customer' that is available from the 'Customer Invoice Views' folder on the main Integrated Business Intelligence Suite (iBIS) menu.
- Gives permission to the 'ibis_in' role and to the individual user, 'user10', to access this new view.
1. Create a New System View from an Individual Resource (Existing View):
- Signed on as the system user, open the existing view that will serve as the base for the new system view. In our example, we will be using the Invoice History-Header (IN45) view as that base for our new system view.
- In order to create the new view, we will make changes to the existing view. Click on Personalize in the bottom right hand corner of the view and then make the changes to the Search Criteria, Search Results, Sort and/or Details folders. We will not outline the details of the changes being made to this view in this topic.
- With the changes made, click on the Save As button found in the bottom right hand corner of the Personalization section and save the view with a new name. There are two fields on the 'Save View As' page that we must enter information into:
- New Title - enter a new title for the view. In this case, we will enter AR Totals by Customer
. The title displays at the top of the view as well as on the iBIS menu system when the view is assigned to a Group Resource.
- New View Name - enter a new view name. The view name is the resource name that is used when you assign the Individual Resource to a Group Resource. The view name displays when you hover over the title of the view.
-
Note: When you are renaming an existing view, we recommend that you only change the information after the table name. This makes it easier to find views that were created using the same tables. In our example, the table name is ibis_inih. The new name we have assigned to this view is ibis_inih.ar_tot_by_cust. (Notice also that the text after the table name is separated by underscores. If you do not enter the underscores yourself, they are automatically inserted once the view is saved.)

Save View As
- New Title - enter a new title for the view. In this case, we will enter AR Totals by Customer
. The title displays at the top of the view as well as on the iBIS menu system when the view is assigned to a Group Resource.
- Click on the Submit button. This returns you to the Search Criteria/Results Grid page.
- The view is now available in the system user's My Views folder. At this point, only the system user has access to the view.
2. Add Permissions (Operations) to a View:
- Signed on as the system user, open the new view AR Totals by Customer. This view is found under the My Views folder.
- Click on Personalize in the bottom right hand corner of the view. When the Personalization page opens, click on the Permissions button (found on the bottom right side of the window).
- On the Permissions page for the 'AR Totals by Customer' view, the title, resource and roles that currently have access to the view display. You will notice that the only role that currently has access to the view is the system user.
- In order to allow other users access to this new view, we must add roles and then select operations for each role. To add roles to the new view:
- In the Add a Role field, enter or select from the lookup a Role and then click Add. Continue this step until all of the roles that require access to this view have been added. Following our example, we will add the role ibis_in which is assigned to users and an individual user user10.
- Next we must select the check boxes for the appropriate Operations that are required for each role. Following our example, we will give the 'Execute' and 'Read' operations to both roles.
- In the Add a Role field, enter or select from the lookup a Role and then click Add. Continue this step until all of the roles that require access to this view have been added. Following our example, we will add the role ibis_in which is assigned to users and an individual user user10.
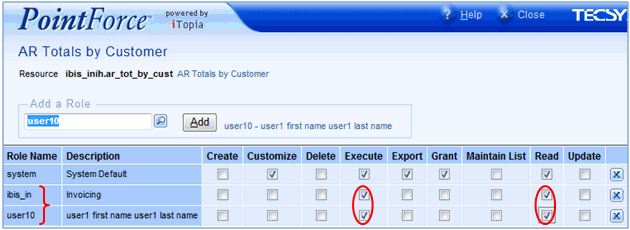
Permissions: Adding Roles and Operations to a View
- Now that the roles and operations are assigned to the new view, click Submit to save the changes. Note: Even though you have not yet added the view to the iBIS menu system, this view can still be accessed by the users assigned to the ibis_in role as well as the individual user user10
. These users can access the view by entering the title or the resource name in the Search field when an iTopia session is opened.
- Click Submit on the Personalization page. You are then returned to the Search Criteria page of the new view.
- You can leave the new view open, or you can close it. We will close the new system view.
3. Create a New Resource Group & Add Permissions:
The information in this section guides you through the process of creating a new Resource Group and adding the 'Execute' operation to the assigned Roles for the Resource Group, thereby allowing access to the Resource Group. Note: If you are planning on using an existing Resource Group to put your new system views in, there is no need to create a new Resource Group.
Following our example, we will create a new Resource Group for our new system view, the 'AR Totals by Customer' view.
- Resource Groups are used to group like Individual and/or Group Resources. Resource Groups are displayed on the iBIS menu system as folders. We will begin by creating a new Resource Group that will be used to group other relative resources.
- Signed on as the system user, open the Resource Master view by:
- Entering resource in the Search field and then clicking Go.
OR - Selecting 'Resource Master' from Master Tables menu found under the User Management System (UMS) on the main menu.
- Entering resource in the Search field and then clicking Go.
- Click Create on the Resource Master view (found in the bottom right corner of the view).
- A new page opens that contains the 'Resource Master' field and a Continue button. Enter the new Resource Group name.
- Note: When assigning Resource Group names, we recommend that you prefix the name with your client code. Prefixing Resource Group names with your client code differentiates the Resource Groups that you create for your company from those created by PointForce Enterprise. After your client code, seperate the text with underscores.
In this example, we will name the Resource Group pfient_cust_inv_views where pfient is the client code and cust_inv_views is the remainder of the resource name.
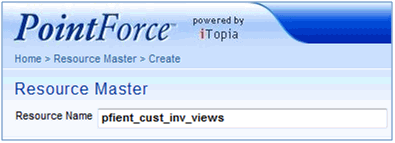
Creating a new Resource Group
- When the Resource Name is entered, click the Continue button.
- The Resource Master/Details page opens. You only need to enter information into the 'Overridden Description' and 'Type' fields:
- Overridden Description - enter the actual name of the Resource Group. The text entered here displays on the iBIS menu for the Resource Group. In this example, we will enter Custom Invoice Views
- Type - the Type indicates the kind of Resource being created. Click on the drop down list arrow and then select 'Resource Group' as the Type.
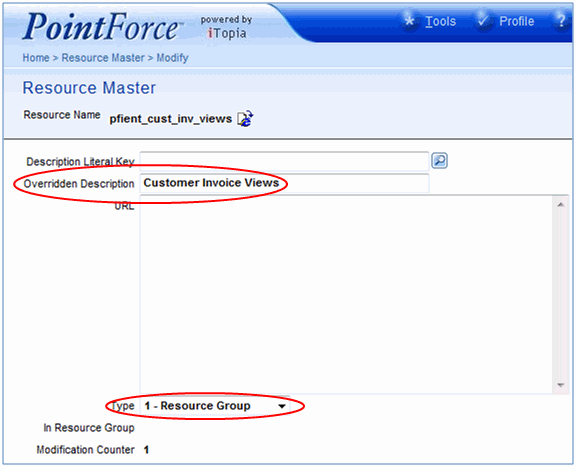
New Resource Description and Resource Type
- Overridden Description - enter the actual name of the Resource Group. The text entered here displays on the iBIS menu for the Resource Group. In this example, we will enter Custom Invoice Views
- Click Submit.
- You are returned to the first Resource Master page that contains the Resource Name and Continue button. Close the Resource Master.
- Now we will add the Execute operation (permission) to the Resource Group for the roles that we want to have access to this Resource Group from the iBIS menu. We will begin by opening the Role Master-Permission view:
- Enter permission in the Search field and then click Go.
OR - Select 'Role Master-Permission' from Master Tables menu found under the User Management System (UMS) on the main menu.
- Enter permission in the Search field and then click Go.
- Click Create on the Role Master-Permission view (found in the bottom right corner of the view).
- A new Role Master-Permissions page opens. There are 3 blank fields on this page:
- Role Name - enter or select from the lookup the Role Name that you want to have access to the Resource Group. In this case, we want the ibis_in and user10 roles to have access to the Resource Group. Note: You can only enter one Role name at a time. If you have multiple Roles to enter, you should use the Edit with Excel functionality.
- Resource Name - enter or select from the lookup the Resource Group to which the Role Name will have access. In our example, the Resource Group we want to give access to is the 'prient_cust_inv_views'.
- Operation Name - enter or select from the lookup the Operation Name that the Role Name is granted for the Resource Group. We will enter 'Execute' in this field. Note: This is the only operation required for Resource Groups because users only need to open the resource to access the Individual Resources contained within the Group.
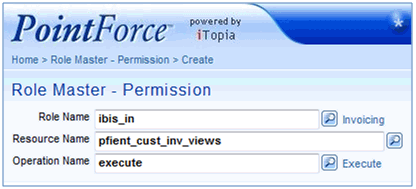
Role Master-Permission: Adding a Role/Operation to a Resource Group
- Role Name - enter or select from the lookup the Role Name that you want to have access to the Resource Group. In this case, we want the ibis_in and user10 roles to have access to the Resource Group. Note: You can only enter one Role name at a time. If you have multiple Roles to enter, you should use the Edit with Excel functionality.
- Click Submit.
- Continue to enter all Role Names and then click Submit until all of the Roles are updated to the Resource Name and Operation.
- Once all of the information is added, close the Role Master-Permission view.
4. Add the new Individual Resource to a Resource Group (existing):
Once you have created your new view (Individual Resource), you must assign it to an existing Resource Group in order for the view to be available on the iBIS menu.
- Signed on as the system user, open the Resource Master-Group Item view by:
- Entering resource_group in the Search field and then clicking Go.
OR - Selecting 'Resource Master-Group Item' from Master Tables menu found under the User Management System (UMS) on the main menu.
- Entering resource_group in the Search field and then clicking Go.
- Click Create on the Resource Master-Group Item view (found in the bottom right corner of the view).
- A new Resource Master-Group Item view opens. There are 2 blank fields:
- Parent Resource Name - enter or select from the lookup the Resource Group name you want to be the Parent resource. This is the folder that will contain the Individual Resource(s) and/or other Resource Groups. In this case, we will enter the Resource Group that we created in step 3: the 'Customer Invoice Views' with the resource name of pfient_cust_inv_views.
- Child Resource Name - enter or select from the lookup the Resource Name (Individual or Group) that you want to appear under the Parent Resource Name. In this case, we will enter the Resource Name that we assigned to the new view in step 1: the 'AR Totals by Customer' with the resource name of ibis_inih.ar_tot_by_cust.
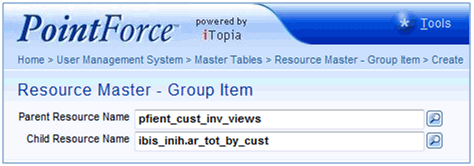
Adding an Individual Resource to a Group Resource
- Parent Resource Name - enter or select from the lookup the Resource Group name you want to be the Parent resource. This is the folder that will contain the Individual Resource(s) and/or other Resource Groups. In this case, we will enter the Resource Group that we created in step 3: the 'Customer Invoice Views' with the resource name of pfient_cust_inv_views.
- Click Continue.
- A second Resource Master-Group Item page displays. This page contains 2 fields that require input:
- Sequence - enter the sequence number in which you wish the Child Resource to be displayed within the Parent Resource. If this is a new Group Resource (Parent Resource), the sequence number defaults to 1. As subsequent Child Resources are added to the Parent Resource, the sequence number automatically increases. Once several Child Resources are added to a Parent Resource, you can re-sequence the children as required.
- Launch Mode - select from the drop down list the desired Launch Mode. The Launch Mode controls how the view is launched in the browser when the view is selected. The default Launch Mode is '3-As Specified by User'. This option defaults to the Launch Mode set by the user's browser settings, but can be overridden by selecting either '1-In Same Window' or '2-In Separate Window'. In this case, we will leave the default setting.
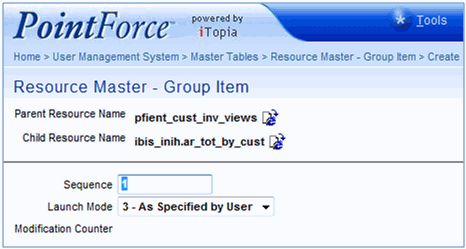
Selecting a Sequence and Launch Mode
- Sequence - enter the sequence number in which you wish the Child Resource to be displayed within the Parent Resource. If this is a new Group Resource (Parent Resource), the sequence number defaults to 1. As subsequent Child Resources are added to the Parent Resource, the sequence number automatically increases. Once several Child Resources are added to a Parent Resource, you can re-sequence the children as required.
- When the information is entered, click Submit.
- You are returned to the Resource Master-Group Item page that contains the Parent and Child Resource Name fields. At this point you can continue to add Child Resources to the Parent Resource or close the Resource Master-Group Item view. We will close the Resource Master-Group Item view.
5. Add the New Resource Group to an Existing Resource Group:
New Resource Groups can be assigned to other existing Resource Groups in order for the group to be available on the iBIS menu. New Resource Groups can be assigned directly to the iBIS home menu Resource Group (ibis_home_menu) or to any other existing Resource Group.
-
We are working with a new Resource Group. If the Resource Group you are working with is a pre-existing resource, then there is no need to continue with this step as the resource is already linked into the iBIS menu system.
This step will add our new Group Resource to the main iBIS menu. Note: You can add Group Resources to any other existing Group Resource within the iBIS menu system.
- Signed on as the system user, open the Resource Master-Group Item view by:
- Entering resource_group in the Search field and then clicking Go.
OR - Selecting 'Resource Master-Group Item' from Master Tables menu found under the User Management System (UMS) on the main menu.
- Entering resource_group in the Search field and then clicking Go.
- Click Create on the Resource Master-Group Item view (found in the bottom right corner of the view).
- A new Resource Master-Group Item view opens. There are 2 blank fields:
- Parent Resource Name - enter or select from the lookup the Resource Group name you want to be the Parent resource. This is the folder that will contain the Individual Resource(s) and/or other Resource Groups. In this case, we will enter the iBIS home menu ibis_home_menu Resource Group, which is the resource for the iBIS menu.
- Child Resource Name - enter or select from the lookup the Resource Name (Individual or Group) that you want to appear under the Parent Resource Name. In this case, we will enter the Group Resource name that was previously entered as the Parent Resource in step 4: the 'Customer Invoice View' with the resource name of prient_cust_inv_views.

Adding a new Group Resource to the main IBIS menu (also a Group Resource)
- Click Continue.
- A second Resource Master-Group Item page displays. This page contains 2 fields that require input:
- Sequence - enter the sequence number in which you wish the Child Resource to be displayed within the Parent Resource. If this is a new Group Resource (Parent Resource), the sequence number defaults to 1. As subsequent Child Resources are added to the Parent Resource, the sequence number automatically increases. Once several Child Resources are added to a Parent Resource, you can re-sequence the children as required.
- Because we are adding a Child Resource to a Parent Resource that contains several other Resources, the sequence number is not equal to 1. In this case, we will not change the sequence number. This means that our new resource (prient_cust_inv_view) will be placed in the last position within the Parent Resource (ibis_home_menu).
- Launch Mode - select from the drop down list the desired Launch Mode. The Launch Mode controls how the view is launched in the browser when the view is selected. The default Launch Mode is '3-As Specified by User'. This option defaults to the Launch Mode selected by the user's browser settings, but can be overridden by selecting either '1-In Same Window' or 2-In Separate Window'. In this case, we will leave the default setting.
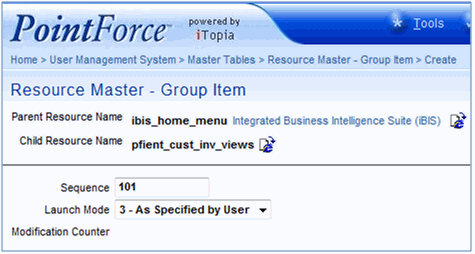
Selecting a Sequence and Launch Mode
- Sequence - enter the sequence number in which you wish the Child Resource to be displayed within the Parent Resource. If this is a new Group Resource (Parent Resource), the sequence number defaults to 1. As subsequent Child Resources are added to the Parent Resource, the sequence number automatically increases. Once several Child Resources are added to a Parent Resource, you can re-sequence the children as required.
- When the information is entered, click Submit.
- You are returned to the Resource Master-Group Item page that contains the Parent and Child Resource Name fields. At this point you can continue to add Child Resources to the Parent Resource or close the Resource Master-Group Item view. We will close the Resource Master-Group Item view.
- To test that our new Group Resource is on the iBIS menu, we will sign on as user10. When we select the iBIS menu, we can see that our Group Resource Customer Invoice Views displays on the menu:
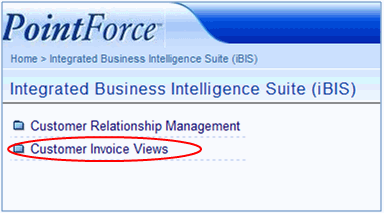
iBIS Menu for user10
- When we open this Group Resource, we can see that our new system view AR Totals by Customer displays:
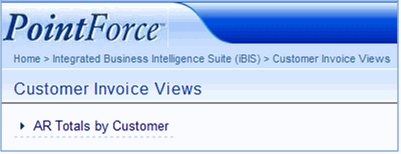
New System View
- Parent Resource Name - enter or select from the lookup the Resource Group name you want to be the Parent resource. This is the folder that will contain the Individual Resource(s) and/or other Resource Groups. In this case, we will enter the iBIS home menu ibis_home_menu Resource Group, which is the resource for the iBIS menu.

