Creating Roles, Assigning Resources to a Role and Adding Roles to Users
The information contained in this topic guides you through the process of creating a new role, assigning resources and permissions to the role, and finally assigning the Role to a user.
- The purpose of a "Role" in iTopia is to define job functions, with associated authority and responsibilities, within the context of an organization.
- Roles contain individual and/or group resources that are assigned various operations (permissions).
- The Roles are then assigned Users.
- Creating a new Role:
- Signed on as the system user, open the Role Master view by:
- Entering role in the Search field and then clicking Go.
OR - Selecting 'Role Master' from the Master Tables menu found under the User Management System (UMS) on the main menu.
- Entering role in the Search field and then clicking Go.
- Click the Create button (found at the bottom right corner of the view).
- A new Role Master page opens. This page only contains the 'Role Name' field and a Continue button.
- Role Name - enter the new Role Name. We recommend that Role Names include your client code followed by a short description of the role. We will enter pfient_ord_only, where 'pfient' is the client code and 'ord_only' (orders only) is the role.
Roles created by TECSYS all begin with 'ibis'. Creating Roles that begin with your client code will enable you to differentiate the Role names.
Note: Even though it is not necessary to separate each group of text for the Role Name with an underscore, it is recommended.
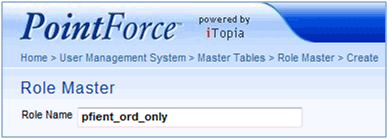
Role Master - Role Name field
- Role Name - enter the new Role Name. We recommend that Role Names include your client code followed by a short description of the role. We will enter pfient_ord_only, where 'pfient' is the client code and 'ord_only' (orders only) is the role.
- Click the Continue button.
- A new Role Master page displays. This page contains a Description field that allows you to enter a description of the Role you are creating. In this case, we will enter 'Orders Only'.
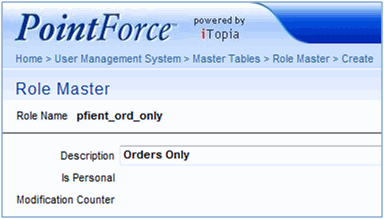
Role Master - Description field
- Click Submit.
- The Role Master page with the Role Name field and the Continue button displays. You can continue to add new roles, or if you are finished creating roles, click the Go to Search Page icon
 at the top right of the page to return to the Role Master Search Criteria/Results grid view. We are going to click on the
icon.
at the top right of the page to return to the Role Master Search Criteria/Results grid view. We are going to click on the
icon.
- When the Role Master Search Criteria/Results grid displays, the Role(s) that you have just created display in the grid. We can see the 'pfient_ord_only' role that we just created.
Once the Role is created, the next step is to assign resources to the role.
- Signed on as the system user, open the Role Master view by:
- Assigning Resources/Permissions to a Role:
Now that we have created a role, we need to add resources to the role to define the views that this role has access to. When the role is assigned to a user, that user will have access to these views (resources).
The function of adding Resources to a Role requires that you are familiar with the following:
- Resources that contain Related Resources. For more information, click here.
- Resources that are Group Resources and resources that are Individual Resources. For more information, click here.
- Resources that are Parent Resources and the associated Child Resources of the Parent Resource. For more information, click here.
Adding resources to a role can be done from either the:
- Role Master view
OR - Role Master–Permission
Using either method will accomplish the same results. However, there are some differences when adding resources to roles using these two methods:
Role Master Role Master-Permission Can add a maximum of 800 Resources. Can add an infinite number of Resources. Can automatically add "Related Resources". "Related Resources" must be added manually. Does not have access to Edit with Excel functionality. Can use Edit with Excel to copy Resources from one Role to another. Can delete resources one at a time. Can delete multiple resources at one time. Can add/remove multiple Operations (permissions) for a single resource on the same page through check box selection. Can add multiple Operations (permissions) for a single resource through Edit with Excel.
Can also remove multiple Operations though the results grid.Operations for the resources are automatically selected as per the original Operations assigned to the resource. Operations are manually entered and updated for each resource when using the Create action to add Resources and Permissions to a Role, however multiple Operations can be added to a resource through the Edit with Excel feature. - Assigning Resources (permissions) through the Role Master View
- From the Search Critera/Results grid of the Role Master, click the 'Use Record as Criteria for Action' icon
 to the left of the Role name that we just created, 'pfient_ord_only'.
- From the drop list, select Permissions.
- A new Role Master page displays. If this is a new Role, then no roles display in the grid area.
- In the Add a Resource field, you can:
- Manually enter the resource you want to add to this role.
- Click on the lookup icon to search and select a resource from the Resource Master that displays when the lookup is invoked.
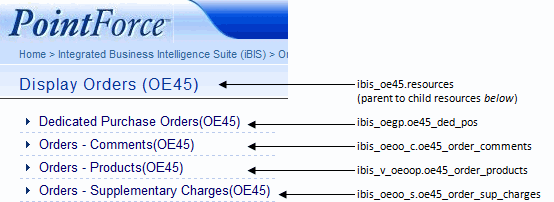
In this case, we want the role to contain the resources that apply to Display Orders (OE45). Here is a screen shot of the Display Orders (OE45) menu and associated resource names:
- Manually enter the resource you want to add to this role.
- Click the Add button.
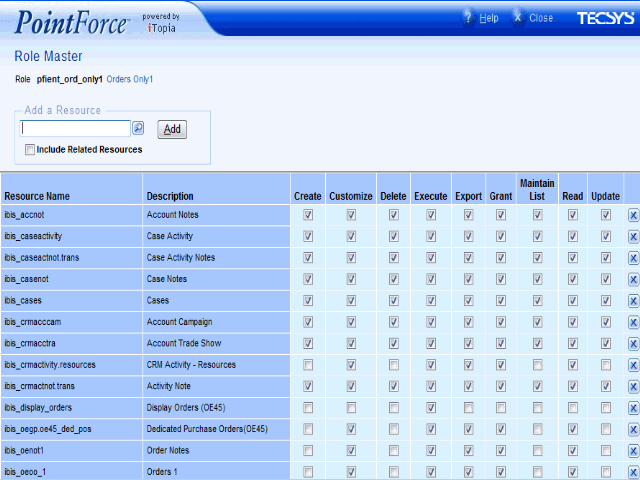
- Once you click the Add action button the Resource you entered plus all of the Related Resources display in the grid. Here is an example of the resources that are added following our example:
You can enter any one of these resources in the Add a Resource field, and when you select the 'Include Related Resources' check box, all of the resources that are related are automatically included when the Add button is clicked. We will enter the resource for the Dedicated Purchase Orders (OE45) resource, ibis_oegp.oe45_ded_pos, and then we will click on the 'Include Related Resources' check box.
- From the Search Critera/Results grid of the Role Master, click the 'Use Record as Criteria for Action' icon
- Resources that contain Related Resources. For more information, click here.
Adding Resources to a Role
- Resource Name - displays the resource names to be added to the current role.
- Description - displays a description of each resource.
- Permissions - Create, Customize, Delete, Execute, Export, Grant, Maintain List, Read and Update. The system picks up the permissions that were originally assigned to the resources are automatically selected. Note: You can modify the permission selections. The permission assigned to each resources only affect the current Role.
- Delete - there is a 'Delete' icon
 at the end of each row. When you click on this icon, the Resource is removed.
- Assigning Resources (permissions) through the Role Master–Permission View
The Role Master-Permission view is used to maintain the resources and the permissions assigned to the resources for a selected role.
There are two means of adding resources and permissions to a role though the Role Master–Permission view.
- One at a time using the Create action button.
- Searching for existing role(s) and using Edit with Excel to copy multiple resources and permissions to the new role.
Both methods are discussed in this topic.
i) Using the 'Create' to add a Resource to a Role:
- Signed on as the system user, open the Role Master-Permission view by:
- Entering permission in the Search field and then clicking Go.
OR - Selecting 'Role Master-Permission' from the Master Tables menu found under the User Management System (UMS) on the main menu.
- Entering permission in the Search field and then clicking Go.
- Click the Create button, found at the bottom right corner of the view.
- A new Role Master–Permission page opens that contains three fields and a Submit button.
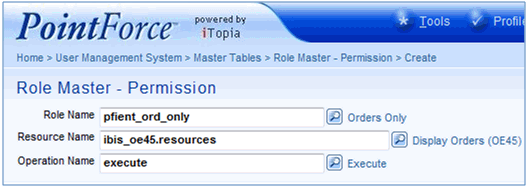
- Role Name - enter or select from the lookup the Role Name that the resource and operation names are to be assigned. In this case, we will enter pfient_ord_only.
- Resource Name - enter or select from the lookup the Resource Name that is to be assigned to the role. In this case, we will enter ibis_oe45.resources.
- Operation Name - enter or select from the lookup the Operation that is to be assigned to the resource. In this case, the resource entered is a Group Resource so only the 'execute' Operation is required. Note: When you add a resource that is an Individual Resource you must, at the very least, add the 'read' and 'execute' Operations to enable the user assigned the role the ability to open and view the resource.
- Role Name - enter or select from the lookup the Role Name that the resource and operation names are to be assigned. In this case, we will enter pfient_ord_only.
Add Resources and Operations to a Role
- Click Submit to update the record.
- Once the record is updated you can continue entering Resource and Operation names for the Role. Once all of the resources and operations are added, you can close the Role Master–Permission view.
ii) Using 'Edit with Excel' to add Resources to a Role:Note: If you are planning on using the Edit with Excel functionality, your Microsoft Excel and Internet Explorer browser must be configured properly. For more information on configuring Excel and your browser, click here. For more Information on using the Edit with Excel functionality click here.
- Signed on as the system user, open the Role Master-Permission view by:
- Entering permission in the Search field and then clicking Go.
OR - Selecting 'Role Master-Permission' from the Master Tables menu found under the User Management System (UMS) on the main menu.
- Entering permission in the Search field and then clicking Go.
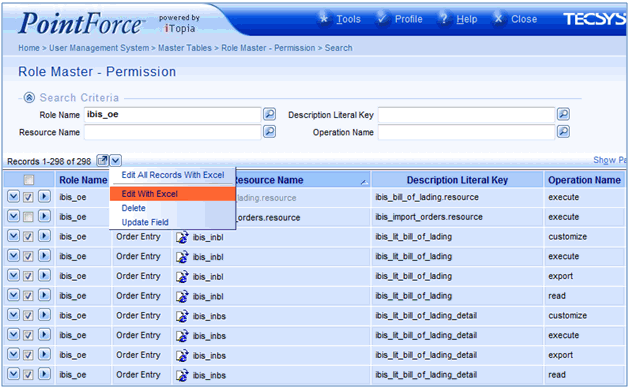
- Enter the Role Name that you want to use as a base to add resources to the new Role in the 'Role Name' field in the Search Criteria section. In this case, we will enter ibis_oe
.
- Click the Search button to display the resources contained in the role.
- At this point you can either:
- Click the Use Selected Records as Criteria for Action icon , and then select the 'Edit All Record With Excel' option to add all of the resources and permissions to the role.
- Select individual Resources and Permissions from the list in the Results grid, click the Use Selected Records as Criteria for Action icon , and then select 'Edit with Excel' from the drop list to only add the selected records to a role.
- Click the Use Selected Records as Criteria for Action icon
- In this case, we only want to add the resources and all of the permissions for the 'Bill of Ladings' views so we will select:
- 'ibis_bill_of_lading.resource' - a Group Resource that is also a Child Resource of the 'ibis_order_menu'.
- 'ibis_inbl' - an Individual Resource.
- 'ibis_inbs' - an Individual Resource.
- 'ibis_order_menu' - the Parent Resource for the Child Resource 'ibis_bill_of_lading.resource'. Note: Selecting this resource will ensure that the views will display on the Order menu found on the iBIS menu system. If you require more information on Parent/Child resources, click here.
- Select the 'Edit with Excel' option from the 'Use Selected Records as Criteria for Action' icon .
-
The following list identifies all of the elements in the grid:
Once you have completed adding all of the required resources for the Role, click the Submit button at the bottom left of the page. You are returned to the Role Master Search Criteria/Results grid.
Using Edit with Excel with the Role Master-Permission view
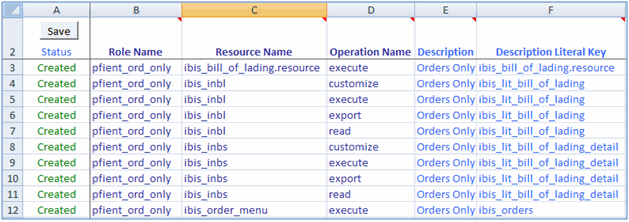
- Once the selected records are transferred to Excel, you can now change the Role Name field to reflect the new role that the resources and permission are to be applied. We will change the Role Name column to our new Role name, pfient_ord_only.
- Click Save on the Excel spreadsheet to save the changes.
Excel Spreadsheet with new Role
- Close Excel without saving the changes.
- The Role Master–Permission view displays the following message: "The data was modified using an external source. Please redo the search to view the latest changes."
- Enter the new Role name in the Role Name field in the Search Criteria section and click Search. In this case, we will enter pfient_ord_only. The records that were selected from the 'ibis_oe' Role are now applied to the 'pfient_ord_only' Role.
- Assigning Roles to Users
- Signed on as the system user, open the User Master-Role view by:
- Entering user_role in the Search field and then clicking Go.
OR - Selecting 'User Master-Role' from the Master Tables menu found under the User Management System (UMS) on the main menu.
- Entering user_role in the Search field and then clicking Go.
- Click the Create button (found at the bottom right corner of the view).
- A new User Master–Role page opens with the 'User Name' and 'Role Name' fields as well as a Submit button.
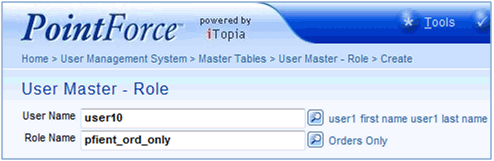
- User Name - enter or select from the lookup the User Name that the Role Name is to be applied. In this case, we will enter user10.
- Role Name - enter or select from the lookup the Role Name that you are applying to the User Name. In this case, we will enter pfient_ord_only.
Add a new Role to a User
- User Name - enter or select from the lookup the User Name that the Role Name is to be applied. In this case, we will enter user10.
- Click Submit.
- The User Master-Role view remains open. You can continue to enter roles for the User or close the User Master–Role view. In this case, we will close the User Master-Role view.
- Signed on as the system user, open the User Master-Role view by:
- Verifying the Role is applied to the User
Let's review what we have done: we have added resources and permissions to the role that was assigned to the User through both the Role Master and the Role Master–Permissions views. Now all of the resources that were applied from both methods display when the user logs into the iTopia system.
To recap:
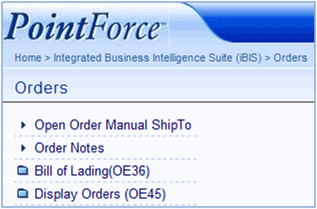
- We created a new Role, 'pfient_ord_only'.
- The Display Orders (OE45) resource was assigned to the Role 'pfient_ord_only' though the Role Master view. In the same step, the 'Open Order Manual Ship To' and the 'Order Notes' resources were also added to the role.
- The Bill of Lading (OE36) resource was assigned to the same Role, 'pfient_ord_only', through the 'Edit with Excel' option in the Role Master–Permission view.
- The 'pfient_ord_only' role was assigned to 'user10' in the User Master-Role view.
When user10 logs into iTopia and accesses the 'Order' menu, the user will have access to the Bill of Lading (OE36) resource, the Display Orders (OE45) resource, the Open Order Manual Ship To view and the Order Notes view:
User10 with 'pfient_ord_only' Role applied
- We created a new Role, 'pfient_ord_only'.
Now that we have created a Role and added Resources and Permissions to the Role, we need to assign the Role to a User. This is done through the User Master-Role view.

