Crystal Report Tree
The Crystal Report Tree window is used to create the Crystal Report Tree by selecting Parent and Child Group/Report (IDs).The following list defines every field on the Crystal Report Tree:
- Parent Group - enter or select from the query a Parent Group. The Parent Group must be a valid Group created in the Crystal Report Groups window.
- Child Group/Report - the entry in this field is dependent upon the 'Type' field:
- If the Type is set to 'Report', then you must enter or select from the query a record that was created in the Crystal Report Files window.
- If the Type is set to 'Group', then you must enter or select form the query a record that was created in the Crystal Report Groups window.
- If the Type is set to 'Report', then you must enter or select from the query a record that was created in the Crystal Report Files window.
- Type - select a Type from the drop down list. Valid options include:
- Report
- Group
- Display Sort - enter a value in this field that determines where the Child Group displays under the Parent Group. The Display Sort also determines how the tree is displayed on the Crystal Report (CR01) panel.
Tip: Do not enter consecutive numbers for the Display Sort. For example, use 10, 15, and 20 and so on. This allows you to insert additional reports or groups into your existing structure at a later time.
To close the window, click the ‘X’ in the upper right corner.
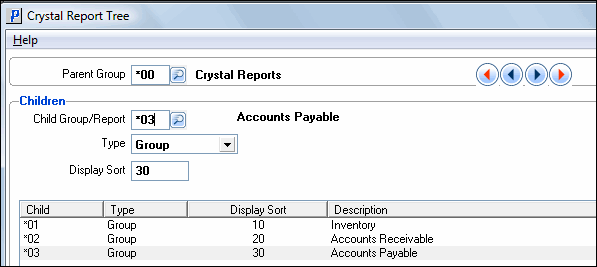
The following is an example of a report tree that has one Parent with 3 Children (sub-folders) and each Child has two reports. The first stage is to set up the main folder and the sub-folder (Parent and one Child):
- Select a Parent ID. In this case we have selected '00'.
- Select "Group" as the Type and then enter or select the first Child ID.
- Enter a sort number.
Repeat these steps for the next 2 Children using the same Parent. Once you have completed attaching all the Children to the current Parent click Update. Here is an example of the Crystal Report Tree with the Parent (*00) and the three Children (*01, *02, *03):
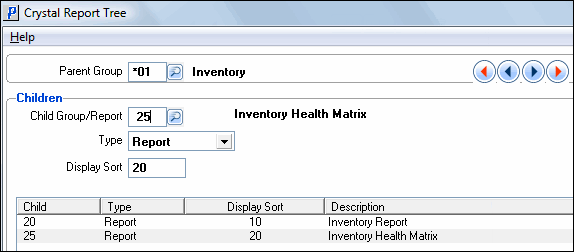
This next stage will add reports to each Child or sub-folder:
- In the Parent field enter the first Child ID.
- Select "Report" as the Type and then enter or select the first Report ID that will be listed within this folder.
- Enter a sort number.
Repeat these steps for the next report for the current Child. Once all the reports have been attached to the current Child, click Start and then repeat the process for the other two Children.
The following table outlines the functionality of each button on the Crystal Report Tree:
| Button Label | Icon | Functionality |
| Submit |  |
Saves the current record and displays it in the list box. |
| Delete |  |
Deletes the current record. |
| Clear | Clears all of the input fields allowing you to enter a new record. | |
| Delete All |  |
Deletes the current Parent Group and all associated Children. |
Crystal Report Tree panel
