Cstmr Not Bought Since Report (SU17)
The Cstmr Not Bought Since Report (SU17) program prints a listing of all customers who have not bought since a specified date with an option to flag the listed customers for deletion once the report is accepted.To run SU17:
- The Printer Selection screen automatically opens. Select the device destination and click OK.
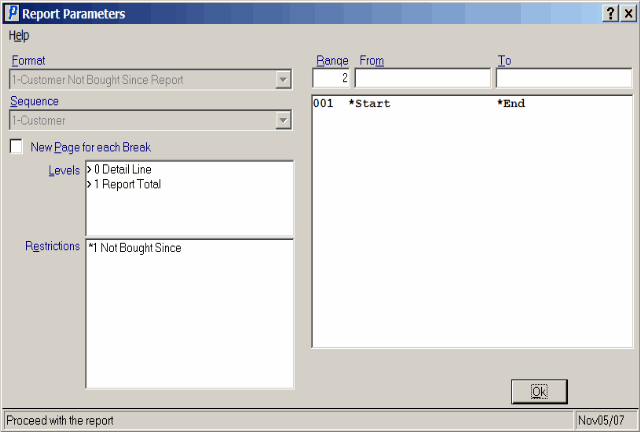
- The Report Parameters window for SU17 opens.
- The Format defaults to 'Customer Not Bought Since Report' and cannot be changed.
- The Sequence defaults to 'Customer' and cannot be changed.
- If a New Page for each Break is required, select the check box.
- The Levels list box displays the various Levels of detail available for the report. All Levels are automatically selected in SU17; the '>' before each Level option indicates the Level is selected. The levels that display is dependent on the Sequence selected and can be modified.
- Select the Restrictions that apply to the Report by double clicking on the line in the list box. Restrictions allow you to tailor SU17 to your specific needs. The '>' before a Restriction indicates the Restriction is selected. An '*' before a Restriction means the Restriction is mandatory. SU17 includes the following Restrictions:
- Not Bought Since - opens the 'Not Bought Since' window. In the 'Not Bought Since Date' field enter or select from the query a valid date. The date entered here will cause the report to print only information for customers who have a date of last sale on or prior to the specified date. Note: If you do not enter a date, the current date is used by the system.
Note: To modify a Restriction once it is set up, reselect the Restriction and make the necessary changes.
- Select the Range From and To for the report. The Range must match the Sequence selected. Multiple Ranges may be entered.
- In the From field, enter the starting 'code' for the report.
- In the To field, enter the ending 'code' for the report.
- The information displays in the list box below.
- To add additional Ranges, repeat these steps.
Note: To print the entire file (all records in the selected sequence), simply tab through the From and To fields. The list box displays *Start and *End in the From and To fields.
- To delete a Range from the list box, double click on the line. The following message displays, "Do you wish to delete this range? Yes/No". Click Yes to delete the range.
- In the From field, enter the starting 'code' for the report.
- When all of the information on the Report Parameters screen is complete, click OK to run the report.
- The Format defaults to 'Customer Not Bought Since Report' and cannot be changed.
- The Report Complete screen opens when the report is generated. Enter the Acceptance Codes to accept the report (if applicable), click OK to complete the printing of the report, or click Abort to cancel the report.
Note: Once the acceptance codes are entered the message ‘Do you wish to Automatically Flag the Printed Customers for deletion? Yes/No’ displays.
- Select Yes to flag all listed customer for deletion in Maintain Customer Master (SU13) or select No to close the message without updating the status of the listed customers.
Here is an example of the SU17 report:
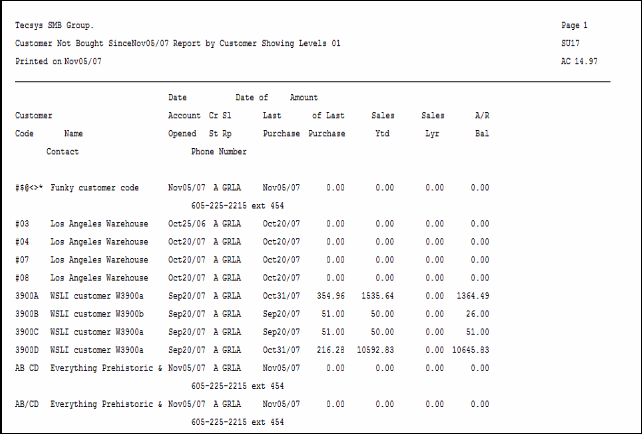
Customer Not Bought Since-example
Here is the Report Parameters window for SU17:
Cstmr Not Bought Since (SU17)
