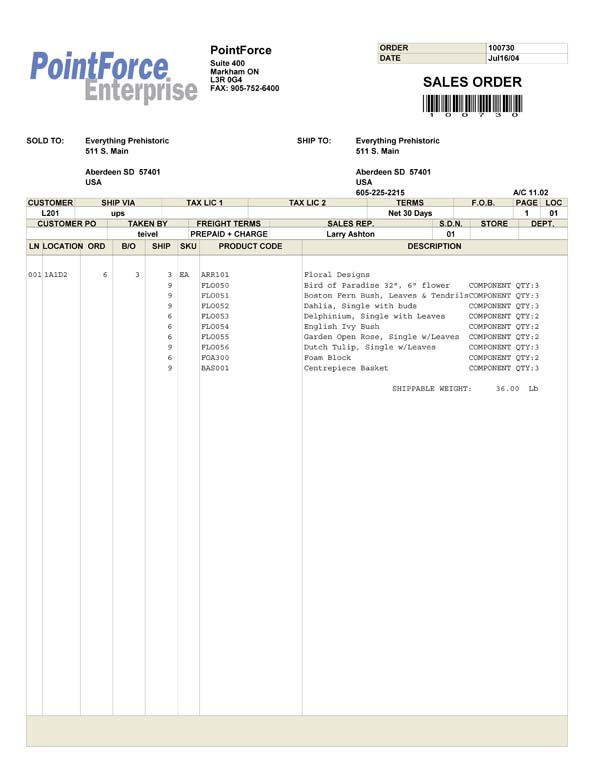
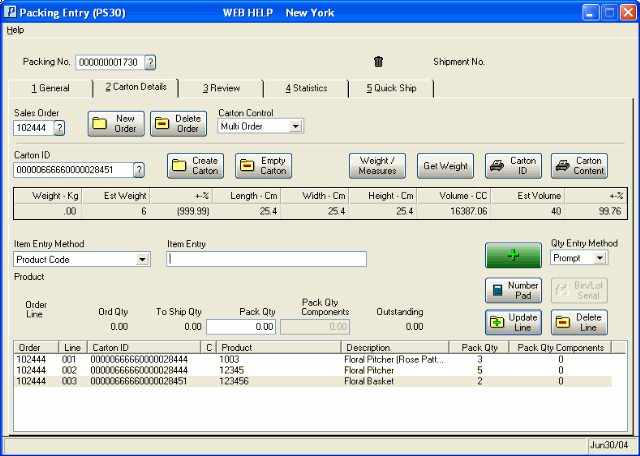
Carton Details (PS30)
The Carton Details folder controls the packing of the Sales Orders in Packing Entry (PS30).
- Add the Sales Order number:
- If this is the first Sales Order for the Packing Session, scan or enter a Sales Order number in the Sales Order field or the Item Entry field.
-
TIP: To expedite data entry, the Item Entry field can be used to enter the Packing Number, Sales Order number, Carton ID or Item code. Packers can remain in the Item Entry field and Packing Station automatically places the Packing Number, Sales Order, Carton ID and Item in their respective fields. The cursor automatically defaults to the Item Entry field. For more details on the Item Entry sequence flow, click here.
Note: The first Sales Order entered in Packing Entry (PS30) establishes the Criteria for the Packing Session. All subsequent Sales Orders for the current session must match the Criteria of this order. Any Sales Orders that do not match the Criteria will be rejected.
- If this is a subsequent Sales Order:
- Click New Order to clear the Sales Order field and scan or enter the new Sales Order number in the Sales Order field.
OR
- Scan or enter the new Sales Order Number in the Item Entry
field.
Note: If Carton Control is set to Single Order, the Carton ID field is cleared when a subsequent Sales Order is entered. You must select a new Carton ID. If Carton Control is set to Multi Order, the last Carton ID remains in the Carton ID field. You can continue to pack in existing Cartons.
- Click New Order to clear the Sales Order field and scan or enter the new Sales Order number in the Sales Order field.
- If this is the first Sales Order for the Packing Session, scan or enter a Sales Order number in the Sales Order field or the Item Entry field.
- Once the Sales Order number is entered, your Packing Number is automatically assigned to this Packing Session. The Packing Number field is in the Header section.
- A Carton ID is required prior to entering items into the Carton. There are 3 ways you can assign a Carton ID:
- Click Create Carton to assign a new system generated Carton ID.
OR
- Scan or enter the existing Carton ID from the Item Entry field. You can print Carton ID labels in Generate/Print Carton ID Labels (PS20).
OR
- In the Carton ID field, scan, enter or select from the Query list the existing Carton ID.
Note: Once the Carton ID field is populated, the Carton Detail grid located below the Carton ID field, automatically populates with the following fields of information if a 'Default Box Type' is set up in Company Control Initialization (CC00/Packing Station):
- Length
- Width
- Height
- Volume
- Click Create Carton to assign a new system generated Carton ID.
- To pack a Carton, ensure you toggle to the Adding Item to Carton
 icon.
icon.
- To unpack or empty a Carton, toggle to the Removing Items from Carton
 icon. For details on unpacking a Carton, click here.
- To unpack or empty a Carton, toggle to the Removing Items from Carton
- Scan or enter the item(s) to be packed.
- The following list of products types have unique packing rules. Click on the following links for additional information:
- Bin/Lot/Serial controlled products
- Models
- Assembled Sets
- The following list of products types have unique packing rules. Click on the following links for additional information:
-
The Item Entry Method field indicates the way in which Packing Station is set up to receive this information. The default Item Entry Method setting is determined by the Packer ID defined in Maintain Packing Station Tables (PS09/Packer Identification).
- You can change the default Item Entry Method, depending on your set up in PS09/Packer Identification. If your Packer ID has 'Locked' selected for the Item Entry Method, then you require a Supervisor override to change this field.
- The Item Entry field updates with each scan or entry. The Quantity Entry Method field determines the way in which the entered quantities are updated:
- When the Quantity Entry Method field is set to Auto
, the detail line in the list box updates with each scan of the item.
- When the Quantity Entry Method field is set to Prompt, the cursor moves to the Pack Quantity field and you enter the total number of items packed. To update the list box, click on Update Line or press Enter.
A 'touch screen' Number Pad option exists. Using your screen, touch the Number Pad
 icon, enter the Pack Quantity and touch Enter/Update.
- You can change the default Quantity Entry Method, depending on your set up in PS09/Packer Identification. If your Packer ID has 'Locked' selected for the Quantity Entry Method, then you require a Supervisor override to change this field.
- When the Quantity Entry Method field is set to Auto
, the detail line in the list box updates with each scan of the item.
- The Pack Quantity increases as the Outstanding Quantity decreases.
- You can over-pack or under-pack items, depending on availability. These exceptions appear as Issues on the Review folder. Depending on the circumstances, Packing Sessions with Issues can be Closed for shipment.
- Note: You can over-pack items beyond the Ship Quantity up to a maximum of the Sales Order's Outstanding Quantity on the current line. Over-packing beyond the Outstanding Quantity requires the entry of a new detail line; an 'A' line is created automatically.
- You can over-pack or under-pack items, depending on availability. These exceptions appear as Issues on the Review folder. Depending on the circumstances, Packing Sessions with Issues can be Closed for shipment.
- When all of the items are packed into the Carton(s), review the detail lines in the list box. If a line in the list box is not correct, you can either:
- Highlight the line and modify the Pack Quantity, and then click Update Line.
OR
- Highlight the line and click on Delete Line in order to remove the item(s) from the Carton. You can now repack the item(s) as required.
- Highlight the line and modify the Pack Quantity, and then click Update Line.
- If you are tracking Carton Weights and/or Measurements, once each Carton is packed, you have two options:
- The Get Weight button is available when a Scale is defined in PS11. Ensure the Carton ID appears in the 'Carton ID' field and set the actual Carton on the scale. The weight is read in the Measuring Units defined in Maintain Sales Office/Warehouse Number (CC96). The Weight field in the grid flashes yellow twice to confirm the weight. For more details on messages receive from the Scale, see Troubleshooting Carton Details.
- If you are tracking Carton Weight and Measurements, click on Weights/Measures. The Carton Weights and Measurements screen automatically opens for the current Carton ID. For details on using the Carton Weights and Measures screen, click here.
- The Get Weight button is available when a Scale is defined in PS11. Ensure the Carton ID appears in the 'Carton ID' field and set the actual Carton on the scale. The weight is read in the Measuring Units defined in Maintain Sales Office/Warehouse Number (CC96). The Weight field in the grid flashes yellow twice to confirm the weight. For more details on messages receive from the Scale, see Troubleshooting Carton Details.
- If you require additional Cartons, repeat from step 3 until your Sales Order is completely packed.
- If you need to empty a Carton: scan, enter or select from the Query list the Carton ID to be 'deleted' and click Empty Carton. For more details on unpacking a Carton, click here.
- If you have additional Sales Orders, repeat from step 1 until all Sales Orders are packed.
- If you need to delete an entire Sales Order: scan, enter or select from the Query list the Sales Order to be deleted and click Delete Order. For more details on deleting a Sales Order, click here.
- When all of the Sales Orders are packed, click on the Review folder to Hold or Close the pack.
Carton Details - Adding Items