Future Contract Notices (CT52)
The Future Contract Notices (CT52) program allows you to print Future Contracts.To run CT52:
- The Printer Selection screen automatically opens. Select the device destination and click OK.
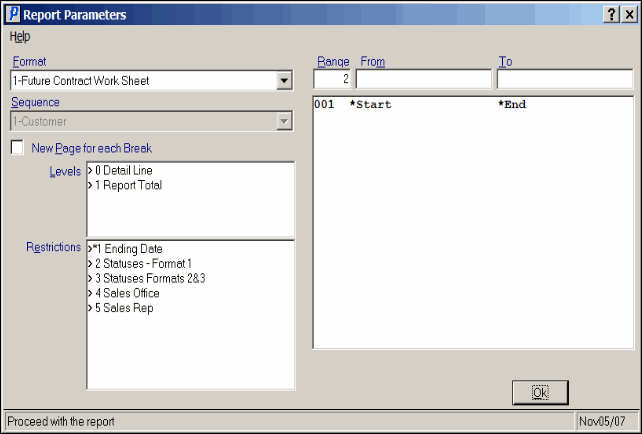
- The Report Parameters screen for CT52 opens.
- Select a Format from the drop down list. The following options are valid:
- Future Contract Work Sheet - this format is intended to be a tool to print any contracts expiring up to the 'Ending Date' entered. The report prints the current set up of all billing sequences, leaving space to write in any new rates or other changes to take effect if the contract is renewed. When this format is accepted, future billing records are generated for each contract printed, which may then be reviewed or edited in the 'Future Contract' folder of Contract Maintenance (CT30). Once future data is generated for a piece of equipment, you cannot reprint that equipment on this report.
- Future Contracts-Edit List - this format can be used to review all future billing information entered in the 'Future Contract' folder of CT30 for contracts expiring up to the 'Ending Date' entered.
- Mail Merge Documents - this format is used to create documents using Microsoft Word mail merge that can be mailed to the customer notifying them that contracts about to expire. The 'Document' that is assigned to each piece of equipment on the 'Equipment' folder in CT30 is used in the mail merge.
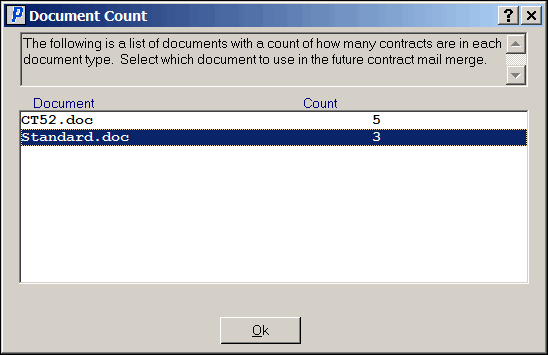
- When this option is selected the Document Count windows opens once OK is clicked to start the program. This window lists the documents with a count of how many contracts there are for each document type. Only one document type is printed at a time and the CT52.txt file is generated in C:\winsol\temp. Once a Document is selected, click OK to continue the process.
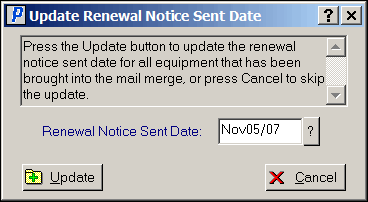
- The Update Renewal Notice Sent Date windows opens. This window includes 2 action buttons. Select Update to update the renewal 'Notice Sent' date on the Equipment folder of CT30 for all equipment that has been brought into the mail merge. Select Cancel to skip the update.
- When this option is selected the Document Count windows opens once OK is clicked to start the program. This window lists the documents with a count of how many contracts there are for each document type. Only one document type is printed at a time and the CT52.txt file is generated in C:\winsol\temp. Once a Document is selected, click OK to continue the process.
- Future Contract Work Sheet - this format is intended to be a tool to print any contracts expiring up to the 'Ending Date' entered. The report prints the current set up of all billing sequences, leaving space to write in any new rates or other changes to take effect if the contract is renewed. When this format is accepted, future billing records are generated for each contract printed, which may then be reviewed or edited in the 'Future Contract' folder of Contract Maintenance (CT30). Once future data is generated for a piece of equipment, you cannot reprint that equipment on this report.
- The Sequence field defaults to 'Customer'. You cannot edit the Sequence field.
- If a New Page for each Break is required, select the check box.
- The Levels list box displays the various Levels of detail available for the report. All Levels are automatically selected in CT52; the '>' before each Level option indicates the Level is selected. The levels that display is dependent on the Sequence selected and can be modified.
- Select the Restrictions that apply to the Report by double clicking on the line in the list box. Restrictions allow you to tailor CT52 to your specific needs. The '>' before a Restriction indicates the Restriction is selected. An '*' before a Restriction means the Restriction is mandatory. CT52 includes the following Restrictions:
- Ending Date - opens the 'Ending Date' window. In the 'Print Contracts up to Ending Date' field, enter or select from the query a date up to which to print contracted equipment. Once a date is entered, click OK
to close the window.
- Statuses – Format 1 - this Restriction is only used with Format 1 (Future Contract Work Sheet). When you select this option, the 'Statuses – Format 1' window opens. There are two valid status's from which to select:
- Print Active Contracts
- Print Expired Contracts
You can select one or both of these options. Once you make you selection, click OK to close the window.
- Statuses Formats 2&3 - this Restriction is only used with Formats 2 (Future Contracts-Edit List) and 3 (Mail Merge Documents). When you select this option, the 'Statuses – Format 2&3' window opens. There are 3 valid status's from which to select:
- Print Future Not Renewed Contracts? - Future Contract data must exist with a Future Contract Status of 'Not Renewed'.
- Print Currently Not Renewed Contracts? - The current Equipment Status must be 'Not Renewed'.
- Print Currently Expired Contracts? - The current Equipment Status must be 'Expired'.
You can select any combination of these options. Once you make you selection, click OK to close the window.
- Ending Date - opens the 'Ending Date' window. In the 'Print Contracts up to Ending Date' field, enter or select from the query a date up to which to print contracted equipment. Once a date is entered, click OK
to close the window.
- Sales Office - opens the 'Sales Office' window. In the 'For Sales Office' field, enter or select from the query the Sales Office from which to print the Future Contract Notices report. Only contracts belonging to the selected Sales Office are reported. By default all Sales Offices are printed. Once a Sales Office is entered click OK to close the window.
- Sales Rep - opens the 'Sales Rep' window. In the 'Sales Rep' field, enter or select from the query the Sales Rep for which to print the Future Contract Notices report. Only contracts belonging to the selected Sales Rep are reported. By default all Sales Reps are printed. Once a Sales Rep is entered click OK to close the window.
Note: To modify a Restriction once it is set up, reselect the Restriction and make the necessary changes.
- Select the Range From and To for the report. The Range must match the Sequence selected. Multiple Ranges may be entered.
- In the From field, enter the starting 'code' for the report.
- In the To field, enter the ending 'code' for the report.
- The information displays in the list box below.
- To add additional Ranges, repeat these steps.
Note: To print the entire file (all records in the selected sequence), simply tab through the From and To fields. The list box displays *Start and *End in the From and To fields.
- To delete a Range from the list box, double click on the line. The following message displays, "Do you wish to delete this range? Yes/No". Click Yes to delete the range.
- In the From field, enter the starting 'code' for the report.
- When all of the information on the Report Parameters screen is complete, click OK to run the report.
- Select a Format from the drop down list. The following options are valid:
- The Report Complete
screen opens when the report is generated. Depending on the print device selected, you are presented with one of the following two options:
- If you are printing the report to a local printer device, PDF file or to your screen, enter the Acceptance Codes to accept the report, click Restart to restart the printing of the report, or click Abort to cancel the report.
- If you are sending the report via an email or fax device, click OK to accept the report, click Restart to restart the fax/email (not always applicable), or click Abort to cancel the report.
- If you are printing the report to a local printer device, PDF file or to your screen, enter the Acceptance Codes to accept the report, click Restart to restart the printing of the report, or click Abort to cancel the report.
Here is an example of the Document Count window:

Document Count (CT52)
Here is an example of the Update Renewal Notice Sent Date window:

Update Renewal Notice Sent Date(CT52)
Here is the Report Parameters window for CT52:

Future Contract Notices (CT52)
