Print Statements (AR85)
AR85 is used to produce statements for customers who are defined to receive monthly statements in the SU13 Send Statement field.
All invoices are aged into 30 day categories or monthly buckets based on the invoice terms; credits are applied to the oldest outstanding balance or are aged based on their terms depending on the aging option selected in program CC00, AR tab.
Upon entry of the print statements program a printer selection screen is presented. There are options to print to screen, print to file, print to a printer or email / fax the statements to the customers.
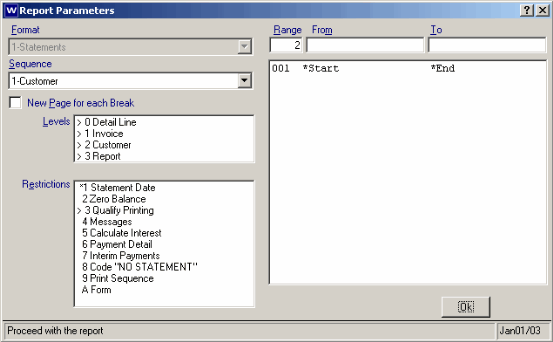
Report Parameters
You need to select the following information before the statements print.Sequence
Select the report sequence:- Customer- will print the statements in order of customer code ( name)
- Sale rep - will print the statements for each sales rep together.
New Page for each Break
Select the check box if a new page for each sequence break is required.Levels
Levels allow reports to be printed in various degrees of detail. The more levels selected, the more details print on the report. Upon entry of all print programs all levels are selected (a greater than sign (>) appears in front of each level). Double click a level to remove that degree of detail (greater than sign is removed).The detail line and invoice levels must be deleted or included together. If you don't want the detail lines to print on the report then you need to remove detail line and invoice from the levels.
Restrictions
Restrictions allow reports to be tailored more specifically. Double click on a restriction to select the option and/or answer a restricting question. Once a restriction is selected a greater than sign (>) appears in front of the restriction. When an asterisk (*) appears in front of a restriction it indicates a mandatory restriction. The report will not run unless the restriction is answered. Mandatory restrictions need not be selected before entering a range to print. The operator is prompted for the mandatory restriction before the report will run.- Statement Date - Enter the statement date. This date may not be a future date and may be set as far back as the closing date of the last fiscal period. This is the only mandatory restriction for AR85.
- Zero Balance - By selecting this check box, zero balance (paid off) transactions are included on the statement.
- Qualify Printing - By selecting the check box, restriction options become available. Statements will not print unless the account meets the exact restrictions selected. These restrictions include Short paid invoice, Paid on account, Credit unclaimed, Only 1/30, Only 31/60, Only 61/90, Only 91/120, Only 121+. Before using this restriction ensure that AR52 Generate Customer Account Status is ran.
- Messages - Select one type of message to print on the statements. Options include None, Collection and General. Collection and General messages are defined in AR01. Before using this restriction ensure that AR52 Generate Customer Account Status is ran.
- Calculate Interest - If memo interest is to be calculated on overdue accounts, enter the monthly interest charge rate as a percentage value.
- Payment Detail - By selecting this check box, payment information is printed on the statement.
- Interim Payments - By selecting this check box, payments received after the statement date are shown.
- Code "NO STATEMENT" - By selecting this check box, a statement is printed for customers with the Send Statement By flag set to NO in SU13. This is especially useful at year end.
- Print Sequence - Select the invoice print sequence by invoice date or invoice number.
- Form - Select the form on which the statements are to be printed. Options are Stock or Preprinted.
Range From and To
Enter the Range to print. A series of ranges may be entered. The range entered must relate to the sequence selected. For Example, if Sequence = Customer, the ranges must be customer codes; if Sequence = Sales rep, the ranges must be sales rep codes.- In the From field enter the code to indicate the starting position.
- In the To field enter the code to indicate the ending position.
- Repeat steps 1 and 2 for each set of ranges required. Remember the ranges entered relate to the sequence selected.
- When all sets of ranges have been entered, press OK.
To Delete a Set of Range Parameters double click on a defined range. A message "Do you wish to delete this range? is displayed. Click on the Yes or No button within this message box.
Upon completion of the report, click OK or enter Acceptance Codes if applicable.
AR85 - Print Statements
