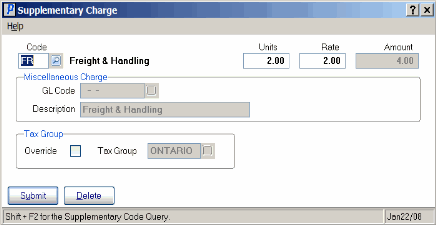
The Supplementary Charge screen opens when the Supp. Charge button is clicked.
Using the Supplementary Charge screen:
- Enter or select from the query a Supplementary Charge Code. Supp. Charges are defined in Maintain Supplementary Charges (IN01).
- If you enter the 'Miscellaneous' Charge ('**'), you must enter information in the 'Amount' and the 'GL Code' fields. (The 'Units' and 'Rate' fields are unavailable.)
- If the Supp. Charge is to be calculated as a 'dollar rate per # of units' charge, then enter the number of units to be used in the Units field. 'Dollar rated' charges are calculated as follows:
- Number of units * Dollar Rate
- Enter a Rate in the Rate field. If a Rate already displays in this field, and the Rate is accurate, press Enter. The Rate entered may represent a Percentage or a Dollar Value that is charged per number of units.
- If the charge amount is calculated as a Percentage of Product sales, then the Percentage is entered in the 'Rate' field. The Supp. Charge is set up with a 'Per Factor' of 100 in IN01. The amount charged is calculated based on the extension of all Product detail lines that PRECEED the Supplementary Charge.
- If the charge amount is calculated as a Dollar Value, then the Dollar amount is entered in the 'Rate' field. The Supp. Charge is set up with a 'Per Factor' of 1 in IN01. The amount charged is calculated based on the number of units entered.
- If the 'Rate' you enter is for re-stocking charges, i.e. intended to reduce the amount of a Credit Note, the 'Rate' entered must be negative.
- If the charge amount is calculated as a Percentage of Product sales, then the Percentage is entered in the 'Rate' field. The Supp. Charge is set up with a 'Per Factor' of 100 in IN01. The amount charged is calculated based on the extension of all Product detail lines that PRECEED the Supplementary Charge.
- When the Supplementary Charge is a fixed Amount, enter the Amount to be charged in the Amount field. Note: If a 'Rated' Supplementary Charge is added to an Order/Invoice, and a fixed 'Amount' is also entered for the Supplementary Charge code, the fixed 'Amount' overrides the calculated amount.
- The fields in the Miscellaneous Charge section are only available if a Miscellaneous Supplementary Charge Code ('**') is entered:
- Enter or select from the query a valid GL Code as defined in Maintain Chart of Accounts (GL01).
- Enter a description of the GL Code in the Description field or press Enter to accept the default description.
- Enter or select from the query a valid GL Code as defined in Maintain Chart of Accounts (GL01).
- To Override the Tax Group, select the Override check box. This opens the Tax Group field, allowing you to enter or select from the query the override Tax Group required.
- The Tax Group of a transaction determines how the Tax System will assess the transaction. The Maintain Tax Groups (IN06) program is used to create Tax Groups, which can contain no taxes, a single tax, or collection of taxes. The Maintain Tax Codes (IN05) program manages the individual taxes contained in the Tax Group.
- Each Customer Master record (SU13) and Ship-to Address (SU14) record is assigned a default Tax Group. When an Order transaction is created it acquires the default Tax Group from the SU13 or SU14. Each detail line acquires the Tax Group assigned to the transaction or you can specify an override for the detail line.
- When a transaction is totaled, the Tax Codes (IN05) within the assigned Tax Group (IN06) of each line are assessed to determine the taxable Sales for each individual tax and to calculate the tax amount.
- The Tax Group of a transaction determines how the Tax System will assess the transaction. The Maintain Tax Groups (IN06) program is used to create Tax Groups, which can contain no taxes, a single tax, or collection of taxes. The Maintain Tax Codes (IN05) program manages the individual taxes contained in the Tax Group.
The following table outlines the functionality of each button on the Supplementary Charge window:
| Button Label | Icon | Functionality |
| Submit |  |
Adds the Supplementary Charge to the current RMA and closes the Supplementary Charge window. |
| Delete |  |
Removes the selected Supplementary Charge from the current RMA and closes the Supplementary Charge window. |

Supplementary Charge

