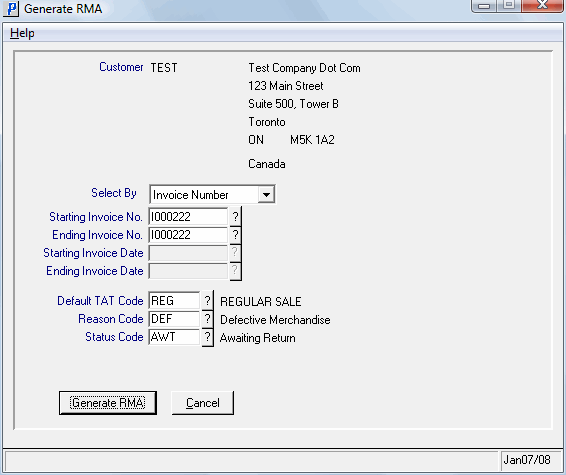
Generate RMA Window
The Generate RMA window opens when the Generate RMA button is clicked on the Lines folder of IN67.When selecting the Invoice(s) to add to the RMA, please be advised of the following restrictions:
- You cannot mix regular Invoices with Summary Invoices. You can mix Invoices with different cost centres.
Note: RMA lines will only be generated for the selected criteria for customer entered in the header section.
The following list defines every field on the Generate RMA window:
- Customer - displays the current Customer code entered in the header section of IN67 along with the Customer name and address. You cannot edit this information.
- Select By - from the drop list, select the criteria by which the Invoice(s) will be selected. Valid options include:
- Invoice Number
- Invoice Date
- Starting Invoice No. - this field is only available when the 'Select By' field is set to 'Invoice Number'. Enter or select from the query the starting Invoice number for the current RMA. The query provides several options from which to select invoices such as by Invoice or by Customer + Invoice Date + Invoice.
- Ending Invoice No. - this field is only available when the 'Select By' field is set to 'Invoice Number'. By default, the same Invoice number that is entered in the Starting Invoice field displays in this field. If you want to enter a range of Invoice numbers, you can override this field. The query provides several options from which to select invoices such as by Invoice or by Customer + Invoice Date + Invoice.
- Starting Invoice Date - this field is only available when the 'Select By' field is set to 'Invoice Date'. Enter or select from the query the starting Invoice date for the current RMA.
- Ending Invoice Date - this field is only available when the 'Select By' field is set to 'Invoice Date'. By default, the same date that is entered in the Starting Invoice Date field displays in this field. If you want to include other dates in the range of dates, you can override this field.
- Default TAT Code - enter or select from the query a TAT code for the RMA. This is a mandatory field. Once the TAT code is entered, the description automatically displays to the right of this field.
- Reason Code - enter or select from the query a Reason code for the RMA. This field is optional. Once the Reason code is entered, the description automatically displays to the right of this field.
- Status Code - enter or select from the query a Status code for the RMA. This field is optional. Once the Status code is entered, the description automatically displays to the right of this field.
The following table outlines the functionality of each button on the Generate RMA window:
| Button Label | Icon | Functionality |
| Generate RMA |  |
Adds the Invoice or range of Invoices selected on the Generate RMA window to the RMA. You are automatically returned to IN67/Lines. For reference purposes, this list box in IN67/Lines displays the range of Invoice Numbers or Invoice Dates as a Comment line. |
| Cancel |  |
Closes the Generate RMA window and returns you to the IN67/Lines folder without selecting an Invoice or range of Invoices. |

Supplementary Charge

